Unpacking

All transit bolts and packing must be removed before using the appliance.

Keep all packaging away from children.

You are advised to keep all the transit bolts for re-use in case the machine is to be transported again.

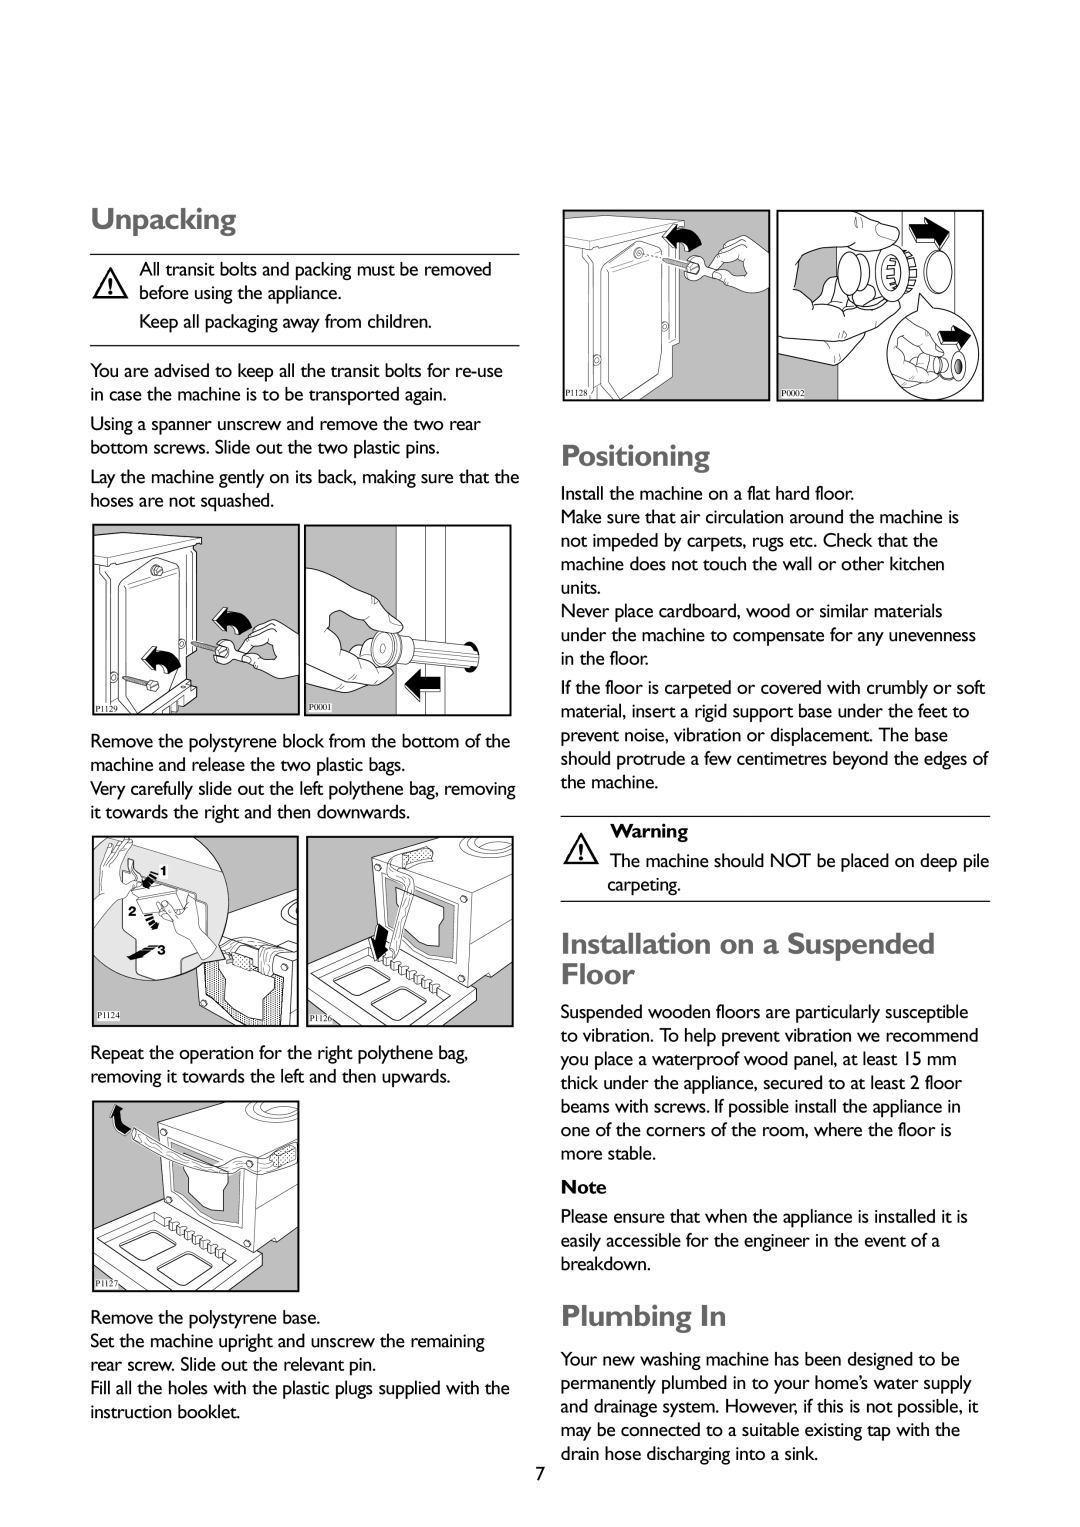
Using a spanner unscrew and remove the two rear bottom screws. Slide out the two plastic pins.

Lay the machine gently on its back, making sure that the hoses are not squashed.

P1128

P0002

Positioning


Install the machine on a flat hard floor.

P1129

P0001

Make sure that air circulation around the machine is not impeded by carpets, rugs etc. Check that the machine does not touch the wall or other kitchen units.

Never place cardboard, wood or similar materials under the machine to compensate for any unevenness in the floor.

If the floor is carpeted or covered with crumbly or soft material, insert a rigid support base under the feet to

Remove the polystyrene block from the bottom of the machine and release the two plastic bags.

Very carefully slide out the left polythene bag, removing it towards the right and then downwards.

prevent noise, vibration or displacement. The base should protrude a few centimetres beyond the edges of the machine.

1

2

3

P1124

P1126

Warning

The machine should NOT be placed on deep pile carpeting.

Installation on a Suspended Floor

Suspended wooden floors are particularly susceptible to vibration. To help prevent vibration we recommend

Repeat the operation for the right polythene bag, removing it towards the left and then upwards.

P1127

Remove the polystyrene base.

Set the machine upright and unscrew the remaining rear screw. Slide out the relevant pin.

Fill all the holes with the plastic plugs supplied with the instruction booklet.

you place a waterproof wood panel, at least 15 mm thick under the appliance, secured to at least 2 floor beams with screws. If possible install the appliance in one of the corners of the room, where the floor is more stable.

Note

Please ensure that when the appliance is installed it is easily accessible for the engineer in the event of a breakdown.

Plumbing In

Your new washing machine has been designed to be permanently plumbed in to your home’s water supply and drainage system. However, if this is not possible, it may be connected to a suitable existing tap with the drain hose discharging into a sink.

7

Page 7
Image 7
John Lewis JLWM1202, JLWM1403 instruction manual Unpacking, Positioning, Installation on a Suspended Floor, Plumbing

JLWM1202, JLWM1403 specifications

John Lewis has long been synonymous with quality and reliability in the home appliance market, and the John Lewis JLWM1403 and JLWM1202 washing machines are prime examples of this commitment. Both models combine efficiency, advanced technologies, and user-friendly features, making them excellent choices for modern households.

The JLWM1403 is designed to accommodate larger loads with its 8kg capacity, which is ideal for families or individuals who frequently wash larger items such as bedding. It offers a maximum spin speed of 1400 RPM, ensuring that clothes come out dryer and require less time in the dryer, ultimately saving energy and reducing drying time. This model features a variety of wash programs, including a quick wash option that allows users to clean lightly soiled clothes in just 30 minutes, providing convenience when time is of the essence.

On the other hand, the JLWM1202 is more suitable for smaller spaces or those with lighter laundry needs, featuring a 6kg capacity. Despite its compact size, it does not compromise on performance and also provides a maximum spin speed of 1200 RPM. The JLWM1202 also comes equipped with an array of wash programs, ensuring that every fabric type and dirt level can be addressed efficiently. Its eco setting is particularly noteworthy, optimizing water and energy usage for environmentally conscious consumers.

Both models benefit from the latest washing technologies, including inverter motors that promote quiet and efficient operation. This technology not only reduces noise levels during washing cycles but also contributes to improved energy efficiency. Furthermore, both washing machines come with an A+++ energy rating, which assures users of low running costs and minimal environmental impact, making them both economical and eco-friendly choices.

Another key feature common to both models is their user-friendly interface. The LED display and intuitive controls make selecting wash programs and adjusting settings a straightforward task. Additionally, the delay start function allows users to schedule wash cycles at their convenience.

With excellent build quality and a selection of smart features, the John Lewis JLWM1403 and JLWM1202 washing machines stand out as reliable appliances that cater to different household needs, ensuring laundry day is as efficient and hassle-free as possible.