Getting Started

Installing the Equipment on the Wall

The Center Unit and Speakers can be attached to a wall.

CAUTIONS:

Attachment to a wall

The Center Unit weighs approximately 4.3 kg. When its buttons are operated, an additional force will be applied to it in the downward direction. Therefore, sufficient care must be taken when attaching to a wall to prevent any accidents caused by the Center Unit’s falling off the wall.

Before attaching the Center Unit to the wall, check the wall and other related aspects, and verify whether the strength of the wall will be sufficient not only to support the weight of the Center Unit itself but also to withstand the additional downward force which will be applied to it during operation. (Do not attach the Center Unit to a plywood or plasterboard wall. The Center Unit may fall and sustain damage as a re- sult.) If you do not know the strength of the wall and other aspects, consult a qualified service person (such as a qualified constructor).

The screws needed for attachment are not supplied. Use screws which are compatible with the strength and material of the pillar or wall.

When attaching the Center Unit, the screws must be secured tightly in all three locations. Attaching the Center Unit to the wall by making only one or two holes for the screws makes for an unstable attachment and causes a safety hazard as the Center Unit may fall down.

Location of attachment to a wall

Care is required in selecting a location for attaching the Center Unit to the wall. Injury to personnel, or damage to the Center Unit, may result if the Center Unit is attached in a location which interferes with daily activities or a location that the users are liable to knock their bodies or heads against.

Avoid a location above a bed, sofa, water tank, sink, etc. or in a passage.

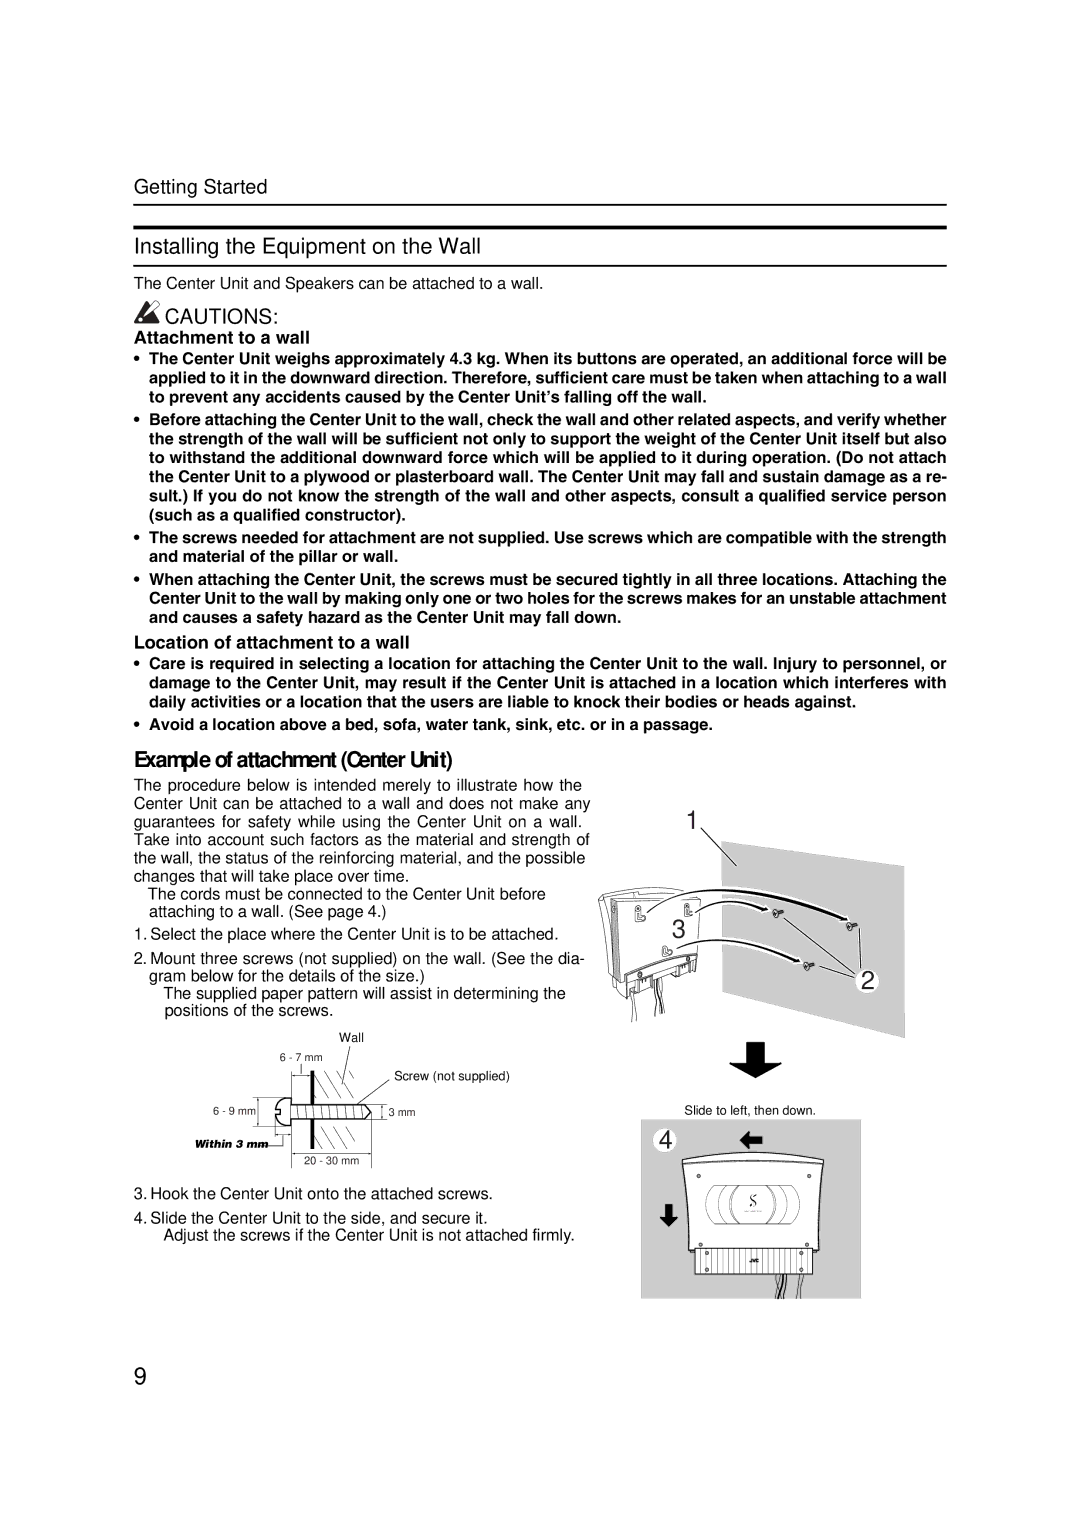
Example of attachment (Center Unit)

The procedure below is intended merely to illustrate how the Center Unit can be attached to a wall and does not make any guarantees for safety while using the Center Unit on a wall. Take into account such factors as the material and strength of the wall, the status of the reinforcing material, and the possible changes that will take place over time.

The cords must be connected to the Center Unit before attaching to a wall. (See page 4.)

1.Select the place where the Center Unit is to be attached.

2.Mount three screws (not supplied) on the wall. (See the dia- gram below for the details of the size.)

The supplied paper pattern will assist in determining the positions of the screws.

1

3

2

Wall

6 - 7 mm

6 - 9 mm

Within 3 mm

20 - 30 mm

Screw (not supplied)

3 mm

Slide to left, then down.

4

3.Hook the Center Unit onto the attached screws.

4.Slide the Center Unit to the side, and secure it.

• Adjust the screws if the Center Unit is not attached firmly.

9

Page 12
Image 12
JVC CA-VSDT7R, CA-VSDT9R, CA-VSDT6R, SP-VSDT9 manual Installing the Equipment on the Wall, Example of attachment Center Unit

SP-VSDT6, SP-VSDT9, CA-VSDT7R, CA-VSDT6R, CA-VSDT9R specifications

The JVC CA-VSDT7R, SP-VSDT6, CA-VSDT6R, CA-VSDT9R, and SP-VSDT9 are a series of innovative audio components designed to enhance the listening experience for audiophiles and casual listeners alike. These models showcase JVC’s commitment to quality, performance, and cutting-edge technology.

The CA-VSDT7R stands out with its sleek design and intuitive user interface. It features a built-in CD player along with support for various digital formats, ensuring versatility in playback options. The device is equipped with JVC's proprietary audio processing technology, which enhances sound clarity and depth, providing a rich listening experience. Its connectivity options include USB and Bluetooth, allowing for seamless integration with various devices for wireless streaming.

In contrast, the SP-VSDT6 is designed as a versatile speaker system that complements the CA-VSDT7R. It delivers impressive sound with a balanced audio profile, making it suitable for different genres of music. The speakers are engineered with high-quality drivers and cabinets that optimize acoustics, resulting in profound bass and crisp highs. This model also includes advanced sound processing technologies, such as dynamic range control, which adjusts the volume between soft and loud passages for optimal listening.

The CA-VSDT6R serves as a compact and efficient audio solution. It combines modern connectivity features with a stylish design, making it an excellent addition to any home or office setting. With a focus on energy efficiency, the CA-VSDT6R is not only powerful but also environmentally friendly.

Meanwhile, the CA-VSDT9R represents a higher-end option within the series. This model is equipped with advanced digital signal processing and powerful amplification, delivering exceptional audio fidelity. The multi-zone capability allows users to enjoy music in different rooms simultaneously, making it perfect for entertaining guests.

Finally, the SP-VSDT9 speakers provide a robust and immersive soundstage. They are designed to handle a wide range of frequencies, ensuring that every note is faithfully reproduced. The construction quality of the speakers is top-notch, with materials selected for their resonance and durability.

Overall, the JVC CA-VSDT series exemplifies a perfect blend of modern technology, thoughtful design, and exceptional sound quality. Whether used individually or as part of a complete audio system, these models are engineered to provide an unparalleled listening experience for all users. Each component reflects JVC's dedication to innovation and excellence in the audio industry.