10

RECORDINGBasic Recording

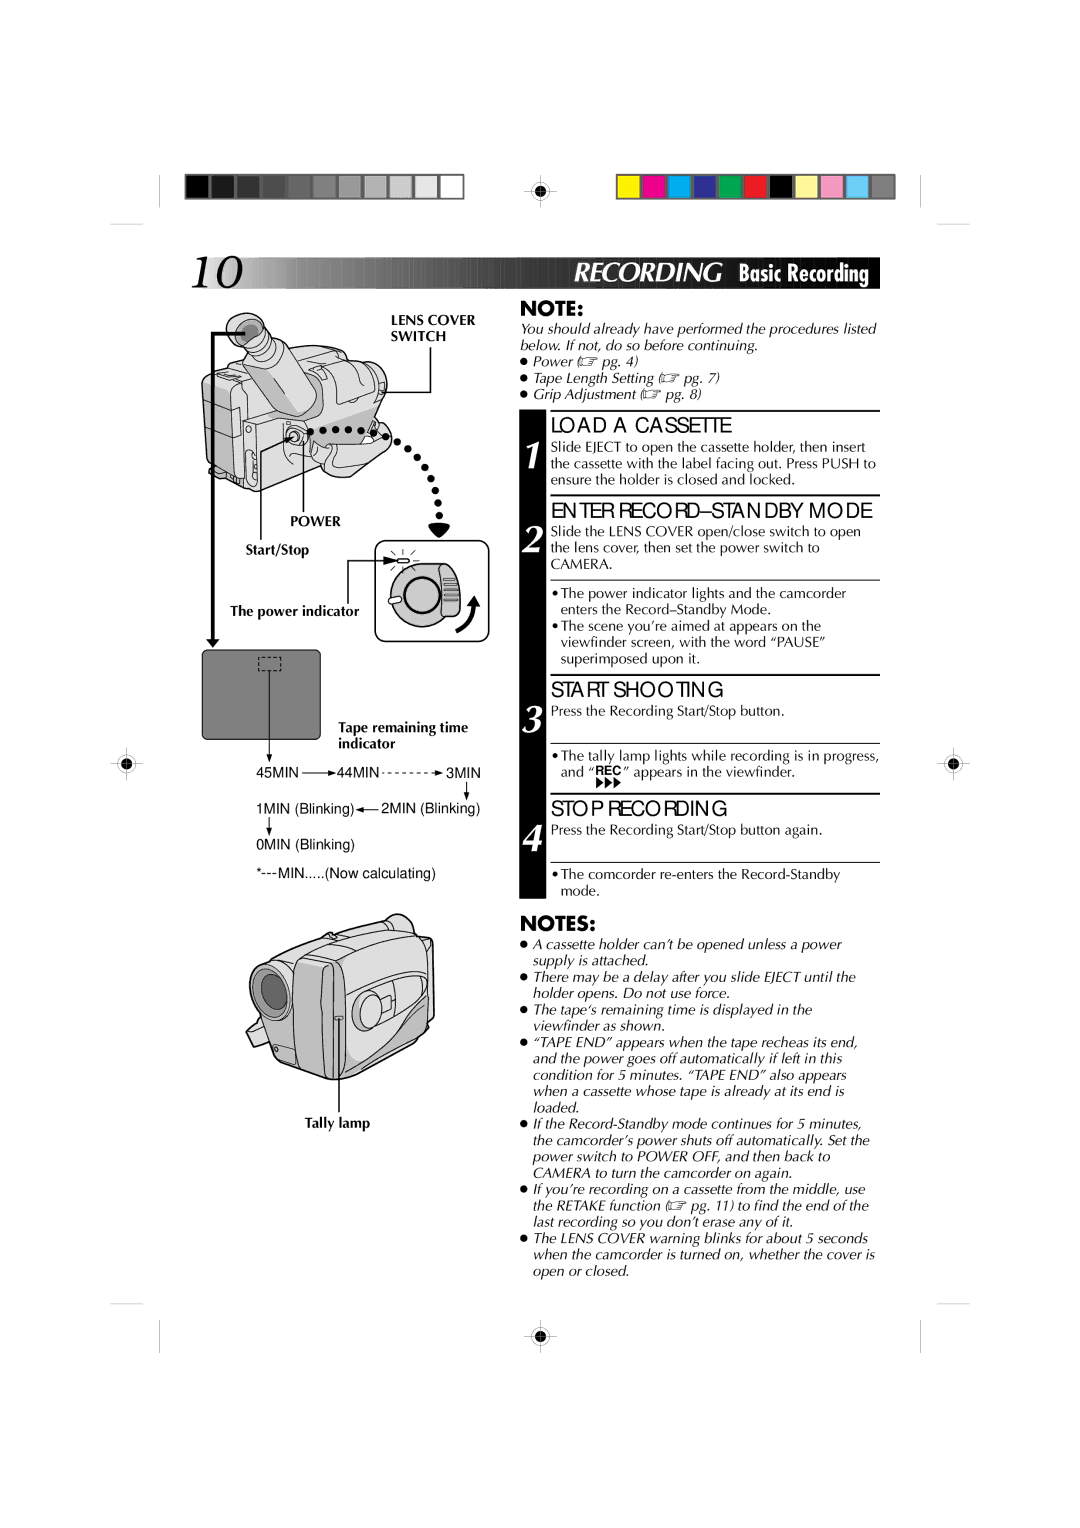
LENS COVER

SWITCH

POWER

Start/Stop

The power indicator

Tape remaining time indicator

45MIN 44MIN 3MIN

1MIN (Blinking) 2MIN (Blinking)

0MIN (Blinking)

*MIN.....(Now calculating)

NOTE:

You should already have performed the procedures listed below. If not, do so before continuing.

Power (pg. 4)

Tape Length Setting (pg. 7)

Grip Adjustment (pg. 8)

LOAD A CASSETTE

1 Slide EJECT to open the cassette holder, then insert the cassette with the label facing out. Press PUSH to ensure the holder is closed and locked.

ENTER RECORD–STANDBY MODE

2 Slide the LENS COVER open/close switch to open the lens cover, then set the power switch to

CAMERA.

•The power indicator lights and the camcorder enters the Record–Standby Mode.

•The scene you’re aimed at appears on the viewfinder screen, with the word “PAUSE” superimposed upon it.

START SHOOTING

3 Press the Recording Start/Stop button.

•The tally lamp lights while recording is in progress, and “REC ” appears in the viewfinder.

STOP RECORDING

4 Press the Recording Start/Stop button again.

•The comcorder re-enters the Record-Standby mode.

NOTES:


A cassette holder can’t be opened unless a power


supply is attached.


There may be a delay after you slide EJECT until the


holder opens. Do not use force.


The tape‘s remaining time is displayed in the


viewfinder as shown.


“TAPE END” appears when the tape recheas its end,


and the power goes off automatically if left in this


condition for 5 minutes. “TAPE END” also appears


when a cassette whose tape is already at its end is


loaded.

Tally lamp

If the Record-Standby mode continues for 5 minutes,


the camcorder’s power shuts off automatically. Set the


power switch to POWER OFF, and then back to


CAMERA to turn the camcorder on again.


If you’re recording on a cassette from the middle, use


the RETAKE function (pg. 11) to find the end of the


last recording so you don’t erase any of it.


The LENS COVER warning blinks for about 5 seconds


when the camcorder is turned on, whether the cover is


open or closed.


Page 10
Image 10
JVC GR-AX360 manual RE Cordin G Basic Recording, Load a Cassette, Enter RECORD-STANDBY Mode, Start Shooting, Stop Recording

GR-AX260, GR-AX460, GR-AX360 specifications

The JVC GR-AX360, GR-AX460, and GR-AX260 are part of JVC's notable line of compact camcorders that emerged during the late 1990s. These models are distinguished not just by their sleek design, but also by their impressive array of features and technologies that cater to both amateur and semi-professional videographers.

The GR-AX360 is particularly known for its advanced image stabilization system, which helps to reduce blurriness and shakiness in video recordings—an essential feature for capturing dynamic scenes or when shooting handheld. This camcorder offers a maximum recording time, allowing users to capture extended footage without the need for frequent tape changes. Its 20x optical zoom lens provides versatility in shooting, making it easier to get close to the action without compromising image quality.

On the other hand, the GR-AX460 builds upon the features of the GR-AX360 by incorporating additional functionalities. It offers a built-in flash and improved low-light performance, making it ideal for evening or indoor events. The GR-AX460 includes a larger LCD viewfinder, enhancing user experience by providing a clearer image for framing shots. Furthermore, this model supports a variety of recording formats, allowing for flexibility in editing and playback.

The GR-AX260, while more basic than its counterparts, remains a strong contender in the compact camcorder market. It is designed with user-friendliness in mind, incorporating many automatic settings that make it accessible for novice users. Despite its simplicity, the GR-AX260 features a robust zoom capability and delivers solid image quality for everyday recording needs.

All three models utilize JVC's renowned VHS-C format, which contributes to their compatibility with standard VCRs. The compact size of these camcorders also makes them portable, allowing users to capture moments on the go without sacrificing quality. With battery life that supports extended recording sessions and an ergonomic design, the GR-AX360, GR-AX460, and GR-AX260 stand out as reliable options for video enthusiasts looking for affordability and performance in a compact package.

Overall, JVC's commitment to innovation in the GR-AX series is evident. Whether users opt for the advanced features of the GR-AX460 or the simplicity of the GR-AX260, there is an option to fit a variety of videography needs and preferences.