JVC GR-AX401, GR-AX501, GR-AX301, GR-AX201 manual Using AC Power, Using a CAR Battery, Discharged

Models: GR-AX401 GR-AX501 GR-AX201 GR-AX301

1 56
Download 56 pages 40.5 Kb
Page 5
Image 5

EN5


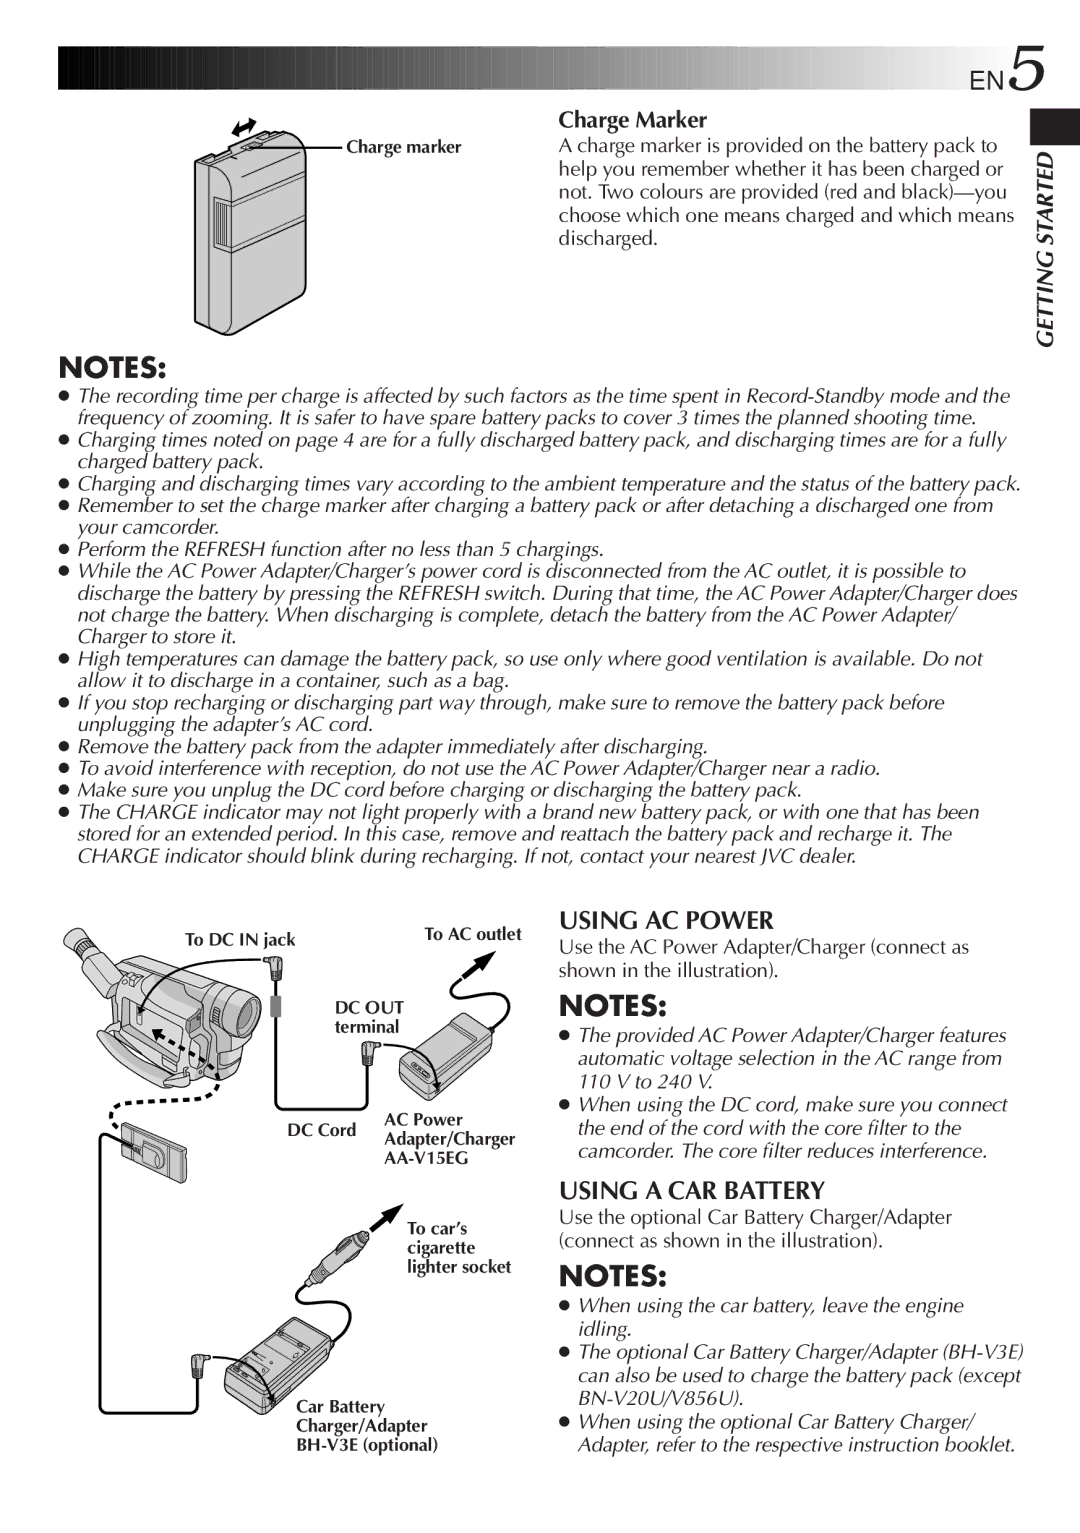
Charge Marker

Charge marker

A charge marker is provided on the battery pack to


help you remember whether it has been charged or


not. Two colours are provided (red and black)—you


choose which one means charged and which means


discharged.

NOTES:

The recording time per charge is affected by such factors as the time spent in Record-Standby mode and the frequency of zooming. It is safer to have spare battery packs to cover 3 times the planned shooting time.

Charging times noted on page 4 are for a fully discharged battery pack, and discharging times are for a fully charged battery pack.

Charging and discharging times vary according to the ambient temperature and the status of the battery pack.

Remember to set the charge marker after charging a battery pack or after detaching a discharged one from your camcorder.

Perform the REFRESH function after no less than 5 chargings.

While the AC Power Adapter/Charger’s power cord is disconnected from the AC outlet, it is possible to discharge the battery by pressing the REFRESH switch. During that time, the AC Power Adapter/Charger does not charge the battery. When discharging is complete, detach the battery from the AC Power Adapter/ Charger to store it.

High temperatures can damage the battery pack, so use only where good ventilation is available. Do not allow it to discharge in a container, such as a bag.

If you stop recharging or discharging part way through, make sure to remove the battery pack before unplugging the adapter’s AC cord.

Remove the battery pack from the adapter immediately after discharging.

To avoid interference with reception, do not use the AC Power Adapter/Charger near a radio.

Make sure you unplug the DC cord before charging or discharging the battery pack.

The CHARGE indicator may not light properly with a brand new battery pack, or with one that has been stored for an extended period. In this case, remove and reattach the battery pack and recharge it. The CHARGE indicator should blink during recharging. If not, contact your nearest JVC dealer.

GETTING STARTED

To DC IN jack

To AC outlet


DC OUT terminal

AC Power

DC Cord Adapter/Charger

AA-V15EG

To car’s cigarette lighter socket

Car Battery

Charger/Adapter

BH-V3E (optional)

USING AC POWER

Use the AC Power Adapter/Charger (connect as shown in the illustration).

NOTES:

The provided AC Power Adapter/Charger features automatic voltage selection in the AC range from 110 V to 240 V.

When using the DC cord, make sure you connect the end of the cord with the core filter to the camcorder. The core filter reduces interference.

USING A CAR BATTERY

Use the optional Car Battery Charger/Adapter (connect as shown in the illustration).

NOTES:

When using the car battery, leave the engine idling.

The optional Car Battery Charger/Adapter (BH-V3E) can also be used to charge the battery pack (except BN-V20U/V856U).

When using the optional Car Battery Charger/ Adapter, refer to the respective instruction booklet.

Page 5
Image 5
JVC GR-AX401, GR-AX501, GR-AX301, GR-AX201 manual Using AC Power, Using a CAR Battery, Discharged

GR-AX401, GR-AX501, GR-AX201, GR-AX301 specifications

The JVC GR-AX series of camcorders, including the GR-AX301, GR-AX201, GR-AX501, and GR-AX401, represents a versatile and innovative range designed for both amateur and semi-professional videographers. Each model shares a range of core features and technologies, while also offering unique characteristics to cater to different user needs.

At the heart of the GR-AX series is the advanced Video Home System (VHS-C) format, which enables users to record high-quality video directly onto compact cassettes. This makes the camcorders portable and easy to handle, a key feature for on-the-go filmmaking. The GR-AX501 and GR-AX401 are particularly notable for their enhanced optical zoom capabilities, offering up to 22x zoom. This allows users to capture distant subjects with stunning clarity, a feature that is complemented by their advanced autofocus technology.

An important hallmark of the GR-AX series is the exceptional image stabilization system, which helps minimize the shaky footage that often accompanies handheld video recording. This feature is especially beneficial for capturing dynamic action scenes or when shooting in less than stable conditions. Coupled with a high-resolution CCD sensor, these camcorders provide vivid color reproduction and sharp images.

The GR-AX301 and GR-AX201 are equipped with a variety of manual controls, allowing users to have greater creative control over their filming. This includes adjustable settings for exposure and focus, catering to users who seek a more hands-on approach to videography. The inclusion of a color LCD screen on these models enhances usability, allowing for easy framing and playback of footage.

For audio recording, the GR-AX series utilizes built-in stereo microphones, ensuring high-quality sound capture to complement the visual content. The ability to connect external microphones provides even more versatility for sound recording, making it suitable for interviews or more complex audio setups.

In terms of connectivity, these camcorders come equipped with AV outputs, allowing for easy connection to televisions and video editing equipment. The GR-AX501 and GR-AX401 also include features such as digital effects and scene transitions, adding a layer of polish to any project.

In summary, the JVC GR-AX301, GR-AX201, GR-AX501, and GR-AX401 camcorders present a compelling blend of portability, advanced imaging technology, and user-friendly features. Whether for casual recording or more serious videography, this range caters to a wide variety of filmmaking needs, making JVC a trusted name in the world of video technology.