52ENINDEXIndications

1

2 3

4


5


30MIN


T45


6

REC SP

#

7


2


FADER


$


%


01


8


LENS COVER


^


9


15S

PAUSE


&


1X


0


TAPE END


*


a


5S


(


!


MERRY CHRISTMAS


@


25. 12. 99


22 : 50 : 00


b


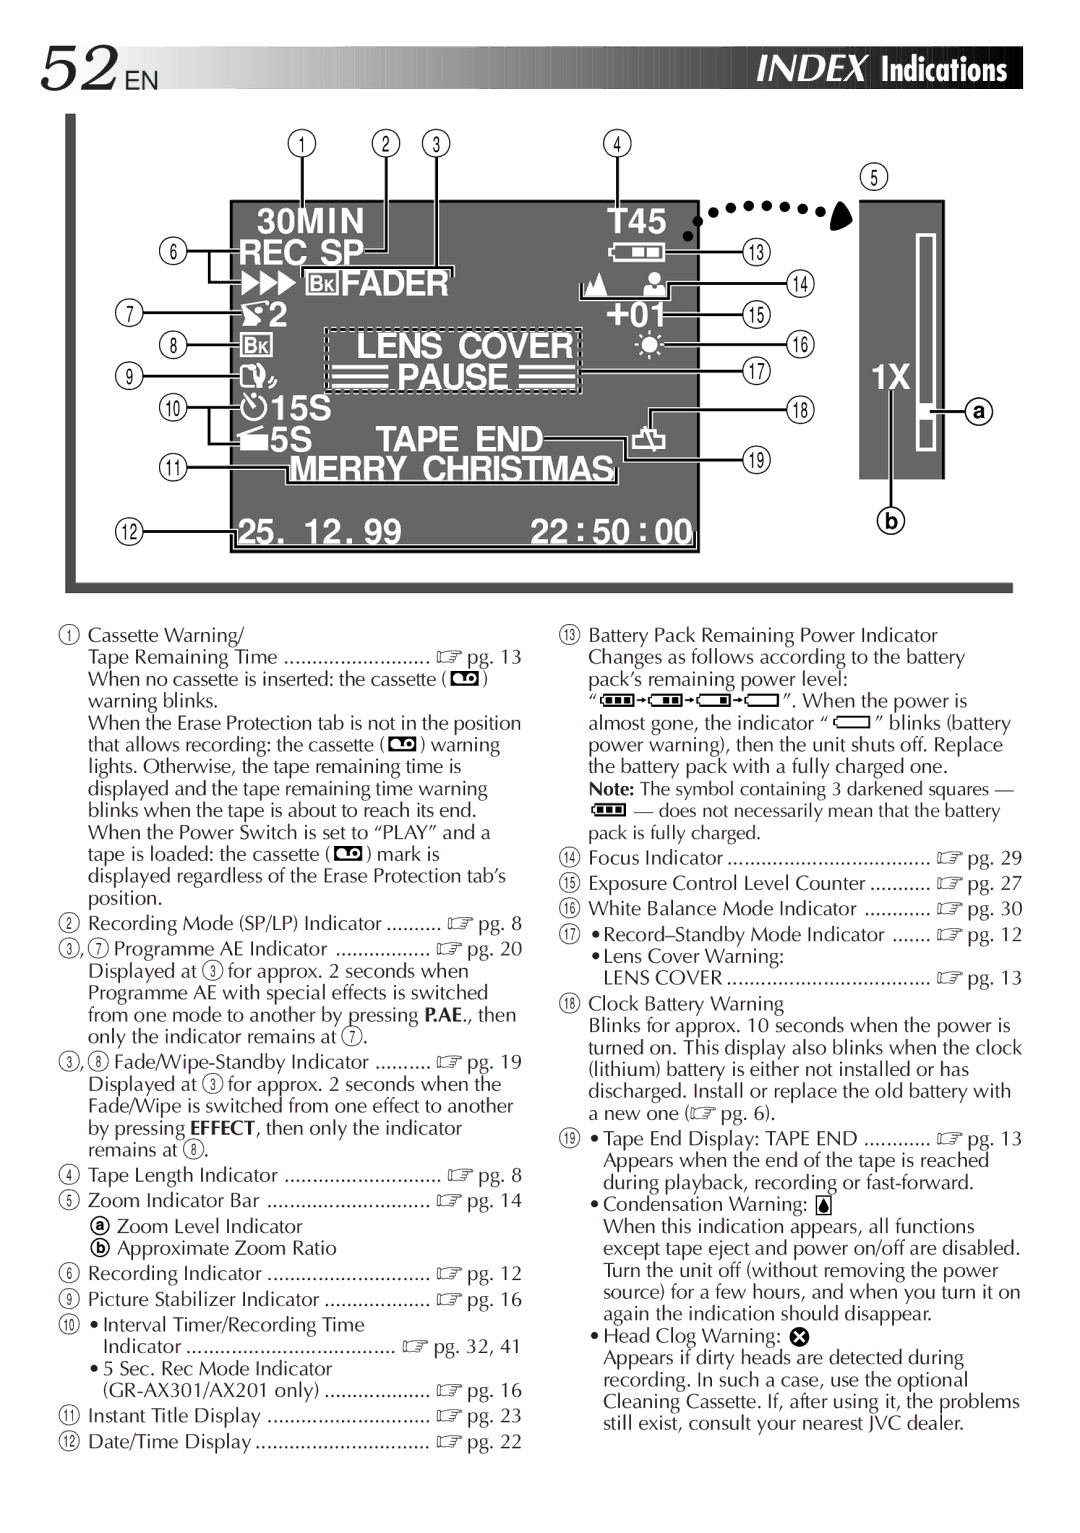
1Cassette Warning/

Tape Remaining Time

pg. 13

When no cassette is inserted: the cassette (


)


warning blinks.

When the Erase Protection tab is not in the position that allows recording: the cassette ( ) warning lights. Otherwise, the tape remaining time is displayed and the tape remaining time warning blinks when the tape is about to reach its end. When the Power Switch is set to “PLAY” and a

tape is loaded: the cassette (


) mark is


displayed regardless of the Erase Protection tab’s

position.


2 Recording Mode (SP/LP) Indicator

.......... pg. 8

3, 7 Programme AE Indicator

.................

pg. 20

Displayed at 3 for approx. 2 seconds when

Programme AE with special effects is switched

from one mode to another by pressing P.AE., then

only the indicator remains at 7.


3, 8 Fade/Wipe-Standby Indicator

pg. 19

Displayed at 3 for approx. 2 seconds when the Fade/Wipe is switched from one effect to another by pressing EFFECT, then only the indicator remains at 8.

4 Tape Length Indicator

pg. 8

5 Zoom Indicator Bar

pg. 14

Zoom Level Indicator


Approximate Zoom Ratio


6 Recording Indicator

pg. 12

9 Picture Stabilizer Indicator

pg. 16

0•Interval Timer/Recording Time

Indicator

pg. 32, 41

•5 Sec. Rec Mode Indicator

pg. 16

(GR-AX301/AX201 only)

! Instant Title Display

pg. 23

@ Date/Time Display

pg. 22

#Battery Pack Remaining Power Indicator Changes as follows according to the battery pack’s remaining power level:

”. When the power is

almost gone, the indicator “ ” blinks (battery power warning), then the unit shuts off. Replace the battery pack with a fully charged one.

Note: The symbol containing 3 darkened squares —

— does not necessarily mean that the battery pack is fully charged.

$ Focus Indicator

pg. 29

% Exposure Control Level Counter

pg. 27

^ White Balance Mode Indicator

pg. 30

& •Record–Standby Mode Indicator

pg. 12

•Lens Cover Warning:

pg. 13

LENS COVER

*Clock Battery Warning

Blinks for approx. 10 seconds when the power is turned on. This display also blinks when the clock (lithium) battery is either not installed or has

discharged. Install or replace the old battery with a new one (pg. 6).

( •Tape End Display: TAPE END ............ pg. 13

Appears when the end of the tape is reached during playback, recording or fast-forward.

•Condensation Warning:

When this indication appears, all functions except tape eject and power on/off are disabled. Turn the unit off (without removing the power source) for a few hours, and when you turn it on again the indication should disappear.

•Head Clog Warning:

Appears if dirty heads are detected during recording. In such a case, use the optional Cleaning Cassette. If, after using it, the problems still exist, consult your nearest JVC dealer.

Page 52
Image 52
JVC GR-AX501, GR-AX401, GR-AX301, GR-AX201 manual EN Index Indications

GR-AX401, GR-AX501, GR-AX201, GR-AX301 specifications

The JVC GR-AX series of camcorders, including the GR-AX301, GR-AX201, GR-AX501, and GR-AX401, represents a versatile and innovative range designed for both amateur and semi-professional videographers. Each model shares a range of core features and technologies, while also offering unique characteristics to cater to different user needs.

At the heart of the GR-AX series is the advanced Video Home System (VHS-C) format, which enables users to record high-quality video directly onto compact cassettes. This makes the camcorders portable and easy to handle, a key feature for on-the-go filmmaking. The GR-AX501 and GR-AX401 are particularly notable for their enhanced optical zoom capabilities, offering up to 22x zoom. This allows users to capture distant subjects with stunning clarity, a feature that is complemented by their advanced autofocus technology.

An important hallmark of the GR-AX series is the exceptional image stabilization system, which helps minimize the shaky footage that often accompanies handheld video recording. This feature is especially beneficial for capturing dynamic action scenes or when shooting in less than stable conditions. Coupled with a high-resolution CCD sensor, these camcorders provide vivid color reproduction and sharp images.

The GR-AX301 and GR-AX201 are equipped with a variety of manual controls, allowing users to have greater creative control over their filming. This includes adjustable settings for exposure and focus, catering to users who seek a more hands-on approach to videography. The inclusion of a color LCD screen on these models enhances usability, allowing for easy framing and playback of footage.

For audio recording, the GR-AX series utilizes built-in stereo microphones, ensuring high-quality sound capture to complement the visual content. The ability to connect external microphones provides even more versatility for sound recording, making it suitable for interviews or more complex audio setups.

In terms of connectivity, these camcorders come equipped with AV outputs, allowing for easy connection to televisions and video editing equipment. The GR-AX501 and GR-AX401 also include features such as digital effects and scene transitions, adding a layer of polish to any project.

In summary, the JVC GR-AX301, GR-AX201, GR-AX501, and GR-AX401 camcorders present a compelling blend of portability, advanced imaging technology, and user-friendly features. Whether for casual recording or more serious videography, this range caters to a wide variety of filmmaking needs, making JVC a trusted name in the world of video technology.