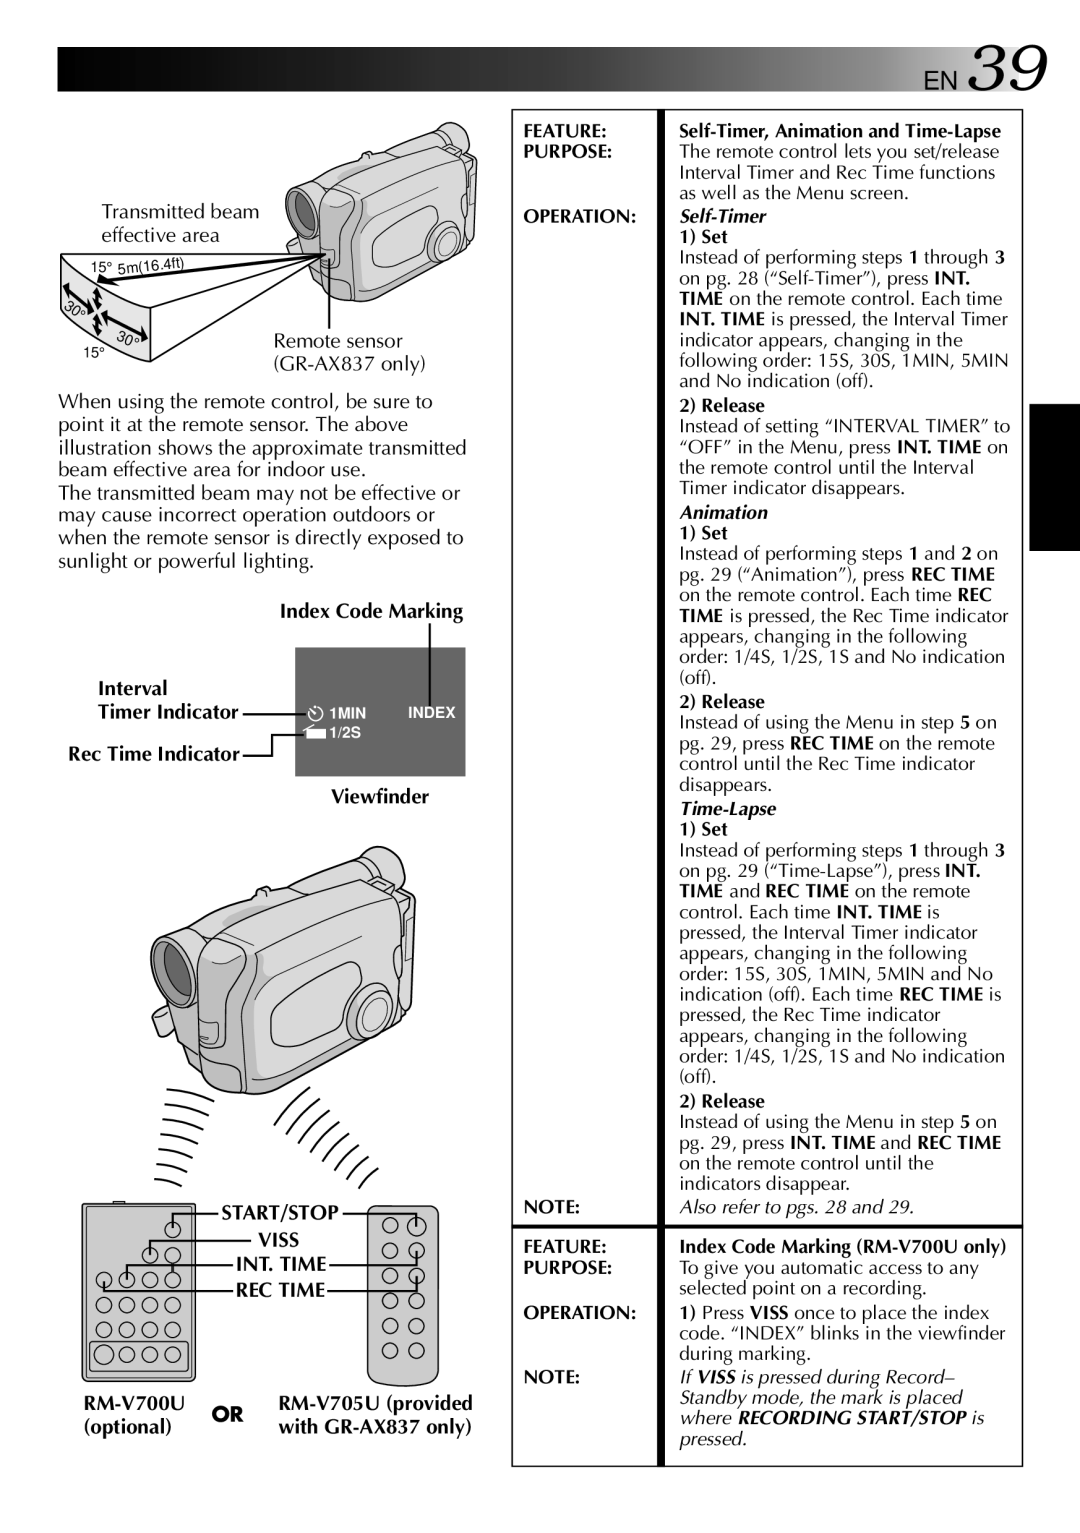
Transmitted beam effective area

15° 5m(16.4ft)

30


°


30

°

Remote sensor

15°


(GR-AX837 only)


When using the remote control, be sure to point it at the remote sensor. The above illustration shows the approximate transmitted beam effective area for indoor use.

The transmitted beam may not be effective or may cause incorrect operation outdoors or when the remote sensor is directly exposed to sunlight or powerful lighting.


Index Code Marking

Interval


Timer Indicator


1MIN

INDEX


1/2S


Rec Time Indicator

Viewfinder

START/STOP

VISS

INT. TIME

REC TIME

RM-V700U

OR

RM-V705U (provided

(optional)


with GR-AX837 only)


EN 39

FEATURE:

Self-Timer, Animation and Time-Lapse


PURPOSE:

The remote control lets you set/release


Interval Timer and Rec Time functions


as well as the Menu screen.


OPERATION:

Self-Timer


1) Set


Instead of performing steps 1 through 3


on pg. 28 (“Self-Timer”), press INT.


TIME on the remote control. Each time


INT. TIME is pressed, the Interval Timer


indicator appears, changing in the


following order: 15S, 30S, 1MIN, 5MIN


and No indication (off).


2) Release


Instead of setting “INTERVAL TIMER” to


“OFF” in the Menu, press INT. TIME on


the remote control until the Interval


Timer indicator disappears.


Animation


1) Set


Instead of performing steps 1 and 2 on


pg. 29 (“Animation”), press REC TIME


on the remote control. Each time REC


TIME is pressed, the Rec Time indicator


appears, changing in the following


order: 1/4S, 1/2S, 1S and No indication


(off).


2) Release


Instead of using the Menu in step 5 on


pg. 29, press REC TIME on the remote


control until the Rec Time indicator


disappears.


Time-Lapse


1) Set


Instead of performing steps 1 through 3


on pg. 29 (“Time-Lapse”), press INT.


TIME and REC TIME on the remote


control. Each time INT. TIME is


pressed, the Interval Timer indicator


appears, changing in the following


order: 15S, 30S, 1MIN, 5MIN and No


indication (off). Each time REC TIME is


pressed, the Rec Time indicator


appears, changing in the following


order: 1/4S, 1/2S, 1S and No indication


(off).


2) Release


Instead of using the Menu in step 5 on


pg. 29, press INT. TIME and REC TIME


on the remote control until the


indicators disappear.


NOTE:

Also refer to pgs. 28 and 29.


FEATURE:

Index Code Marking (RM-V700U only)


PURPOSE:

To give you automatic access to any


selected point on a recording.


OPERATION:

1) Press VISS once to place the index


code. “INDEX” blinks in the viewfinder


during marking.


NOTE:

If VISS is pressed during Record–


Standby mode, the mark is placed


where RECORDING START/STOP is


pressed.


Page 39
Image 39
JVC GR-AX237, GR-AX537, GR-AX837 manual Rec Time Indicator Viewfinder, START/STOP Viss INT. Time REC Time, RM-V700U, Optional

GR-AX437, GR-AX537, GR-AX837, GR-AX237 specifications

The JVC GR-AX series of camcorders, particularly the models GR-AX237, GR-AX837, GR-AX537, and GR-AX437, are notable for their accessible design and impressive performance characteristics, making them popular choices for both amateur and semi-professional videographers during their time of release.

The GR-AX237 offers a compact design and lightweight construction, making it perfect for portable use. It features a 20x optical zoom lens that allows users to capture distant subjects with clarity. Additionally, this model incorporates JVC's Super VHS-C technology, providing enhanced video quality compared to standard VHS. The camcorder also boasts a built-in image stabilizer, helping to reduce blurriness from hand movement.

Upgrading to the GR-AX537, users benefit from additional features such as a 2.5-inch LCD screen that enhances framing and playback capabilities. This camcorder offers a higher resolution recording, ensuring that video playback is sharp and vibrant. The GR-AX537 also integrates advanced manual controls that allow for greater flexibility when capturing scenes under different lighting conditions.

The GR-AX837 takes things a step further, incorporating a range of professional-grade features. This model comes equipped with a wider aperture lens, which excels in low-light situations. Users will appreciate the camcorder's multi-functional capabilities, including digital effects, allowing for creative options in video production. It also has an extensive array of audio inputs and outputs, enhancing its versatility for external microphones and speakers.

Lastly, the GR-AX437 strikes a balance between the features offered in the previous models, targeting users who want quality without overwhelming complexity. This model retains many of the essential characteristics of the GR-AX series, such as the 20x optical zoom and image stabilization. The GR-AX437 stands out with its intuitive interface, making it easy for anyone to operate, from beginners to experienced users.

Overall, the JVC GR-AX series is characterized by their user-friendly designs and technological advancements. These camcorders made a significant impact in the realm of home video recording, delivering high-quality footage and a range of features that catered to the needs of its users. Whether it's the compact GR-AX237 or the feature-rich GR-AX837, these models are a testament to JVC's commitment to innovation and quality in camcorder technology.