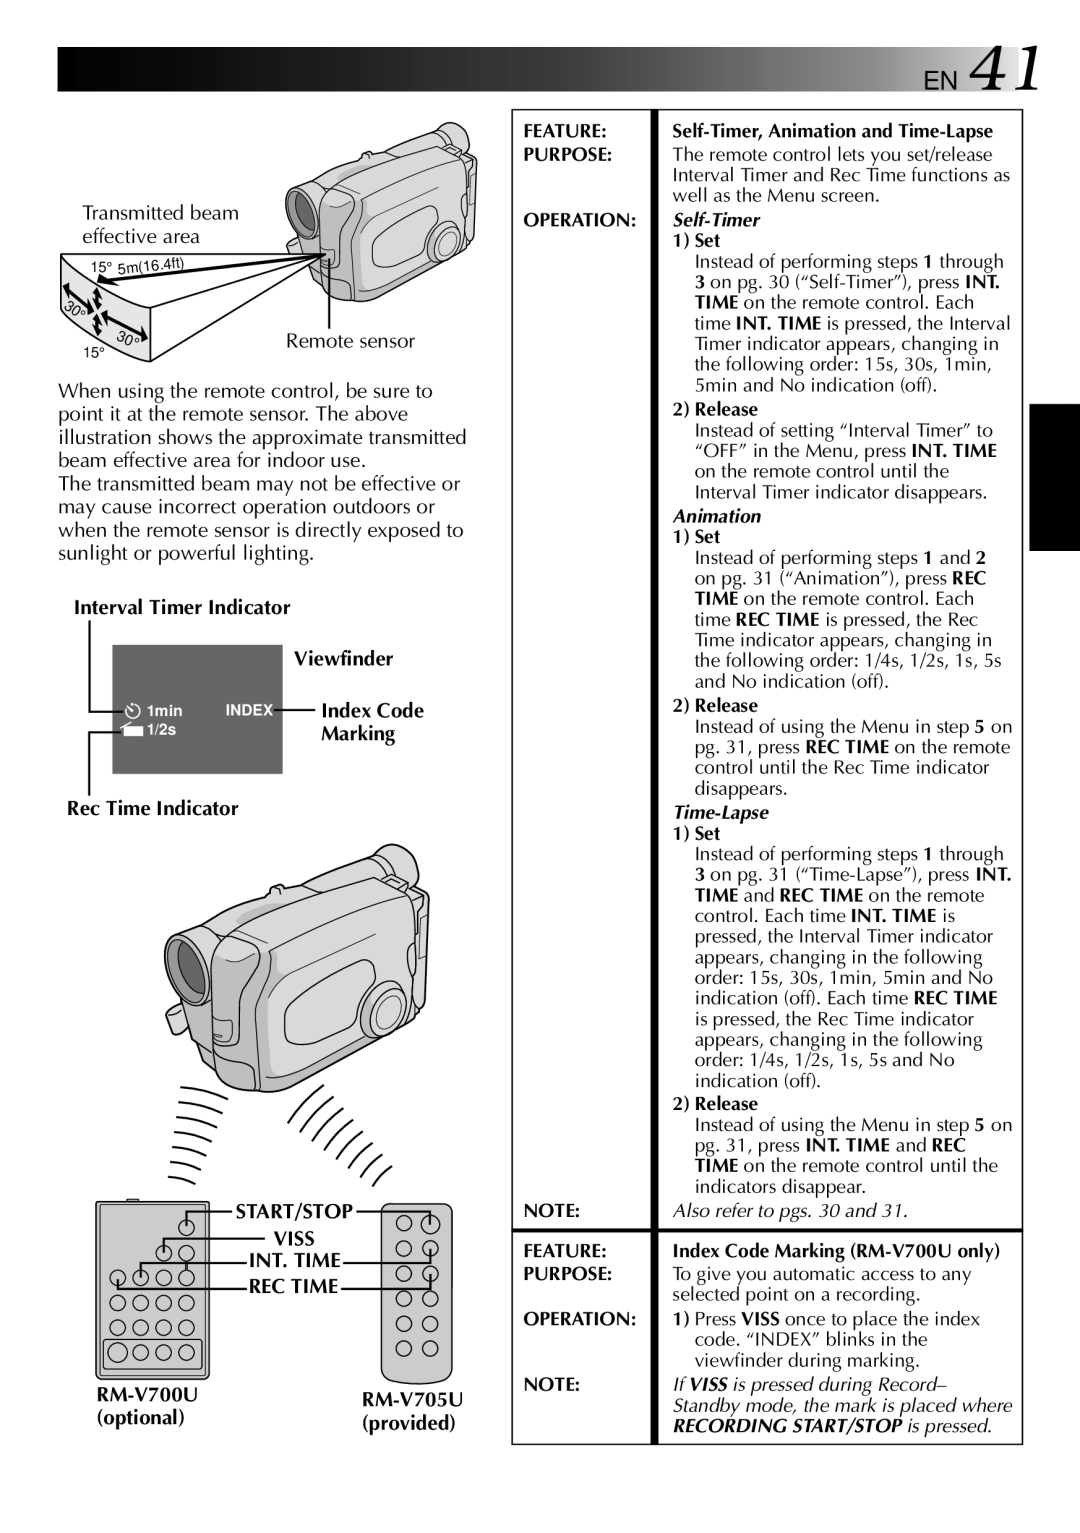
Transmitted beam effective area

15° 5m(16.4ft)

30


°


15°

30

°

Remote sensor


When using the remote control, be sure to point it at the remote sensor. The above illustration shows the approximate transmitted beam effective area for indoor use.

The transmitted beam may not be effective or may cause incorrect operation outdoors or when the remote sensor is directly exposed to sunlight or powerful lighting.

Interval Timer Indicator


Viewfinder


1min

INDEX


Index Code


1/2s


Marking


Rec Time Indicator

START/STOP

VISS

INT. TIME

REC TIME

RM-V700URM-V705U

(optional)(provided)


EN 41

FEATURE:

Self-Timer, Animation and Time-Lapse


PURPOSE:

The remote control lets you set/release


Interval Timer and Rec Time functions as


well as the Menu screen.


OPERATION:

Self-Timer


1) Set


Instead of performing steps 1 through


3 on pg. 30 (“Self-Timer”), press INT.


TIME on the remote control. Each


time INT. TIME is pressed, the Interval


Timer indicator appears, changing in


the following order: 15s, 30s, 1min,


5min and No indication (off).


2) Release


Instead of setting “Interval Timer” to


“OFF” in the Menu, press INT. TIME


on the remote control until the


Interval Timer indicator disappears.


Animation


1) Set


Instead of performing steps 1 and 2


on pg. 31 (“Animation”), press REC


TIME on the remote control. Each


time REC TIME is pressed, the Rec


Time indicator appears, changing in


the following order: 1/4s, 1/2s, 1s, 5s


and No indication (off).


2) Release


Instead of using the Menu in step 5 on


pg. 31, press REC TIME on the remote


control until the Rec Time indicator


disappears.


Time-Lapse


1) Set


Instead of performing steps 1 through


3 on pg. 31 (“Time-Lapse”), press INT.


TIME and REC TIME on the remote


control. Each time INT. TIME is


pressed, the Interval Timer indicator


appears, changing in the following


order: 15s, 30s, 1min, 5min and No


indication (off). Each time REC TIME


is pressed, the Rec Time indicator


appears, changing in the following


order: 1/4s, 1/2s, 1s, 5s and No


indication (off).


2) Release


Instead of using the Menu in step 5 on


pg. 31, press INT. TIME and REC


TIME on the remote control until the


indicators disappear.


NOTE:

Also refer to pgs. 30 and 31.


FEATURE:

Index Code Marking (RM-V700U only)


PURPOSE:

To give you automatic access to any


selected point on a recording.


OPERATION:

1) Press VISS once to place the index


code. “INDEX” blinks in the


viewfinder during marking.


NOTE:

If VISS is pressed during Record–


Standby mode, the mark is placed where


RECORDING START/STOP is pressed.


Page 41
Image 41
JVC GR-AX937 manual Transmitted beam effective area, Rec Time Indicator, START/STOP Viss INT. Time REC Time

GR-AX937 specifications

The JVC GR-AX937 is a compact and versatile camcorder that gained popularity in the late 1990s for its combination of ease of use, advanced technology, and solid performance. As part of JVC's well-regarded line of VHS-C camcorders, the GR-AX937 offers users a plethora of features that appeal to both amateur videographers and more seasoned enthusiasts.

One of the standout features of the GR-AX937 is its compact design. Weighing in at just under 2.5 pounds, this camcorder is lightweight and portable, making it easy to carry for extended filming sessions. The sleek, ergonomic shape fits comfortably in hand, allowing users to capture footage with minimal fatigue.

The camcorder boasts a 22x optical zoom lens, providing excellent flexibility and enabling users to capture distant subjects with remarkable clarity. The lens is complemented by a digital zoom capability, which extends the reach even further while maintaining acceptable image quality. The GR-AX937 also has a built-in image stabilizer, a crucial feature that minimizes the effects of shaky hands, ensuring smooth and stable video.

The GR-AX937 features JVC's Super VHS capabilities, which allows for improved video resolution and enhanced color reproduction. This feature is particularly beneficial for those looking to create high-quality home videos or capture important moments in stunning detail. Additionally, the camcorder supports a variety of recording speeds, which offers flexibility based on user needs and available tape length.

An easy-to-use interface allows for straightforward navigation of the camcorder's various settings and functions. Users can easily switch between shooting modes, including a night mode for improved low-light performance. The LCD viewfinder is another valuable addition, providing real-time feedback and ensuring that users can frame their shots with precision.

The camcorder also features various input and output options, including RCA outputs for connecting to a television or for transfer to a VCR, making it easy to share videos with family and friends. It operates on standard VHS-C tapes, which were widely available and affordable at the time, contributing to its popularity.

Overall, the JVC GR-AX937 encapsulates the spirit of late '90s videography, blending user-friendly functionality with advanced features that cater to a diverse range of video recording needs. Whether capturing family events or documenting travel adventures, the GR-AX937 stands out as a reliable and capable choice for home video enthusiasts.