Indications During Playback
1 |
| 2 | 3 4 5 6 | |||||||||
|
|
|
|
|
|
|
|
|
|
|
|
|
|
|
|
|
|
| SP |
| 4 |
|
|
| |
TBC |
|
| ||||||||||
|
| – | 1 : 2 | 3 : 4 5 |
|
| ||||||
|
|
|
| |||||||||
|
|
|
|
|
|
|
| AT |
|
|
| |
|
|
|
|
|
|
|
|
|
|
| ||
|
| EN |
| 39 |
|
|
| ||
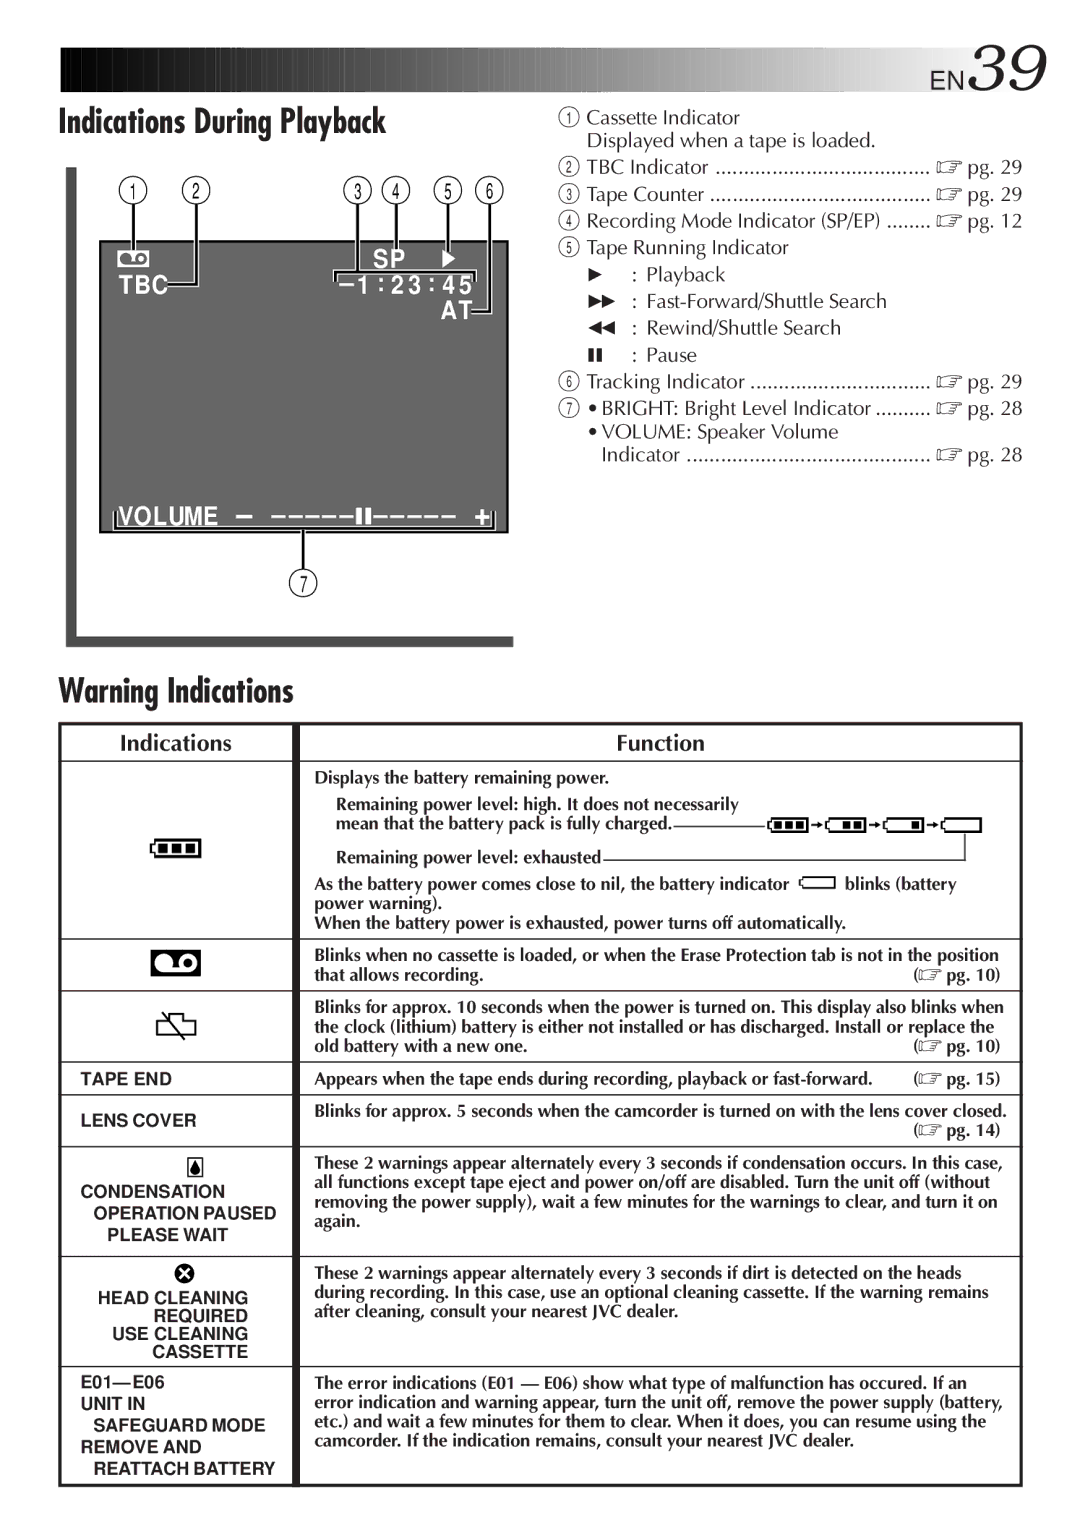
| 1 Cassette Indicator |
|
|
|
| Displayed when a tape is loaded. |
|
|
|
| 2 TBC Indicator | ☞ pg. 29 | ||
| 3 Tape Counter | ☞ pg. 29 | ||
| 4 Recording Mode Indicator (SP/EP) | ☞ pg. 12 | ||
5Tape Running Indicator 4 : Playback
3 :
2 : Rewind/Shuttle Search
6 : Pause |
|
6 Tracking Indicator | ☞ pg. 29 |
7 •BRIGHT: Bright Level Indicator | ☞ pg. 28 |
•VOLUME: Speaker Volume | ☞ pg. 28 |
Indicator |
 VOLUME – – – – –
 –6– – – – – +
7
Warning Indications
Indications |
| Function |
|
|
| |||||||||
|
|
|
|
|
|
|
|
|
|
|
|
|
| |
|
|
|
|
|
|
| Displays the battery remaining power. |
|
|
| ||||
|
|
|
|
|
|
| Remaining power level: high. It does not necessarily |
|
|
| ||||
|
|
|
|
|
|
| mean that the battery pack is fully charged. |
|
|
|
|
| ||
|
|
|
|
|
|
|
|
|
|
| ||||
|
|
|
|
|
|
| Remaining power level: exhausted |
|
|
|
|
|
| |
|
|
|
|
|
|
|
|
|
|
|
|
| ||
|
|
|
|
|
|
|
|
|
|
|
|
| ||
|
|
|
|
|
|
|
|
|
|
|
|
| ||
|
|
|
|
|
|
| As the battery power comes close to nil, the battery indicator | blinks (battery | ||||||
|
|
|
|
|
|
| power warning). |
|
|
| ||||
|
|
|
|
|
|
| When the battery power is exhausted, power turns off automatically. |
|
| |||||
|
|
|
|
|
|
|
|
|
|
|
| |||
|
|
|
|
|
|
| Blinks when no cassette is loaded, or when the Erase Protection tab is not in the position | |||||||
|
|
|
|
|
|
| ||||||||
|
|
|
|
|
|
| that allows recording. |
| (☞ pg. 10) | |||||
|
|
|
|
|
|
|
| |||||||
|
|
|
|
|
|
|
|
|
|
|
| |||
|
|
|
|
|
|
| Blinks for approx. 10 seconds when the power is turned on. This display also blinks when | |||||||
|
|
|
|
|
|
| the clock (lithium) battery is either not installed or has discharged. Install or replace the | |||||||
|
|
|
|
|
|
| old battery with a new one. |
| (☞ pg. 10) | |||||
|
|
|
|
|
|
|
|
|
|
|
|
| ||
TAPE END | Appears when the tape ends during recording, playback or | (☞ pg. 15) | ||||||||||||
|
|
|
|
|
|
|
|
|
|
|
| |||
LENS COVER | Blinks for approx. 5 seconds when the camcorder is turned on with the lens cover closed. | |||||||||||||
|
|
|
|
| (☞ pg. 14) | |||||||||
|
|
|
|
|
|
|
|
|
|
|
| |||
|
|
|
|
|
|
|
|
|
|
|
| |||
|
|
|
|
|
|
| These 2 warnings appear alternately every 3 seconds if condensation occurs. In this case, | |||||||
CONDENSATION | all functions except tape eject and power on/off are disabled. Turn the unit off (without | |||||||||||||
removing the power supply), wait a few minutes for the warnings to clear, and turn it on | ||||||||||||||
OPERATION PAUSED | ||||||||||||||
again. |
|
|
| |||||||||||
PLEASE WAIT |
|
|
| |||||||||||
|
|
|
|
|
|
| ||||||||
|
|
|
|
|
|
|
|
|
|
|
| |||
|
|
|
|
|
|
| These 2 warnings appear alternately every 3 seconds if dirt is detected on the heads | |||||||
HEAD CLEANING | during recording. In this case, use an optional cleaning cassette. If the warning remains | |||||||||||||
| REQUIRED | after cleaning, consult your nearest JVC dealer. |
|
|
| |||||||||
USE CLEANING |
|
|
|
|
|
|
| |||||||
| CASSETTE |
|
|
|
|
|
|
| ||||||
E01— E06 | The error indications (E01 — E06) show what type of malfunction has occured. If an | |||||||||||||
UNIT IN | error indication and warning appear, turn the unit off, remove the power supply (battery, | |||||||||||||
SAFEGUARD MODE | etc.) and wait a few minutes for them to clear. When it does, you can resume using the | |||||||||||||
REMOVE AND | camcorder. If the indication remains, consult your nearest JVC dealer. |
|
| |||||||||||
|
|
|
|
|
|
| ||||||||
REATTACH BATTERY |
|
|
|
|
|
|
| |||||||
|
|
|
|
|
|
|
|
|
|
|
|
|
| |
