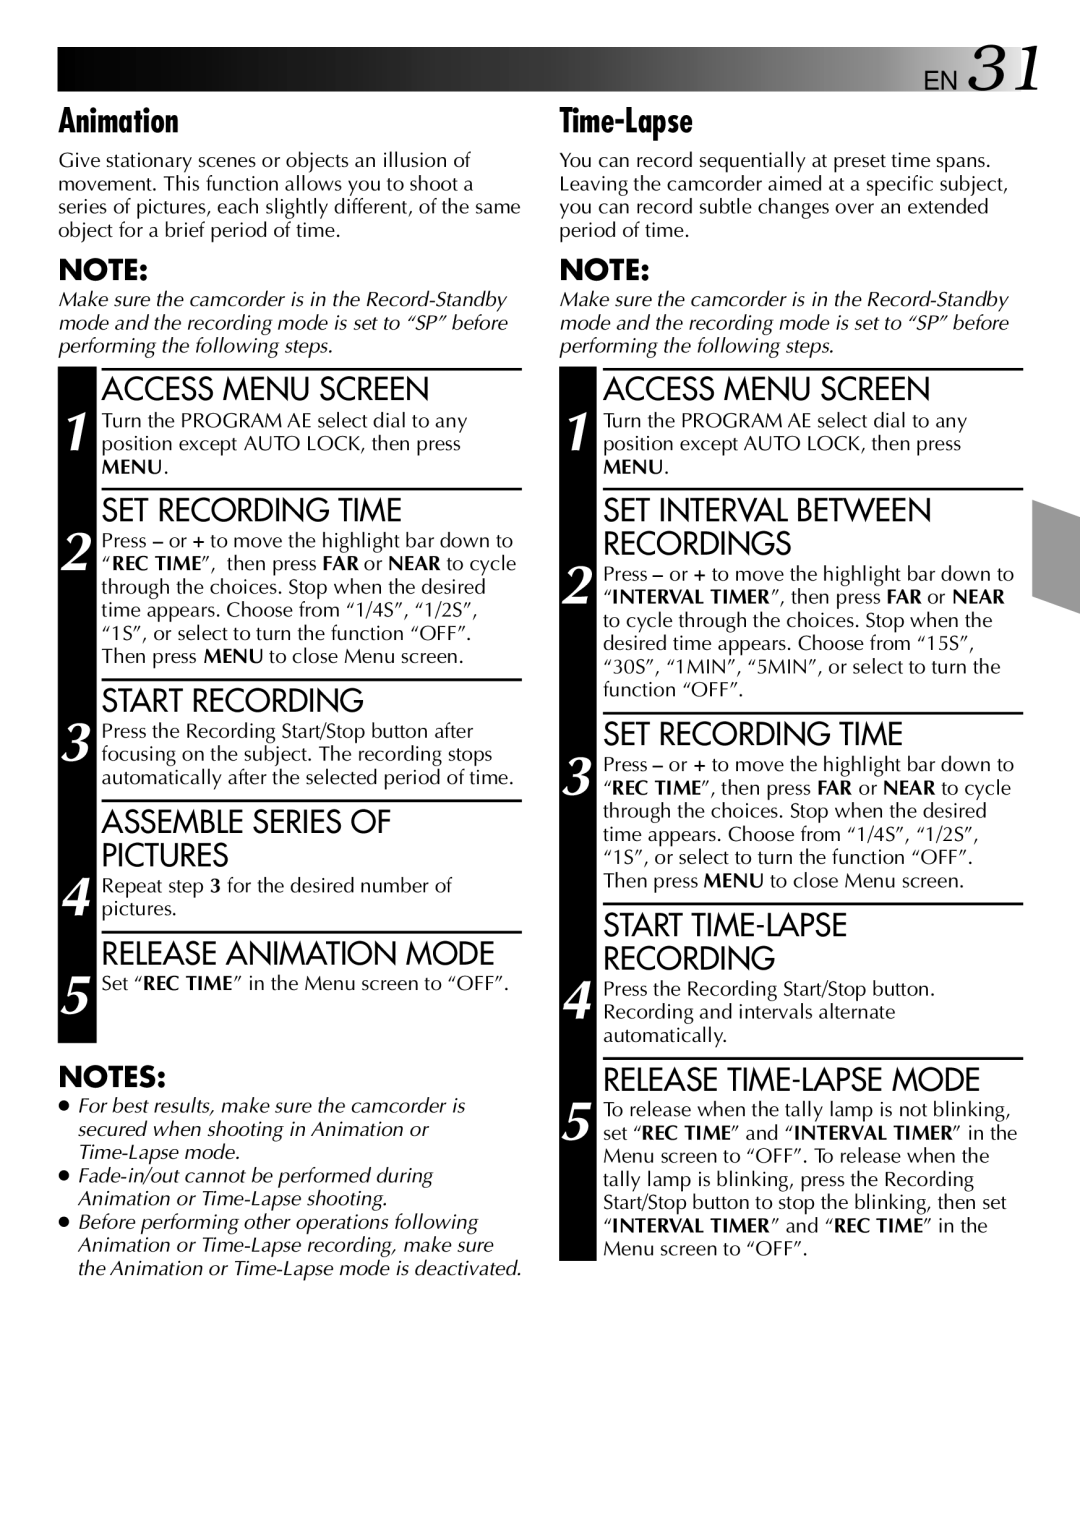
Animation

Give stationary scenes or objects an illusion of movement. This function allows you to shoot a series of pictures, each slightly different, of the same object for a brief period of time.

NOTE:

Make sure the camcorder is in the Record-Standby mode and the recording mode is set to “SP” before performing the following steps.

ACCESS MENU SCREEN

1 Turn the PROGRAM AE select dial to any position except AUTO LOCK, then press MENU.

SET RECORDING TIME

2 Press or + to move the highlight bar down to “REC TIME”, then press FAR or NEAR to cycle through the choices. Stop when the desired time appears. Choose from “1/4S”, “1/2S”, “1S”, or select to turn the function “OFF”. Then press MENU to close Menu screen.

START RECORDING

3 Press the Recording Start/Stop button after focusing on the subject. The recording stops automatically after the selected period of time.

ASSEMBLE SERIES OF

PICTURES

4 Repeat step 3 for the desired number of pictures.

RELEASE ANIMATION MODE

5 Set “REC TIME” in the Menu screen to “OFF”.

NOTES:

For best results, make sure the camcorder is secured when shooting in Animation or Time-Lapse mode.

Fade-in/out cannot be performed during Animation or Time-Lapse shooting.

Before performing other operations following Animation or Time-Lapse recording, make sure the Animation or Time-Lapse mode is deactivated.

EN 31

Time-Lapse

You can record sequentially at preset time spans. Leaving the camcorder aimed at a specific subject, you can record subtle changes over an extended period of time.

NOTE:

Make sure the camcorder is in the Record-Standby mode and the recording mode is set to “SP” before performing the following steps.

ACCESS MENU SCREEN

1 Turn the PROGRAM AE select dial to any position except AUTO LOCK, then press MENU.

SET INTERVAL BETWEEN

RECORDINGS

2 Press or + to move the highlight bar down to “INTERVAL TIMER”, then press FAR or NEAR to cycle through the choices. Stop when the desired time appears. Choose from “15S”, “30S”, “1MIN”, “5MIN”, or select to turn the function “OFF”.

SET RECORDING TIME

3 Press or + to move the highlight bar down to “REC TIME”, then press FAR or NEAR to cycle through the choices. Stop when the desired time appears. Choose from “1/4S”, “1/2S”, “1S”, or select to turn the function “OFF”. Then press MENU to close Menu screen.

START TIME-LAPSE

RECORDING

4 Press the Recording Start/Stop button. Recording and intervals alternate automatically.

RELEASE TIME-LAPSE MODE

5 To release when the tally lamp is not blinking, set “REC TIME” and “INTERVAL TIMER” in the Menu screen to “OFF”. To release when the tally lamp is blinking, press the Recording Start/Stop button to stop the blinking, then set “INTERVAL TIMER” and “REC TIME” in the Menu screen to “OFF”.

Page 31
Image 31
JVC GR-AXM30 manual Animation, Time-Lapse

GR-AXM30 specifications

The JVC GR-AXM30 is a compact and versatile camcorder that gained popularity in the early 2000s, known for its user-friendly design and solid performance in a variety of recording environments. This model showcases JVC's commitment to delivering innovative video technology, making it an ideal choice for amateur videographers and enthusiasts alike.

One of the standout features of the GR-AXM30 is its 34x optical zoom capability, allowing users to capture distant subjects with clarity. This zoom system is complemented by JVC's advanced image stabilization technology, which reduces the effects of camera shake and ensures smooth footage during handheld recording. The camcorder's 800,000-pixel CCD sensor provides vibrant color reproduction and detailed imagery, making it suitable for both indoor and outdoor filming.

The GR-AXM30 incorporates a 3-inch color LCD screen that provides excellent visibility, enabling users to monitor their shots easily and adjust settings on the fly. This display is of particular importance for framing shots during playback, helping users quickly review footage to ensure quality before concluding a recording session.

For connectivity, the GR-AXM30 includes a standard AV output, enabling easy connections to televisions and other compatible devices for immediate playback. Additionally, the camcorder is designed to utilize VHS-C tapes, which were popular for their compact size and ease of storage, making it convenient for users to manage their recordings.

In terms of ergonomics, the GR-AXM30 boasts a lightweight and compact design that allows for easy handling, even during extended use. The intuitive button layout ensures that users can navigate settings without any hassle, enhancing the overall user experience.

The camcorder also features a variety of shooting modes, including night mode, portrait mode, and sports mode, each optimized to enhance the footage based on the shooting environment. Furthermore, it includes built-in effects and transitions that add a creative touch to videos, enriching the storytelling aspect of the recorded content.

Overall, the JVC GR-AXM30 exemplifies a well-rounded camcorder that merges functionality with ease of use. Its combination of optical zoom, image stabilization, and intelligent shooting modes makes it a reliable option for capturing life's memorable moments with quality and style.