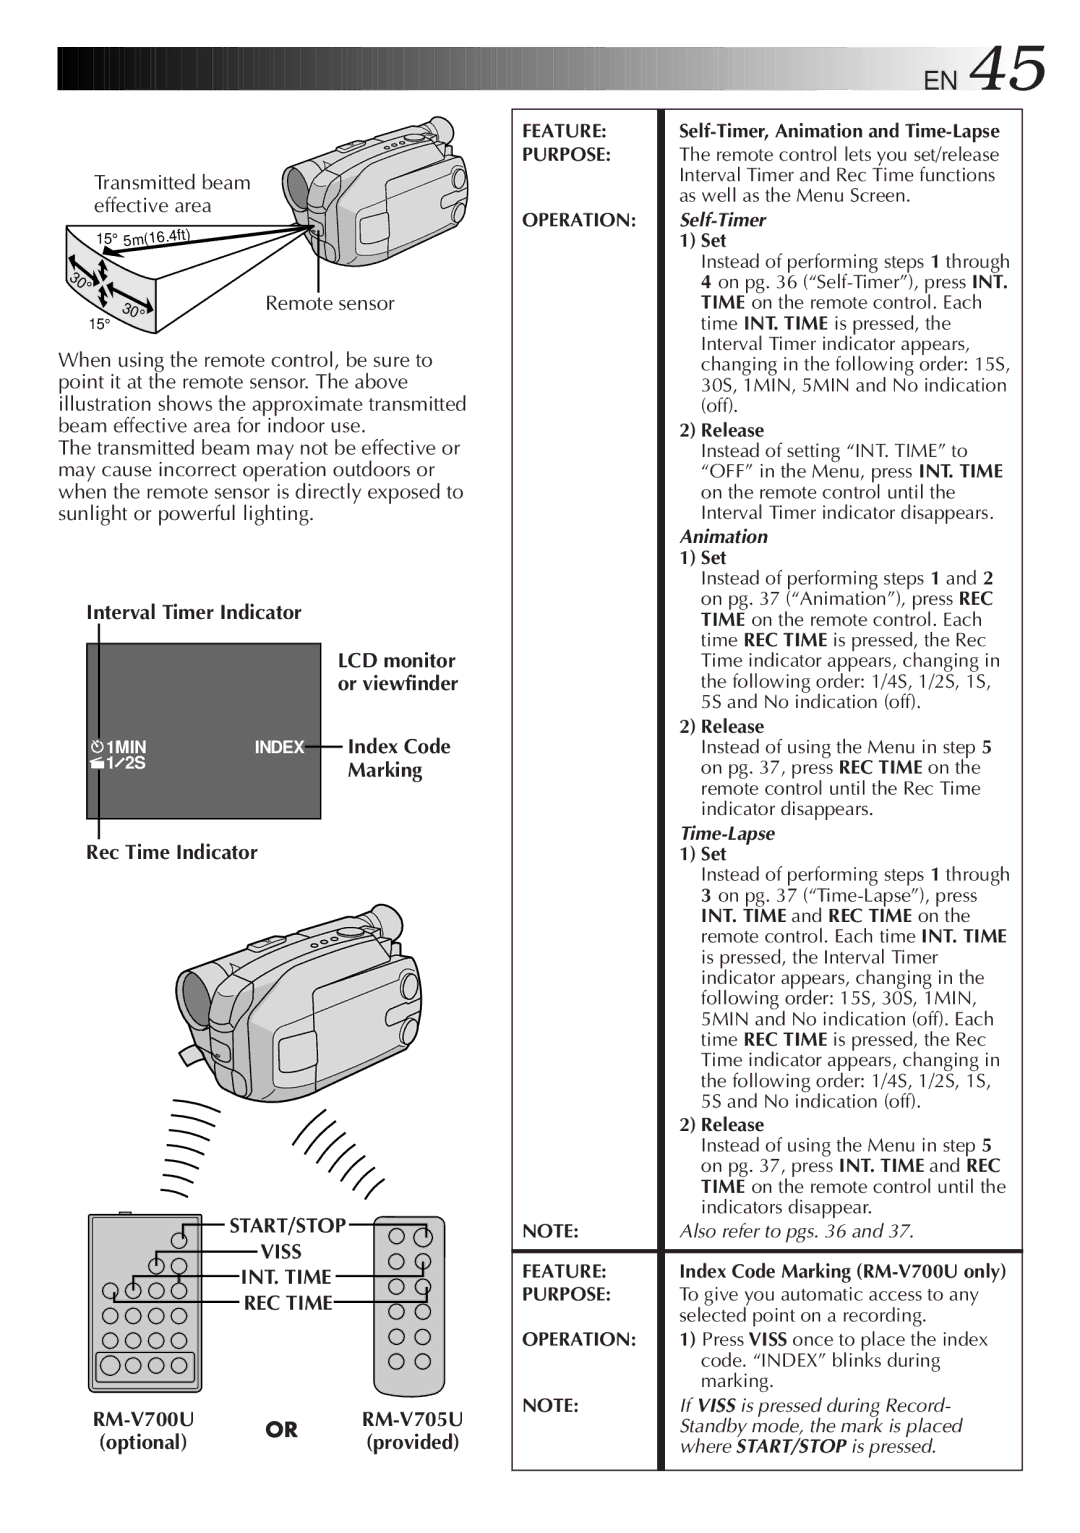
Transmitted beam effective area

15° 5m(16.4ft)

30°

15°

30

°

Remote sensor


When using the remote control, be sure to point it at the remote sensor. The above illustration shows the approximate transmitted beam effective area for indoor use.

The transmitted beam may not be effective or may cause incorrect operation outdoors or when the remote sensor is directly exposed to sunlight or powerful lighting.


EN


45


FEATURE:

Self-Timer, Animation and Time-Lapse


PURPOSE:

The remote control lets you set/release


Interval Timer and Rec Time functions


as well as the Menu Screen.


OPERATION:

Self-Timer


1) Set


Instead of performing steps 1 through


4 on pg. 36 (“Self-Timer”), press INT.


TIME on the remote control. Each


time INT. TIME is pressed, the


Interval Timer indicator appears,


changing in the following order: 15S,


30S, 1MIN, 5MIN and No indication


(off).


2) Release


Instead of setting “INT. TIME” to


“OFF” in the Menu, press INT. TIME


on the remote control until the


Interval Timer indicator disappears.


Animation


1) Set


Instead of performing steps 1 and 2


on pg. 37 (“Animation”), press REC

Interval Timer Indicator


1MIN

INDEX


1 2S


LCD monitor or viewfinder

Index Code Marking

TIME on the remote control. Each

time REC TIME is pressed, the Rec

Time indicator appears, changing in

the following order: 1/4S, 1/2S, 1S,

5S and No indication (off).

2) Release

Instead of using the Menu in step 5

on pg. 37, press REC TIME on the

remote control until the Rec Time

indicator disappears.

Time-Lapse

Rec Time Indicator


START/STOP


VISS


INT. TIME


REC TIME


RM-V700U

OR

RM-V705U

(optional)

(provided)


1) Set


Instead of performing steps 1 through


3 on pg. 37 (“Time-Lapse”), press


INT. TIME and REC TIME on the


remote control. Each time INT. TIME


is pressed, the Interval Timer


indicator appears, changing in the


following order: 15S, 30S, 1MIN,


5MIN and No indication (off). Each


time REC TIME is pressed, the Rec


Time indicator appears, changing in


the following order: 1/4S, 1/2S, 1S,


5S and No indication (off).


2) Release


Instead of using the Menu in step 5


on pg. 37, press INT. TIME and REC


TIME on the remote control until the


indicators disappear.

NOTE:

Also refer to pgs. 36 and 37.


FEATURE:

Index Code Marking (RM-V700U only)

PURPOSE:

To give you automatic access to any


selected point on a recording.

OPERATION:

1) Press VISS once to place the index


code. “INDEX” blinks during


marking.

NOTE:

If VISS is pressed during Record-


Standby mode, the mark is placed


where START/STOP is pressed.

Page 45
Image 45
JVC GR-AXM300 manual Transmitted beam effective area, Interval Timer Indicator, Rec Time Indicator

GR-AXM300 specifications

The JVC GR-AXM300 is a notable addition to the lineup of compact camcorders released in the late 1990s, renowned for its advanced features and user-friendly design. Aimed at both amateur videographers and those seeking to capture important life events, the GR-AXM300 represents a blend of portability and functionality that appealed to its target audience.

One of the standout features of the GR-AXM300 is its compact size and lightweight design, making it convenient for users to carry it for extended periods. Despite its small stature, the camcorder boasts a host of impressive specifications, including a 700x digital zoom and a 20x optical zoom, allowing users to capture distant subjects with remarkable clarity. This combination offers flexibility for various shooting scenarios, whether recording close-up action at a sports event or capturing sweeping landscapes during travel.

The camcorder utilizes JVC’s Super VHS-C format, which enhances the resolution and quality of recorded videos compared to standard VHS. Moreover, the GR-AXM300 is equipped with JVC’s advanced image stabilizer technology, which significantly reduces the effects of shaking and vibrations, resulting in smooth, professional-looking footage. This feature is particularly useful for handheld shooting, ensuring that users can maintain steady shots without the need for additional stabilization equipment.

Additional noteworthy characteristics include the built-in digital effects and transitions, enabling users to add a creative touch to their videos without the need for extensive editing post-shooting. The GR-AXM300 also features a color viewfinder and a flip-out LCD screen, enhancing the shooting experience by allowing users to compose their shots easily and review playback quickly.

For audio, the camcorder comes with a built-in microphone, ensuring that sound quality accompanies the visuals, allowing users to capture the essence of live moments. The model also offers several recording modes and settings tailored to different lighting conditions, helping users achieve the best results regardless of their environment.

In conclusion, the JVC GR-AXM300 encapsulates the essence of user-friendly and innovative technology in a small package. With its combination of optical zoom capabilities, image stabilization, and a range of creative options, it remains a beloved choice for enthusiasts looking to document life's special moments with ease and quality.