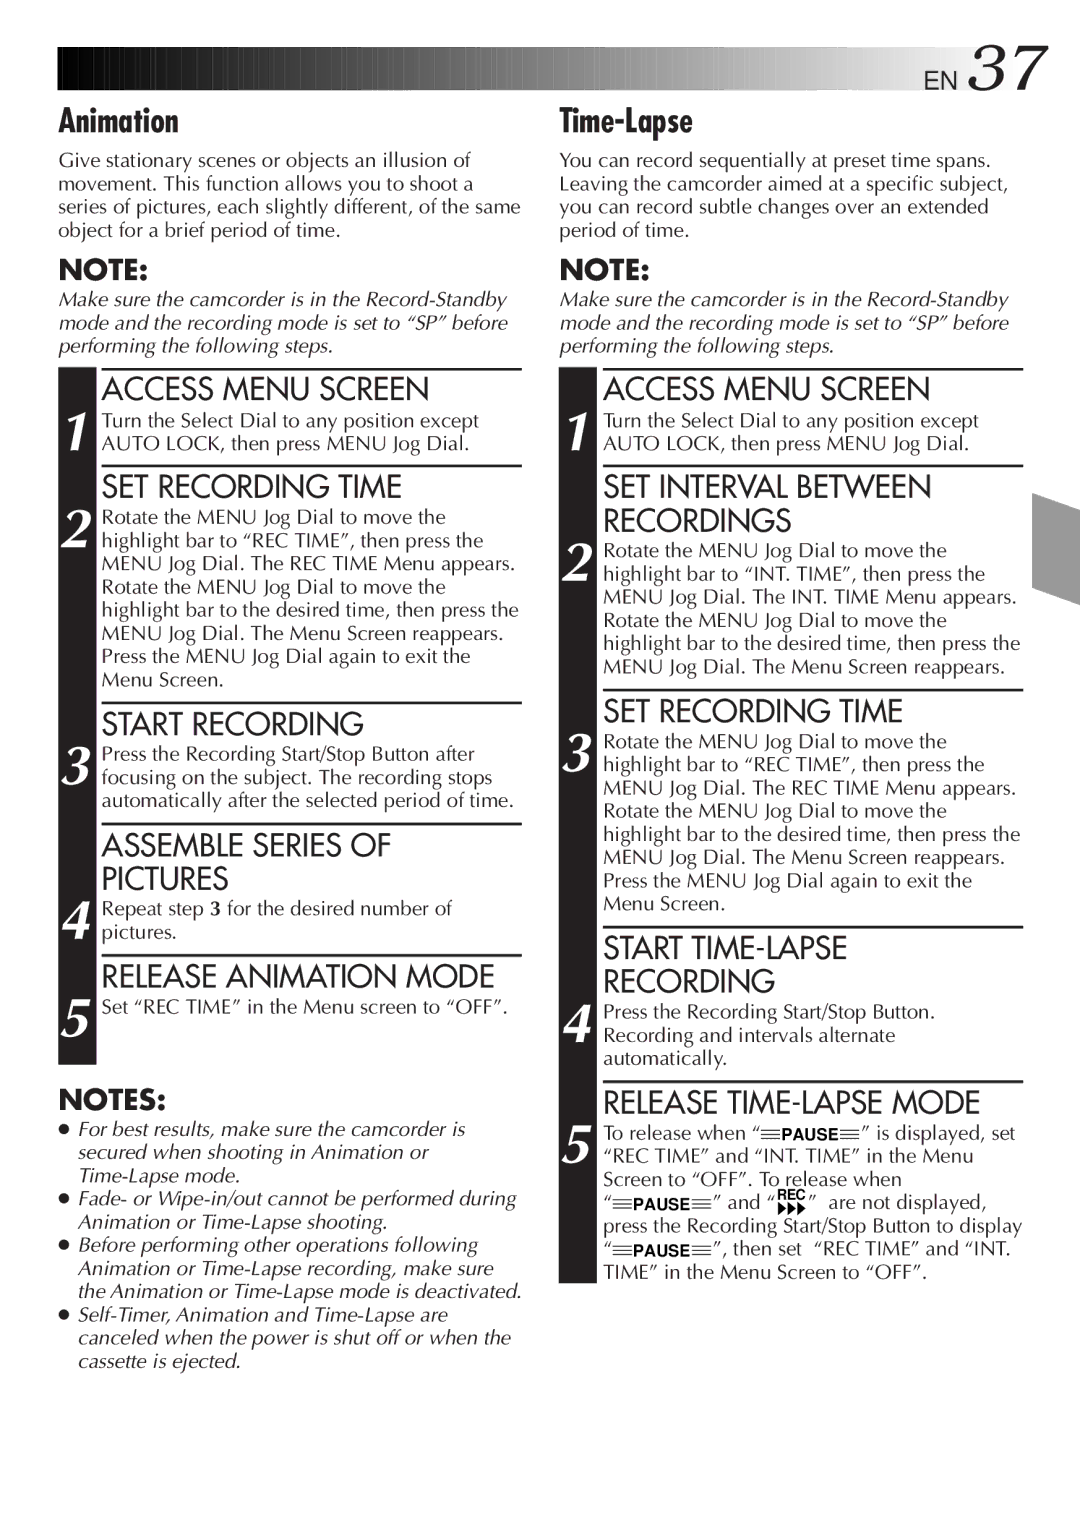
RELEASE TIME-LAPSE MODE
START RECORDING
3 Press the Recording Start/Stop Button after focusing on the subject. The recording stops automatically after the selected period of time.
ASSEMBLE SERIES OF PICTURES
SET RECORDING TIME
Turn the Select Dial to any position except AUTO LOCK, then press MENU Jog Dial.
1
2 Rotate the MENU Jog Dial to move the highlight bar to “REC TIME”, then press the MENU Jog Dial. The REC TIME Menu appears. Rotate the MENU Jog Dial to move the highlight bar to the desired time, then press the MENU Jog Dial. The Menu Screen reappears. Press the MENU Jog Dial again to exit the Menu Screen.
Animation
Give stationary scenes or objects an illusion of movement. This function allows you to shoot a series of pictures, each slightly different, of the same object for a brief period of time.
NOTE:
Make sure the camcorder is in the Record-Standby mode and the recording mode is set to “SP” before performing the following steps.
ACCESS MENU SCREEN

4 Repeat step 3 for the desired number of pictures.

RELEASE ANIMATION MODE

5 Set “REC TIME” in the Menu screen to “OFF”.

NOTES:

For best results, make sure the camcorder is secured when shooting in Animation or Time-Lapse mode.

Fade- or Wipe-in/out cannot be performed during Animation or Time-Lapse shooting.

Before performing other operations following Animation or Time-Lapse recording, make sure the Animation or Time-Lapse mode is deactivated.

Self-Timer, Animation and Time-Lapse are canceled when the power is shut off or when the cassette is ejected.

EN37

Time-Lapse

You can record sequentially at preset time spans. Leaving the camcorder aimed at a specific subject, you can record subtle changes over an extended period of time.

NOTE:

Make sure the camcorder is in the Record-Standby mode and the recording mode is set to “SP” before performing the following steps.

ACCESS MENU SCREEN

1 Turn the Select Dial to any position except AUTO LOCK, then press MENU Jog Dial.

SET INTERVAL BETWEEN

RECORDINGS

2 Rotate the MENU Jog Dial to move the highlight bar to “INT. TIME”, then press the MENU Jog Dial. The INT. TIME Menu appears. Rotate the MENU Jog Dial to move the highlight bar to the desired time, then press the MENU Jog Dial. The Menu Screen reappears.

SET RECORDING TIME

3 Rotate the MENU Jog Dial to move the highlight bar to “REC TIME”, then press the MENU Jog Dial. The REC TIME Menu appears. Rotate the MENU Jog Dial to move the highlight bar to the desired time, then press the MENU Jog Dial. The Menu Screen reappears. Press the MENU Jog Dial again to exit the Menu Screen.

START TIME-LAPSE

RECORDING

4 Press the Recording Start/Stop Button. Recording and intervals alternate automatically.

5 To release when “PAUSE” is displayed, set

“REC TIME” and “INT. TIME” in the Menu

Screen to “OFF”. To release when

PAUSE” and “REC ” are not displayed, press the Recording Start/Stop Button to display “PAUSE”, then set “REC TIME” and “INT. TIME” in the Menu Screen to “OFF”.

Page 37
Image 37
JVC GR-AXM670 manual Time-Lapse, Release Animation Mode, SET Interval Between Recordings, SET Recording Time

GR-AXM670 specifications

The JVC GR-AXM670 is a compact and feature-rich camcorder that was well-regarded during its time for both amateur videographers and casual users. It stands out with a blend of innovative technologies, user-friendly design, and impressive imaging capabilities.

One of the primary features of the GR-AXM670 is its 680,000-pixel CCD image sensor, which provides vibrant and clear images. This sensor excels in capturing video footage with various lighting conditions, allowing users to produce high-quality tapes that are sharp and detailed. The camcorder supports the VHS-C format, an easy-to-find medium providing an accessible option for those who want to record and playback their videos on standard VHS systems.

The GR-AXM670 is equipped with a powerful 14x optical zoom lens, enabling users to get closer to their subjects without sacrificing image quality. This zoom capability allows for versatile shooting, whether the user is capturing expansive landscapes or intimate close-ups. The stabilization technology integrated into the camcorder further enhances video quality by minimizing shake and jitter, which can be particularly useful during handheld shooting.

Another key feature is its wide-angle capability, allowing the camcorder to capture broader scenes effectively. This feature is particularly beneficial for events such as weddings, parties, or any large gatherings where it’s essential to fit multiple subjects into the frame.

To facilitate ease of use, the GR-AXM670 incorporates a clear LCD flip-out screen. This LCD provides a preview of what’s being recorded and allows for simple navigating through menus. The intuitive design ensures that both beginners and experienced users can adapt quickly, making it a practical choice for family use or more serious recording.

The internal editing features, such as digital effects and transitions, allow users to enhance their videos creatively without requiring additional software. Users can add personal touches, ensuring their films are unique and tailored to their style.

In terms of connectivity, the GR-AXM670 includes outputs for video and audio, making it easy to connect to televisions or other recording devices for playback and editing. The design of the camcorder is compact and lightweight, making it convenient to carry for extended periods, which is ideal for travel and on-the-go recording.

Overall, the JVC GR-AXM670 is a well-rounded camcorder that effectively balances user-friendly operation with advanced video technologies, making it a standout choice for those looking to capture life's moments in quality video.