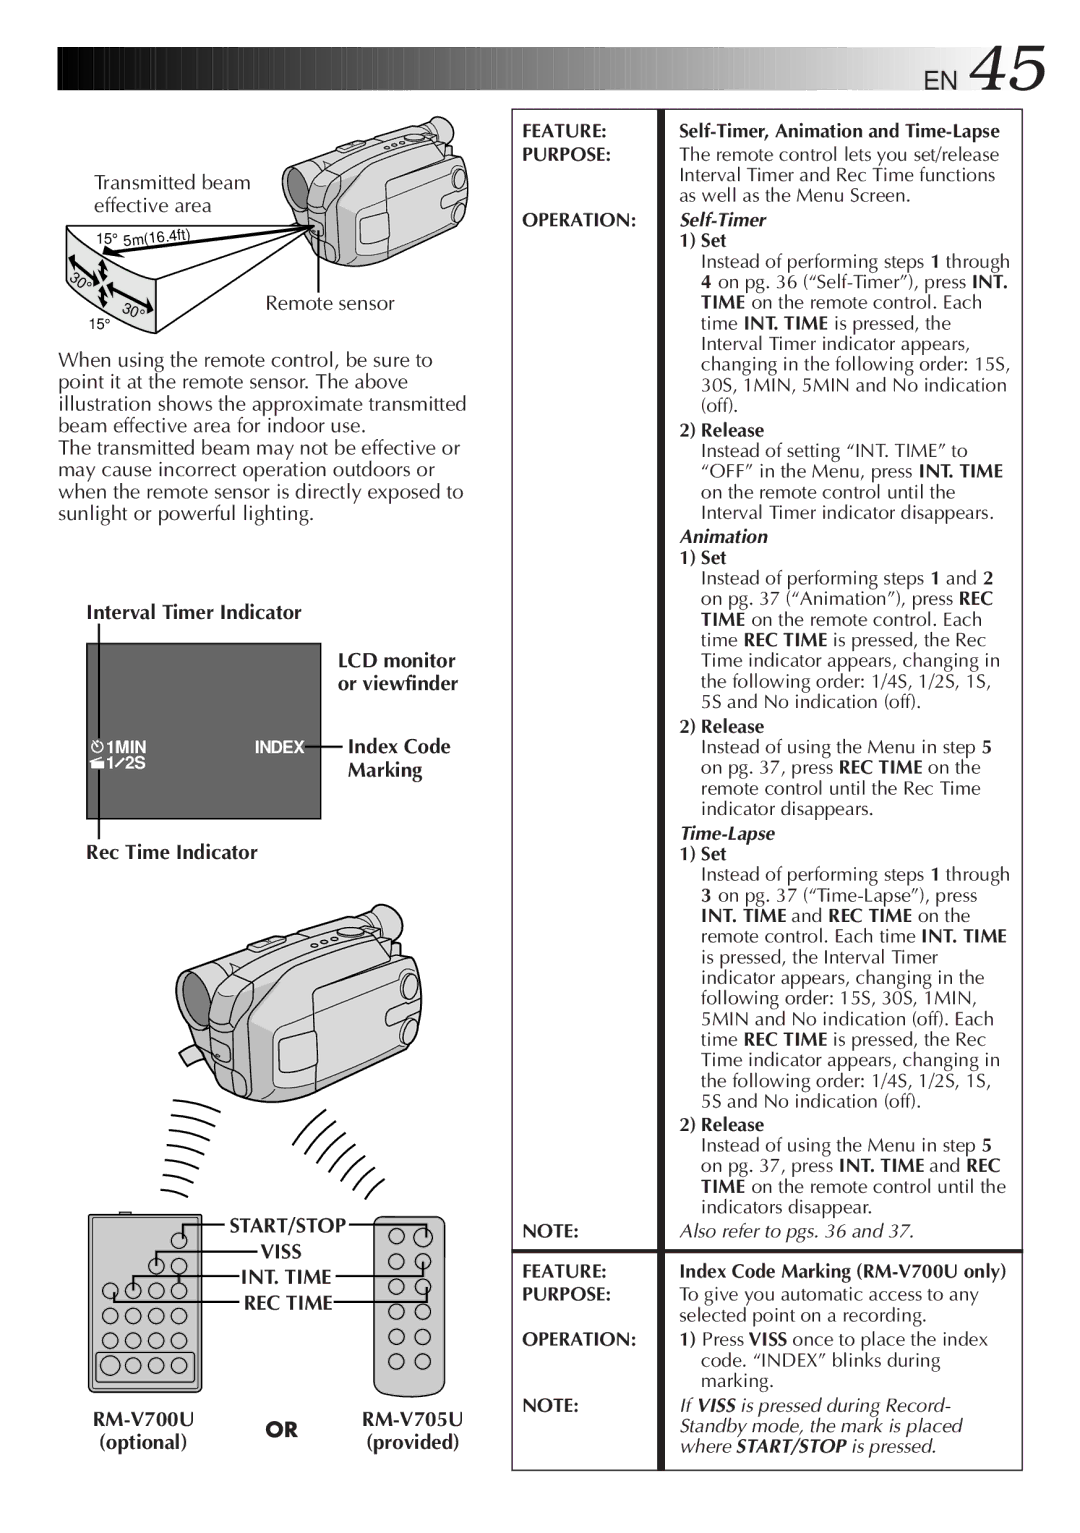
Transmitted beam effective area

15° 5m(16.4ft)

30°

15°

30

°

Remote sensor


When using the remote control, be sure to point it at the remote sensor. The above illustration shows the approximate transmitted beam effective area for indoor use.

The transmitted beam may not be effective or may cause incorrect operation outdoors or when the remote sensor is directly exposed to sunlight or powerful lighting.


EN


45


FEATURE:

Self-Timer, Animation and Time-Lapse


PURPOSE:

The remote control lets you set/release


Interval Timer and Rec Time functions


as well as the Menu Screen.


OPERATION:

Self-Timer


1) Set


Instead of performing steps 1 through


4 on pg. 36 (“Self-Timer”), press INT.


TIME on the remote control. Each


time INT. TIME is pressed, the


Interval Timer indicator appears,


changing in the following order: 15S,


30S, 1MIN, 5MIN and No indication


(off).


2) Release


Instead of setting “INT. TIME” to


“OFF” in the Menu, press INT. TIME


on the remote control until the


Interval Timer indicator disappears.


Animation


1) Set


Instead of performing steps 1 and 2


on pg. 37 (“Animation”), press REC

Interval Timer Indicator


1MIN

INDEX


1 2S


LCD monitor or viewfinder

Index Code Marking

TIME on the remote control. Each

time REC TIME is pressed, the Rec

Time indicator appears, changing in

the following order: 1/4S, 1/2S, 1S,

5S and No indication (off).

2) Release

Instead of using the Menu in step 5

on pg. 37, press REC TIME on the

remote control until the Rec Time

indicator disappears.

Time-Lapse

Rec Time Indicator


START/STOP


VISS


INT. TIME


REC TIME


RM-V700U

OR

RM-V705U

(optional)

(provided)


1) Set


Instead of performing steps 1 through


3 on pg. 37 (“Time-Lapse”), press


INT. TIME and REC TIME on the


remote control. Each time INT. TIME


is pressed, the Interval Timer


indicator appears, changing in the


following order: 15S, 30S, 1MIN,


5MIN and No indication (off). Each


time REC TIME is pressed, the Rec


Time indicator appears, changing in


the following order: 1/4S, 1/2S, 1S,


5S and No indication (off).


2) Release


Instead of using the Menu in step 5


on pg. 37, press INT. TIME and REC


TIME on the remote control until the


indicators disappear.

NOTE:

Also refer to pgs. 36 and 37.


FEATURE:

Index Code Marking (RM-V700U only)

PURPOSE:

To give you automatic access to any


selected point on a recording.

OPERATION:

1) Press VISS once to place the index


code. “INDEX” blinks during


marking.

NOTE:

If VISS is pressed during Record-


Standby mode, the mark is placed


where START/STOP is pressed.

Page 45
Image 45
JVC GR-AXM750 manual Transmitted beam effective area, Interval Timer Indicator, Rec Time Indicator

GR-AXM750 specifications

The JVC GR-AXM750 is a compact and versatile camcorder that was part of the JVC line of consumer video products aimed at amateur filmmakers and home videographers. Renowned for its blend of portability and functionality, the GR-AXM750 is equipped with several key features that cater to both casual users and more serious hobbyists.

One of the standout attributes of the GR-AXM750 is its advanced playback technology. The camcorder supports various tape formats, making it easy to record and playback video on the go. The device utilizes S-VHS-C technology, enabling it to deliver high-quality video recording with improved resolution and detail compared to standard VHS-C tapes. This feature is particularly appealing for users who wish to capture precious memories with greater clarity.

Another highlight is the camcorder’s lens, which boasts a 12x optical zoom capability. This allows users to get closer to the action without sacrificing image quality, making it ideal for distant subjects or dynamic shooting environments. The zoom is complemented by digital zoom options, providing additional versatility for different shooting scenarios.

The GR-AXM750 also incorporates image stabilization technology that helps to minimize shaky footage, a common concern among handheld videography. This feature is essential for capturing smooth, stable images, especially during movement or when shooting in less-than-ideal conditions.

In terms of usability, the camcorder is designed with an intuitive interface, including a clear LCD screen that provides a live view of the recording, as well as menus for quick and easy access to settings. The screen facilitates easier framing and can be tilted to accommodate various shooting angles, enhancing user comfort and creativity during filming.

Battery life is another commendable aspect of the GR-AXM750. With efficient power management, users can record longer without frequently changing batteries, making it suitable for events or extended shooting sessions.

Overall, the JVC GR-AXM750 embodies the essential features and technologies that appeal to both novice and experienced videographers. With its combination of S-VHS-C recording capability, versatile zoom options, image stabilization, and user-friendly design, it offers a reliable solution for capturing life's memorable moments while providing the creative freedom to explore videography.