44 EN | USING MENUS FOR DETAILED ADJUSTMENT |
MENU/BRIGHT Wheel
Lock Button
Power Switch
Display
| W IPE / FADER | OF F | Menu Screen |
|
| ||||
| PROGRAM AE |
|
|
|
| ||||
| EXPOSURE |
|
|
|
|
|
|
|
|
| W. BALANCE |
|
|
|
|
|
|
|
|
| CAMERA |
|
|
|
|
|
|
|
|
| MANUAL |
|
|
| REC MODE |
| – | SP | |
| SYSTEM |
|
|
| SOUND MODE |
| – | 12B I T | |
| D I SPLAY |
|
|
| ZOOM |
| – | 40X | |
| DSC |
|
|
| SNAP MODE |
| – | FUL L | |
| END |
|
|
| GA I N UP |
| – | AGC | |
|
|
|
|
|
| ||||
|
|
|
|
| RETURN |
|
|
| |
|
|
|
|
|
| Sub Menu | |||
|
|
|
|
|
|
|
|
|
|
|
|
| D I S |
|
| – OFF |
|
|
|
|
|
|
|
|
| ON |
|
| |
|
|
|
|
|
|
|
|
|
|
|
|
|
|
|
|
|
|
|
|
|
|
|
|
|
|
|
|
|
|
|
|
|
| BEEP |
|
| – MELODY | ||||
|
|
|
| TALLY |
|
| – | ON | |||
|
|
|
| I D | NUMBER |
| – | 0 6 | |||
|
|
|
| DEMO MODE |
| – | ON | ||||
|
|
|
| CAM RESET |
|
|
| ||||
|
|
|
| RETURN |
|
|
| ||||
|
|
|
|
|
|
|
|
|
|
|
|
| ON | SCREEN |
|
| – | LCD / TV |
| ||||
| DATE / T I ME |
|
| – | AUTO |
|
| ||||
| T I ME | CODE |
|
| – | OF F |
|
| |||
| CLOCK |
|
|
|
| DEC 2 5 ’0 2 |
| ||||
| ADJ . |
|
|
|
|
| 5 : 3 0 | PM |
| ||
| RETURN |
|
|
|
|
|
|
| |||
QUAL I TY | – | F I NE |
|
|
|
|
|
| |||
I MAGE S I ZE | – 1 0 2 4X7 6 8 |
|
| ||||||||
REC SELECT | – |
|
|
|
|
|
|
|
|
| |
| W IPE / FADER | |
| PROGRAM AE | |
| EXPOSURE | |
| W. BALANCE | |
RETURN | CAMERA | |
MANUAL | ||
| ||
| SYSTEM | |
| D I SPLAY | |
| DSC | |
| END |
Normal Screen
For Recording Menu
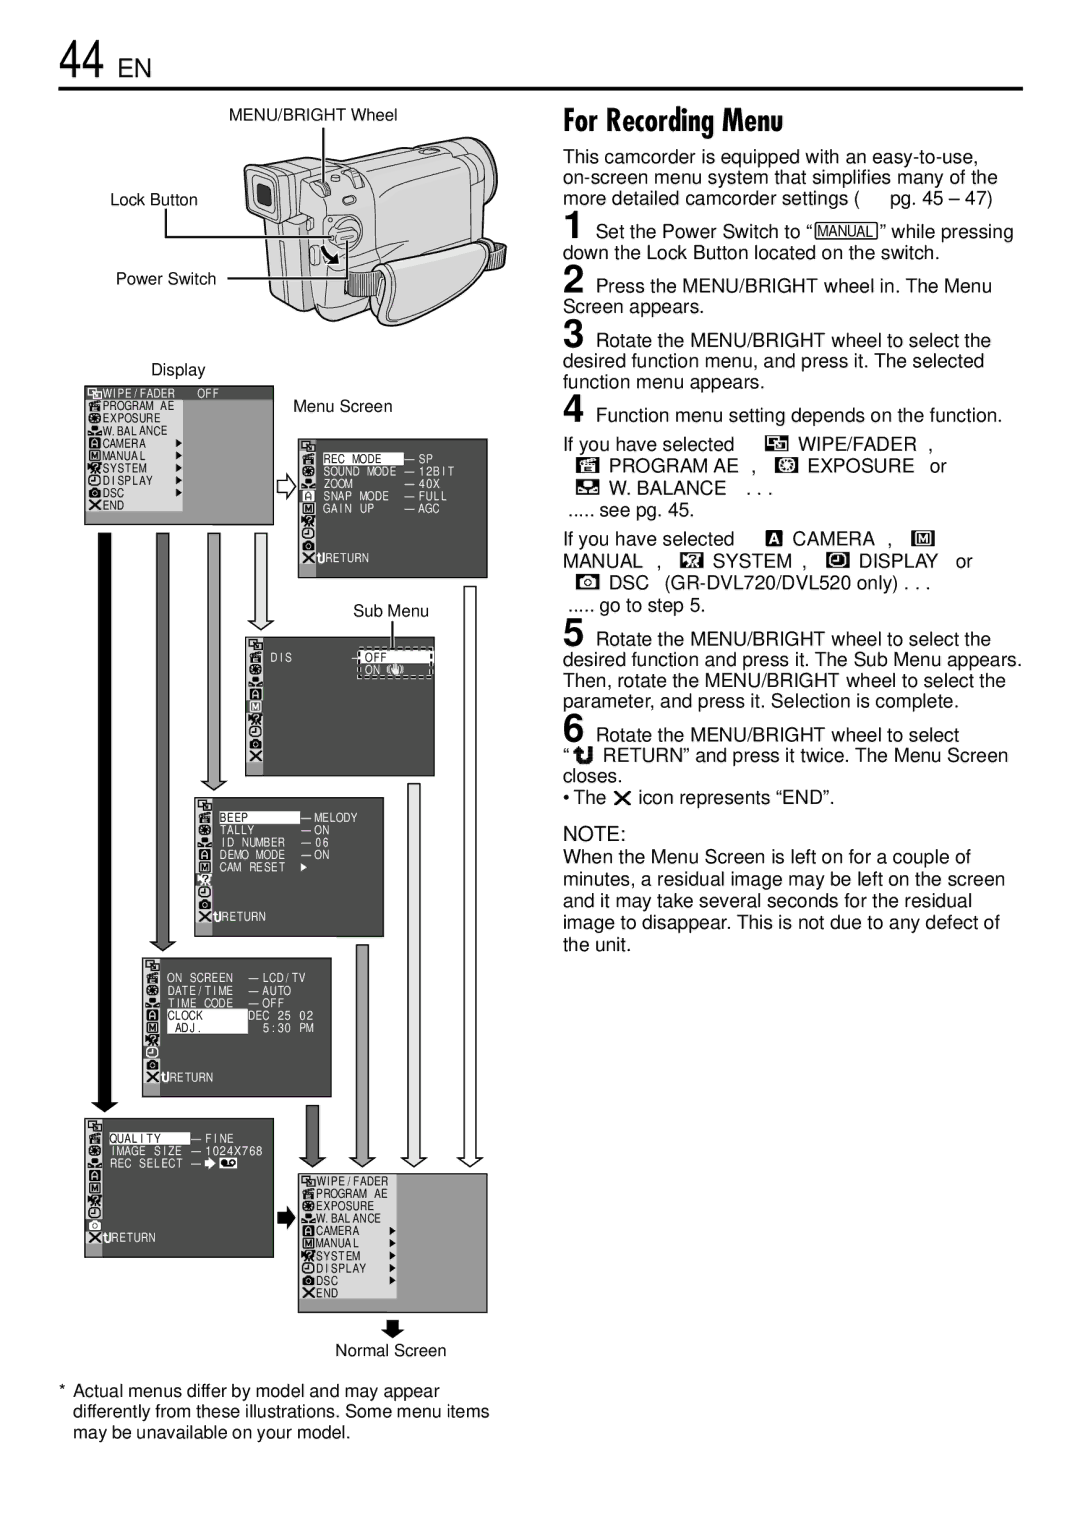
This camcorder is equipped with an
1 Set the Power Switch to “ | ” while pressing |
MANUAL |
|
down the Lock Button located on the switch.
2 Press the MENU/BRIGHT wheel in. The Menu Screen appears.
3 Rotate the MENU/BRIGHT wheel to select the desired function menu, and press it. The selected function menu appears.
4 Function menu setting depends on the function.
If you have selected “ |
|
| WIPE/FADER”, | |||
|
| |||||
|
| |||||
“ |
| PROGRAM AE”, “ |
|
| EXPOSURE” or | |
|
|
| ||||
“ W. BALANCE” . . .
..... see pg. 45.
If you have selected “![]() CAMERA”, “
CAMERA”, “ ![]()
MANUAL”, “ ![]() SYSTEM”, “
SYSTEM”, “ ![]() DISPLAY” or
DISPLAY” or
“![]() DSC”
DSC”
..... go to step 5.
5 Rotate the MENU/BRIGHT wheel to select the desired function and press it. The Sub Menu appears. Then, rotate the MENU/BRIGHT wheel to select the parameter, and press it. Selection is complete.
6 Rotate the MENU/BRIGHT wheel to select
“![]()
![]()
![]()
![]() RETURN” and press it twice. The Menu Screen closes.
RETURN” and press it twice. The Menu Screen closes.
• The ![]() icon represents “END”.
icon represents “END”.
NOTE:
When the Menu Screen is left on for a couple of minutes, a residual image may be left on the screen and it may take several seconds for the residual image to disappear. This is not due to any defect of the unit.
*Actual menus differ by model and may appear differently from these illustrations. Some menu items may be unavailable on your model.
