62 EN

USING THE REMOTE CONTROL UNIT (cont.)

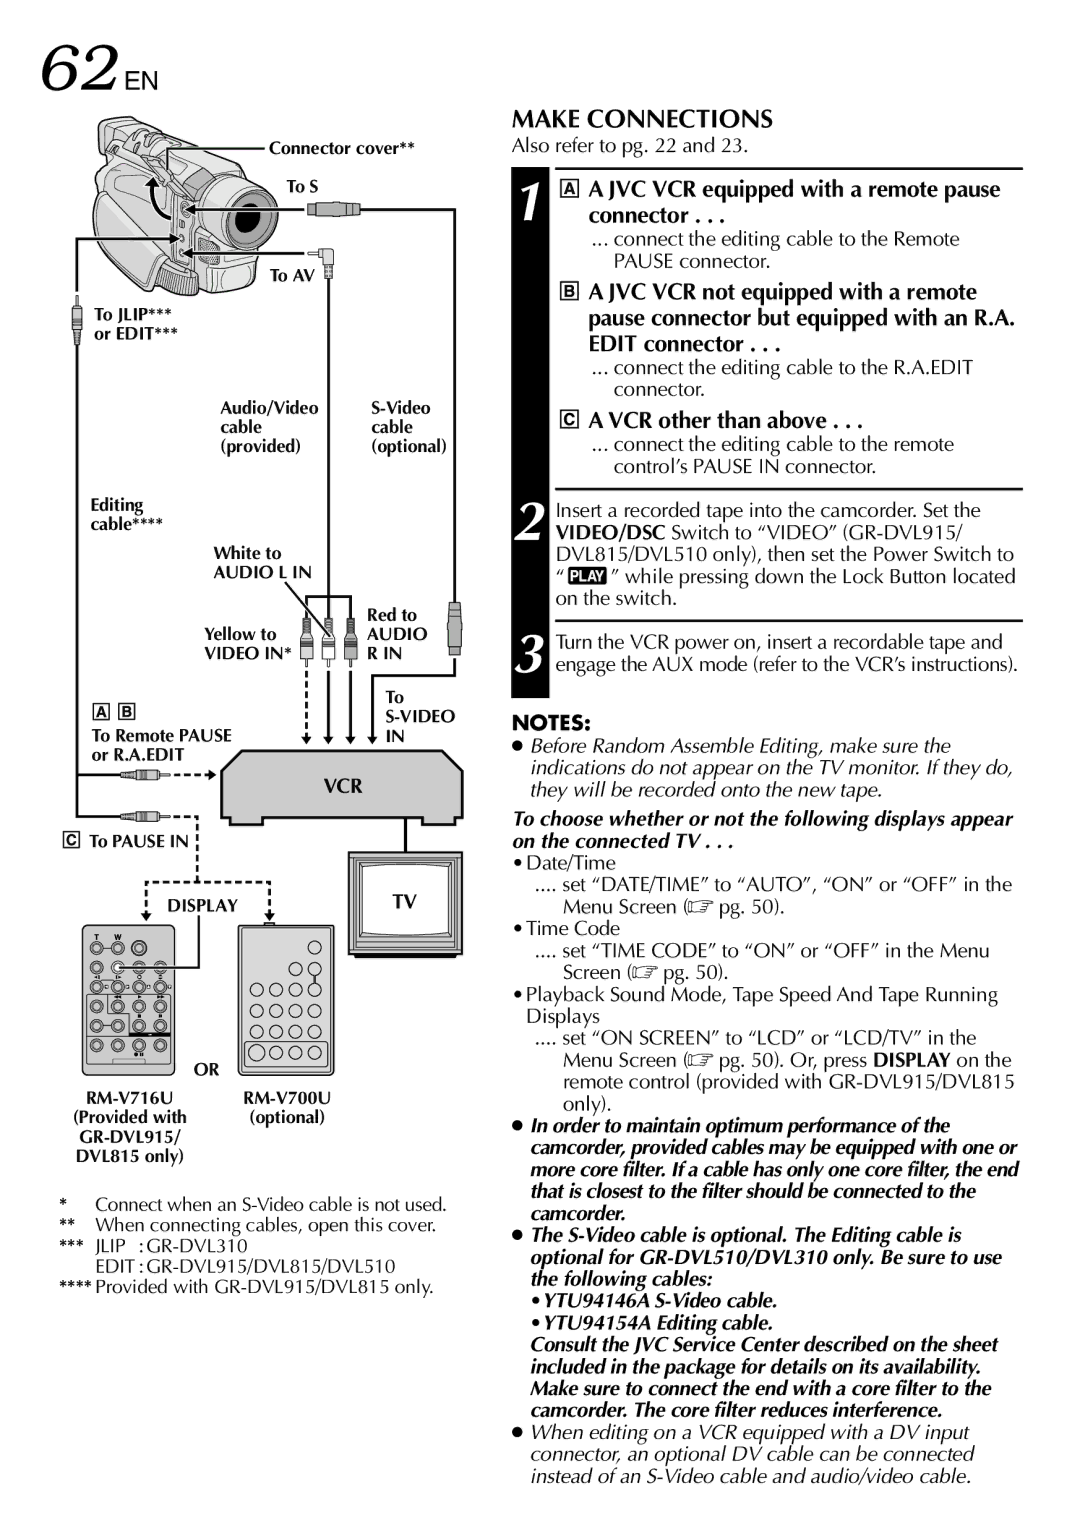
Connector cover** To S

To AV

To JLIP*** or EDIT***

Audio/Video


S-Video

cable


cable

(provided)


(optional)

Editing


cable****


White to


AUDIO L IN


Red to


Yellow to


AUDIO

VIDEO IN*


R IN


To

To Remote PAUSE


S-VIDEO


IN


or R.A.EDIT


VCR

MAKE CONNECTIONS

Also refer to pg. 22 and 23.

1 A JVC VCR equipped with a remote pause connector . . .

... connect the editing cable to the Remote PAUSE connector.

A JVC VCR not equipped with a remote pause connector but equipped with an R.A. EDIT connector . . .

... connect the editing cable to the R.A.EDIT connector.

A VCR other than above . . .

... connect the editing cable to the remote control’s PAUSE IN connector.

2 Insert a recorded tape into the camcorder. Set the VIDEO/DSC Switch to “VIDEO” (GR-DVL915/ DVL815/DVL510 only), then set the Power Switch to

” while pressing down the Lock Button located on the switch.

3 Turn the VCR power on, insert a recordable tape and engage the AUX mode (refer to the VCR’s instructions).

NOTES:

Before Random Assemble Editing, make sure the indications do not appear on the TV monitor. If they do, they will be recorded onto the new tape.

To PAUSE IN

DISPLAY

OR

RM-V716U RM-V700U

(Provided with (optional) GR-DVL915/

DVL815 only)

TV

To choose whether or not the following displays appear on the connected TV . . .

Date/Time

.... set “DATE/TIME” to “AUTO”, “ON” or “OFF” in the

Menu Screen ( pg. 50).

Time Code

.... set “TIME CODE” to “ON” or “OFF” in the Menu

Screen ( pg. 50).

Playback Sound Mode, Tape Speed And Tape Running Displays

.... set “ON SCREEN” to “LCD” or “LCD/TV” in the

Menu Screen ( pg. 50). Or, press DISPLAY on the remote control (provided with GR-DVL915/DVL815 only).

In order to maintain optimum performance of the

camcorder, provided cables may be equipped with one or

more core filter. If a cable has only one core filter, the end

that is closest to the filter should be connected to the

*Connect when an S-Video cable is not used.

**When connecting cables, open this cover.

***JLIP :GR-DVL310

EDIT :GR-DVL915/DVL815/DVL510

****Provided with GR-DVL915/DVL815 only.

camcorder.

The S-Video cable is optional. The Editing cable is

optional for GR-DVL510/DVL310 only. Be sure to use

the following cables:

YTU94146A S-Video cable.

YTU94154A Editing cable.

Consult the JVC Service Center described on the sheet

included in the package for details on its availability.

Make sure to connect the end with a core filter to the

camcorder. The core filter reduces interference.

When editing on a VCR equipped with a DV input

connector, an optional DV cable can be connected

instead of an S-Video cable and audio/video cable.

Page 62
Image 62
JVC GR-DVL815 specifications 62 EN, Make Connections, JVC VCR equipped with a remote pause connector, VCR other than above

GR-DVL815 specifications

The JVC GR-DVL815 is a compact and portable digital camcorder that made its mark in the early 2000s, combining functionality with user-friendly features. Designed for both amateur and semi-professional videographers, this camcorder offers a versatile solution for capturing high-quality video content.

One of the standout features of the JVC GR-DVL815 is its 1/4-inch CCD sensor, which allows for vibrant image quality and enhanced performance in various lighting conditions. With a resolution of 800,000 pixels, it captures crisp, clear images that are suitable for home videos and more serious projects alike. Additionally, the camcorder supports Digital Video (DV) format, providing excellent video clarity and minimizing artifacts during compression.

The GR-DVL815 offers a 10x optical zoom and a 700x digital zoom, giving users the ability to capture distant subjects with remarkable detail. The zoom mechanism is smooth and responsive, allowing for seamless transitions and dynamic shots. The camcorder is equipped with a 2.5-inch LCD screen, which provides a clear view of the shot being captured, making it easier to frame scenes and navigate menus.

In terms of connectivity, the JVC GR-DVL815 features a FireWire (IEEE 1394) port for easy transfer of video content to a computer for editing. This connectivity option was particularly valuable during its time, as it allowed for quick and efficient imports, eliminating the need for extra conversion steps. Moreover, the camcorder includes an A/V output, enabling easy connection to TVs and other video equipment, facilitating playback directly from the device.

The GR-DVL815 also boasts a range of recording formats, including SP (Standard Play) and LP (Long Play), allowing users to choose between video quality and recording time. The camcorder supports MiniDV tapes, another feature that was popular due to the compact size of the media and the high-quality recording it allowed.

Battery life is another essential aspect, and the GR-DVL815 delivers with a reliable power management system that provides ample recording time on a full charge. The lightweight and ergonomic design of the camcorder ensures comfort during extended shooting sessions.

Overall, the JVC GR-DVL815 is a well-rounded camcorder that combines essential features, solid performance, and ease of use, making it a popular choice for those looking to document significant moments of their lives or engage in creative video projects. Its blend of optical zoom capabilities, digital connectivity, and intuitive design solidified its place in the hearts of early 2000s videographers and hobbyists.