60EN EDITING (Cont.)

Random Assemble Editing

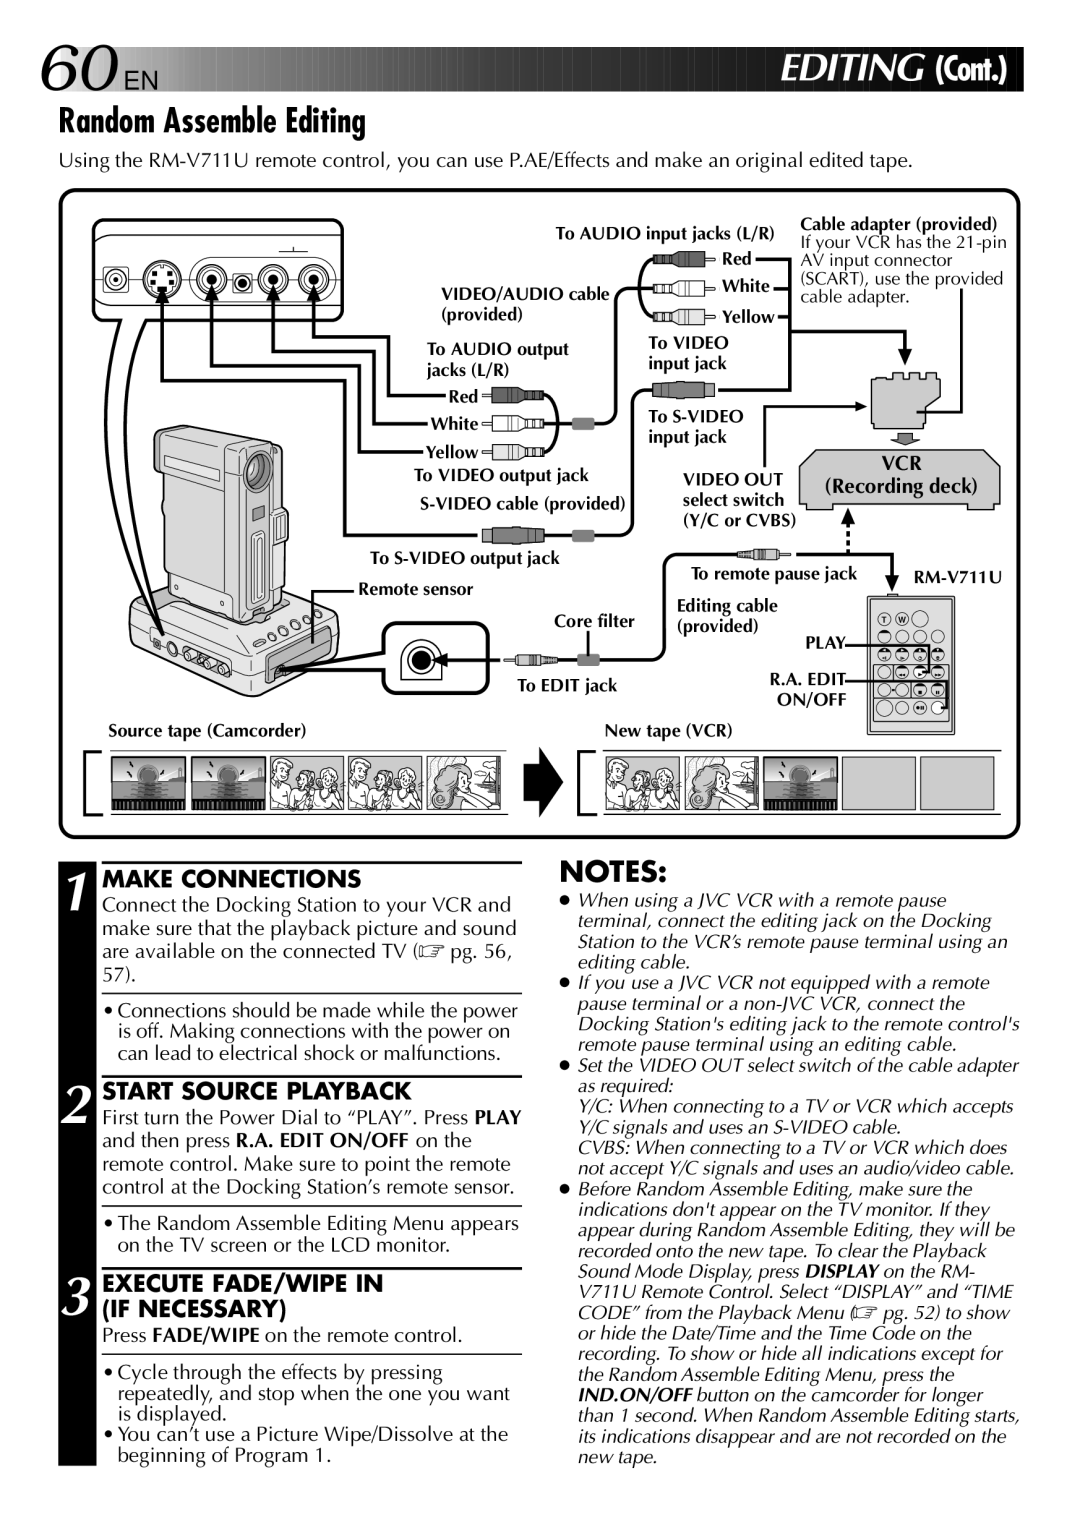
Using the RM-V711U remote control, you can use P.AE/Effects and make an original edited tape.


To AUDIO input jacks (L/R)

Cable adapter (provided)


If your VCR has the 21-pin


Red


AV input connector


VIDEO/AUDIO cable

White

(SCART), use the provided


cable adapter.


(provided)

Yellow


To AUDIO output

To VIDEO


input jack


jacks (L/R)


Red

To S-VIDEO


White


input jack


Yellow


VCR


To VIDEO output jack

VIDEO OUT


(Recording deck)


S-VIDEO cable (provided)

select switch


(Y/C or CVBS)


To S-VIDEO output jack

To remote pause jack

RM-V711U


Remote sensor


Editing cable


Core filter

T

W


(provided)


PLAY


To EDIT jack

R.A. EDIT


ON/OFF


Source tape (Camcorder)

New tape (VCR)


1 MAKE CONNECTIONS

Connect the Docking Station to your VCR and make sure that the playback picture and sound are available on the connected TV (pg. 56, 57).

Connections should be made while the power is off. Making connections with the power on can lead to electrical shock or malfunctions.

2 START SOURCE PLAYBACK

First turn the Power Dial to “PLAY”. Press PLAY and then press R.A. EDIT ON/OFF on the remote control. Make sure to point the remote control at the Docking Station’s remote sensor.

The Random Assemble Editing Menu appears on the TV screen or the LCD monitor.

3 EXECUTE FADE/WIPE IN (IF NECESSARY)

Press FADE/WIPE on the remote control.

Cycle through the effects by pressing repeatedly, and stop when the one you want is displayed.

You can’t use a Picture Wipe/Dissolve at the beginning of Program 1.

NOTES:

When using a JVC VCR with a remote pause terminal, connect the editing jack on the Docking Station to the VCR’s remote pause terminal using an editing cable.

If you use a JVC VCR not equipped with a remote pause terminal or a non-JVC VCR, connect the Docking Station's editing jack to the remote control's remote pause terminal using an editing cable.

Set the VIDEO OUT select switch of the cable adapter as required:

Y/C: When connecting to a TV or VCR which accepts Y/C signals and uses an S-VIDEO cable.

CVBS: When connecting to a TV or VCR which does not accept Y/C signals and uses an audio/video cable.

Before Random Assemble Editing, make sure the indications don't appear on the TV monitor. If they appear during Random Assemble Editing, they will be recorded onto the new tape. To clear the Playback Sound Mode Display, press DISPLAY on the RM-

V711U Remote Control. Select “DISPLAY” and “TIME CODE” from the Playback Menu (pg. 52) to show or hide the Date/Time and the Time Code on the recording. To show or hide all indications except for the Random Assemble Editing Menu, press the IND.ON/OFF button on the camcorder for longer than 1 second. When Random Assemble Editing starts, its indications disappear and are not recorded on the new tape.

Page 60
Image 60
JVC GR-DVX2 Random Assemble Editing, Make Connections, Start Source Playback, Execute FADE/WIPE in if Necessary

LYT0002-0X8A, GR-DVX2 specifications

The JVC GR-DVX2, also known by its model number LYT0002-0X8A, is a compact yet powerful digital camcorder that combines advanced technology with user-friendly features. Targeted at both amateur and professional videographers, this camcorder stands out for its remarkable performance and versatility.

One of the primary features of the JVC GR-DVX2 is its high-definition video recording capability, capable of recording in resolutions that cater to modern viewing standards. The camcorder employs a 1/6-inch CCD lens, which ensures excellent image quality, rich colors, and sharp details. The inclusion of a vari-angle LCD screen allows for flexible shooting angles, empowering users to capture dynamic shots with ease.

In terms of storage, the GR-DVX2 utilizes SD/SDHC memory cards, providing ample space for long recording sessions. This digital format ensures easy transfer of footage to computers for editing and sharing, making it a convenient choice for videographers. The camcorder's flexibility is enhanced with features such as digital image stabilization, which effectively reduces shake and delivers smooth, stable footage even in challenging shooting conditions.

The JVC GR-DVX2 is also equipped with an impressive 20x optical zoom lens, offering significant reach for capturing distant objects or subjects without compromising on quality. Combined with the 800x digital zoom capability, this camcorder allows for versatile shooting, whether in close or far-away settings.

Advanced audio technologies are another highlight of the GR-DVX2, which incorporates a built-in microphone that captures high-quality sound, ensuring that the audio quality matches the impressive visuals. The camcorder also supports the use of external microphones, enabling users to achieve even higher sound fidelity when desired.

The camcorder's intuitive interface and ergonomic design facilitate easy operation, making it accessible for users of all experience levels. The various shooting modes, including portrait, landscape, and night modes, optimize settings for different environments, ensuring stunning results every time.

With its combination of high-definition recording, robust zoom capabilities, and user-friendly design, the JVC GR-DVX2 (LYT0002-0X8A) is an excellent choice for anyone looking to elevate their video recording experience, whether for personal memories or professional projects.