24EN

RECORDINGAdvancedFeatures(cont.)

Using Menu For Detailed Adjustment


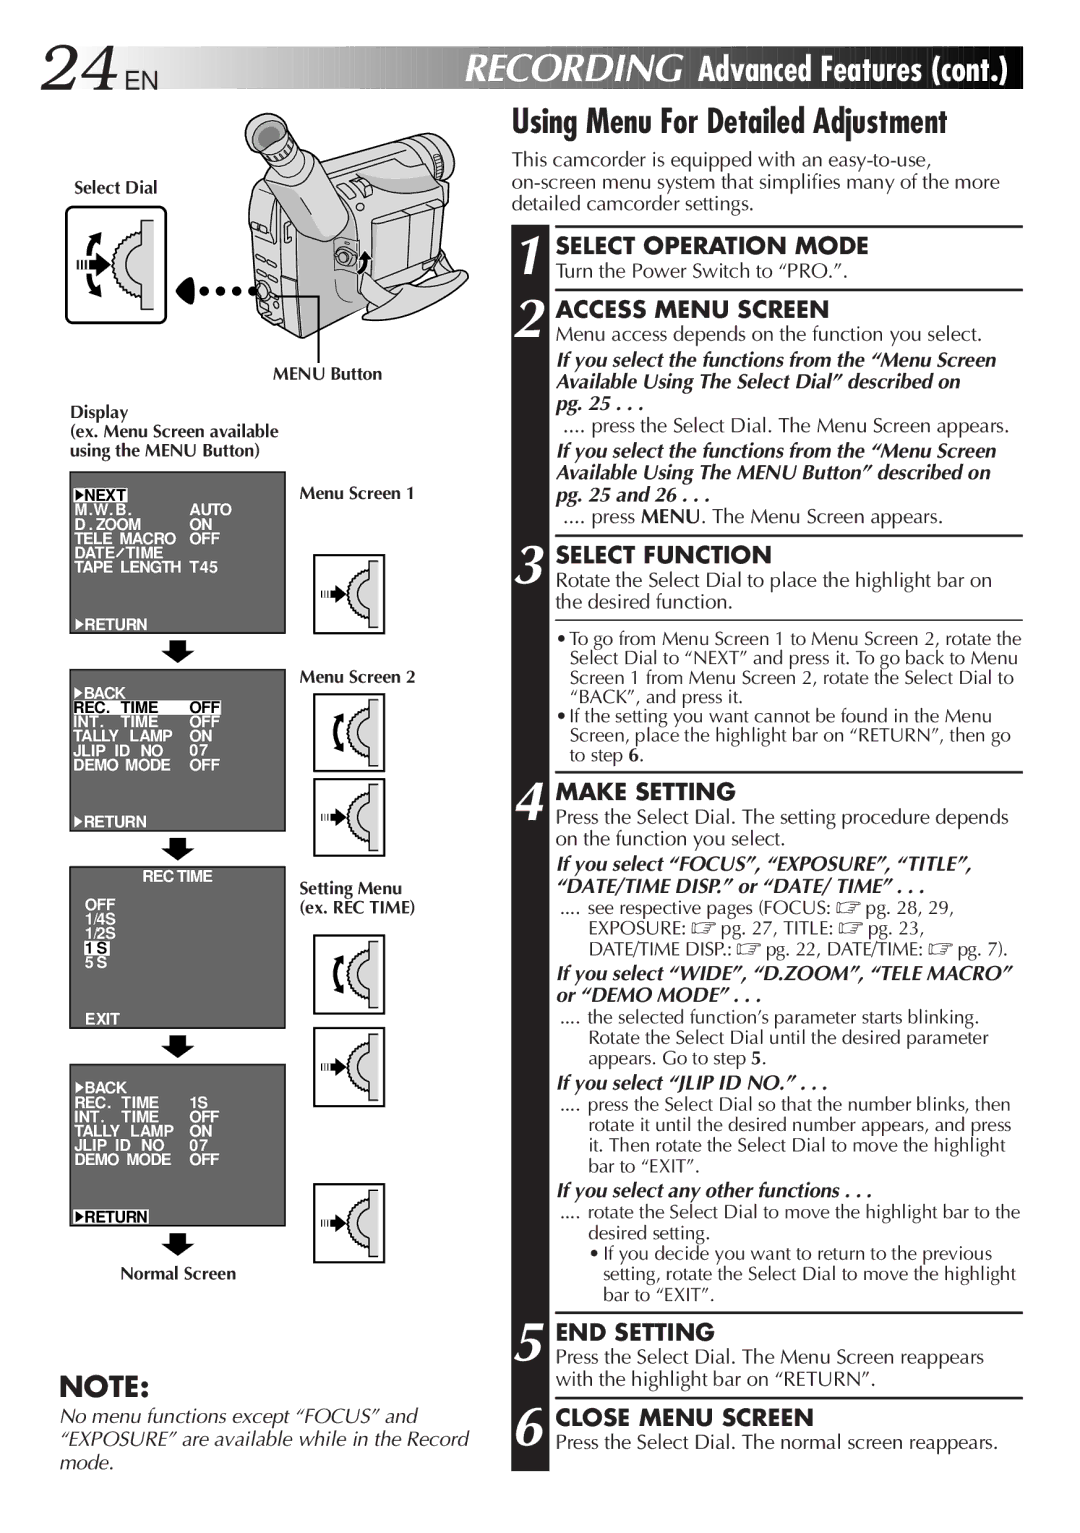
This camcorder is equipped with an easy-to-use,

Select Dial

on-screen menu system that simplifies many of the more


detailed camcorder settings.

MENU Button

Display

(ex. Menu Screen available using the MENU Button)

4NEXT

Menu Screen 1

M. W. B.

AUTO

D . ZOOM

ON

TELE MACRO

OFF

DATE TIME


TAPE LENGTH T45

4RETURN


1

2

3

SELECT OPERATION MODE

Turn the Power Switch to “PRO.”.

ACCESS MENU SCREEN

Menu access depends on the function you select.

If you select the functions from the “Menu Screen Available Using The Select Dial” described on pg. 25 . . .

.... press the Select Dial. The Menu Screen appears.

If you select the functions from the “Menu Screen Available Using The MENU Button” described on pg. 25 and 26 . . .

.... press MENU. The Menu Screen appears.

SELECT FUNCTION

Rotate the Select Dial to place the highlight bar on the desired function.

4BACK

REC. TIME OFF

INT. TIME OFF TALLY LAMP ON

JLIP ID NO 07 DEMO MODE OFF

￿

4RETURN

Menu Screen 2

4

•To go from Menu Screen 1 to Menu Screen 2, rotate the Select Dial to “NEXT” and press it. To go back to Menu Screen 1 from Menu Screen 2, rotate the Select Dial to “BACK”, and press it.

•If the setting you want cannot be found in the Menu Screen, place the highlight bar on “RETURN”, then go to step 6.

MAKE SETTING

Press the Select Dial. The setting procedure depends on the function you select.

REC TIME

OFF 1/4S 1/2S

1S

5S

EXIT

4BACK

REC. TIME 1S

INT. TIME OFF TALLY LAMP ON JLIP ID NO 07 DEMO MODE OFF

Setting Menu (ex. REC TIME)

If you select “FOCUS”, “EXPOSURE”, “TITLE”, “DATE/TIME DISP.” or “DATE/ TIME” . . .

.... see respective pages (FOCUS: pg. 28, 29,

EXPOSURE: pg. 27, TITLE: pg. 23,

DATE/TIME DISP.: pg. 22, DATE/TIME: pg. 7).

If you select “WIDE”, “D.ZOOM”, “TELE MACRO” or “DEMO MODE” . . .

.... the selected function’s parameter starts blinking.

Rotate the Select Dial until the desired parameter appears. Go to step 5.

If you select “JLIP ID NO.” . . .

.... press the Select Dial so that the number blinks, then

rotate it until the desired number appears, and press it. Then rotate the Select Dial to move the highlight bar to “EXIT”.

If you select any other functions . . .

4RETURN

Normal Screen

NOTE:

No menu functions except “FOCUS” and “EXPOSURE” are available while in the Record mode.

5

6

.... rotate the Select Dial to move the highlight bar to the

desired setting.

If you decide you want to return to the previous setting, rotate the Select Dial to move the highlight bar to “EXIT”.

END SETTING

Press the Select Dial. The Menu Screen reappears with the highlight bar on “RETURN”.

CLOSE MENU SCREEN

Press the Select Dial. The normal screen reappears.

Page 24
Image 24
JVC GR-FX505, GR-FX305, GR-FX405 manual 24 EN, Using Menu For Detailed Adjustment, Make Setting, END Setting

GR-FX505, GR-FX305, GR-FX405 specifications

The JVC GR-FX405, GR-FX305, and GR-FX505 are part of JVC's popular line of compact camcorders from the early 2000s, designed to offer advanced video recording capabilities while remaining user-friendly and portable. Each model, while sharing core characteristics, has distinct features that cater to various user preferences and requirements.

The JVC GR-FX405 stands out with its impressive video quality, offering a 680,000 pixel CCD sensor that ensures sharp and clear images. This model boasts a 25x optical zoom, allowing users to capture distant subjects without significant loss of detail. Another highlight is its Digital Image Stabilizer (DIS), which minimizes the shakes and jitters common in handheld recording, resulting in smoother footage even during movement. The GR-FX405 also features a 2.5-inch LCD monitor, providing a clear view of the frame, which can be crucial for composing shots accurately.

Moving on to the JVC GR-FX305, this model is tailored for users looking for solid performance without an overload of features. It includes a 680,000 pixel CCD as well, ensuring high-quality imaging. The GR-FX305 sports a 16x optical zoom, which, while slightly less powerful than the FX405, still offers versatility for a variety of shooting situations. Users will appreciate the ease of use afforded by the model’s straightforward controls and its 2.5-inch LCD, which makes it simple to navigate settings and playback footage.

The JVC GR-FX505 is the flagship model in this series, amplifying the features of its predecessors. This camcorder steps up with a 800,000 pixel CCD sensor, enhancing image clarity and detail even further. It boasts a powerful 32x optical zoom, allowing for extreme close-ups without sacrificing quality. The GR-FX505 also integrates advanced video editing capabilities, enabling users to trim and join clips directly on the camcorder, which is perfect for creating quick edits without needing a computer. Additionally, the model features enhanced battery life, ensuring longer recording sessions without interruption.

In conclusion, the JVC GR-FX405, GR-FX305, and GR-FX505 offer users a range of features that enhance the video recording experience. From varying zoom capabilities to image stabilization and user-friendly interfaces, these camcorders serve different markets while maintaining JVC’s reputation for quality and innovation in the camcorder space. Whether for casual use or more serious videography, each model caters to the needs of its user base.