22EN

RECORDINGAdvancedFeatures(cont.)

Using Menu For Detailed Adjustment


This camcorder is equipped with an easy-to-use,

Select Dial

on-screen menu system that simplifies many of the more


detailed camcorder settings.

MENU Button

Display

(ex. Menu Screen available using the MENU Button)

4NEXT

Menu Screen 1

M. W. B.

AUTO

D . ZOOM

ON

TELE MACRO

OFF

DATE TIME


TAPE LENGTH T45

S TAPE

AUTO

4RETURN


1

2

3

SELECT OPERATION MODE

Turn the Power Switch to “PRO.”.

ACCESS MENU SCREEN

Menu access depends on the function you select.

If you select the functions from the “Menu Screen Available Using The Select Dial” described on pg. 23 . . .

.... press the Select Dial. The Menu Screen appears.

If you select the functions from the “Menu Screen Available Using The MENU Button” described on pg. 23 and 24 . . .

.... press MENU. The Menu Screen appears.

SELECT FUNCTION

Rotate the Select Dial to place the highlight bar on the desired function.

4BACK

REC. TIME OFF

INT. TIME OFF TALLY LAMP ON

JLIP ID NO 07 DEMO MODE OFF

￿

4RETURN

Menu Screen 2

4

•To go from Menu Screen 1 to Menu Screen 2, rotate the Select Dial to “NEXT” and press it. To go back to Menu Screen 1 from Menu Screen 2, rotate the Select Dial to “BACK”, and press it.

•If the setting you want cannot be found in the Menu Screen, place the highlight bar on “RETURN”, then go to step 6.

MAKE SETTING

Press the Select Dial. The setting procedure depends on the function you select.

REC TIME

OFF 1/4S 1/2S

1S

5S

EXIT

4BACK

REC. TIME 1S

INT. TIME OFF TALLY LAMP ON JLIP ID NO 07 DEMO MODE OFF

Setting Menu (ex. REC TIME)

If you select “FOCUS”, “EXPOSURE”, “TITLE”, “DATE/TIME DISP.” or “DATE/ TIME” . . .

.... see respective pages (FOCUS: pg. 26, 27,

EXPOSURE: pg. 25, TITLE: pg. 21,

DATE/TIME DISP.: pg. 20, DATE/TIME: pg. 7).

If you select “WIDE”, “D.ZOOM”, “TELE MACRO” or “DEMO MODE” . . .

.... the selected function’s parameter starts blinking.

Rotate the Select Dial until the desired parameter appears. Go to step 5.

If you select “JLIP ID NO.” . . .

.... press the Select Dial so that the number blinks, then

rotate it until the desired number appears, and press it. Then rotate the Select Dial to move the highlight bar to “EXIT”.

If you select any other functions . . .

4RETURN

Normal Screen

NOTE:

No menu functions except “FOCUS” and “EXPOSURE” are available while in the Record mode.

5

6

.... rotate the Select Dial to move the highlight bar to the

desired setting.

If you decide you want to return to the previous setting, rotate the Select Dial to move the highlight bar to “EXIT”.

END SETTING

Press the Select Dial. The Menu Screen reappears with the highlight bar on “RETURN”.

CLOSE MENU SCREEN

Press the Select Dial. The normal screen reappears.

Page 22
Image 22
JVC GR-SX20 manual 22 EN, Using Menu For Detailed Adjustment, Make Setting, END Setting

GR-SX20 specifications

The JVC GR-SX20 is a compact and innovative camcorder that gained popularity in the late 1990s for its remarkable features and user-friendly design. At the heart of the GR-SX20's appeal is its VHS-C format, which allows users to record video in a smaller, more manageable cassette size while maintaining a high level of picture quality typical of traditional VHS tapes. This format made it perfect for both amateur and semi-professional videographers seeking convenience without sacrificing performance.

One of the standout features of the GR-SX20 is its 1/4-inch Super VHS (S-VHS) capability, which enhances image clarity and detail compared to standard VHS. This feature is complemented by the camcorder's 20x optical zoom lens, allowing users to easily capture distant subjects without loss of sharpness. The built-in image stabilization technology further elevates the shooting experience by reducing the effects of shaky hands, resulting in smoother and more professional-looking videos.

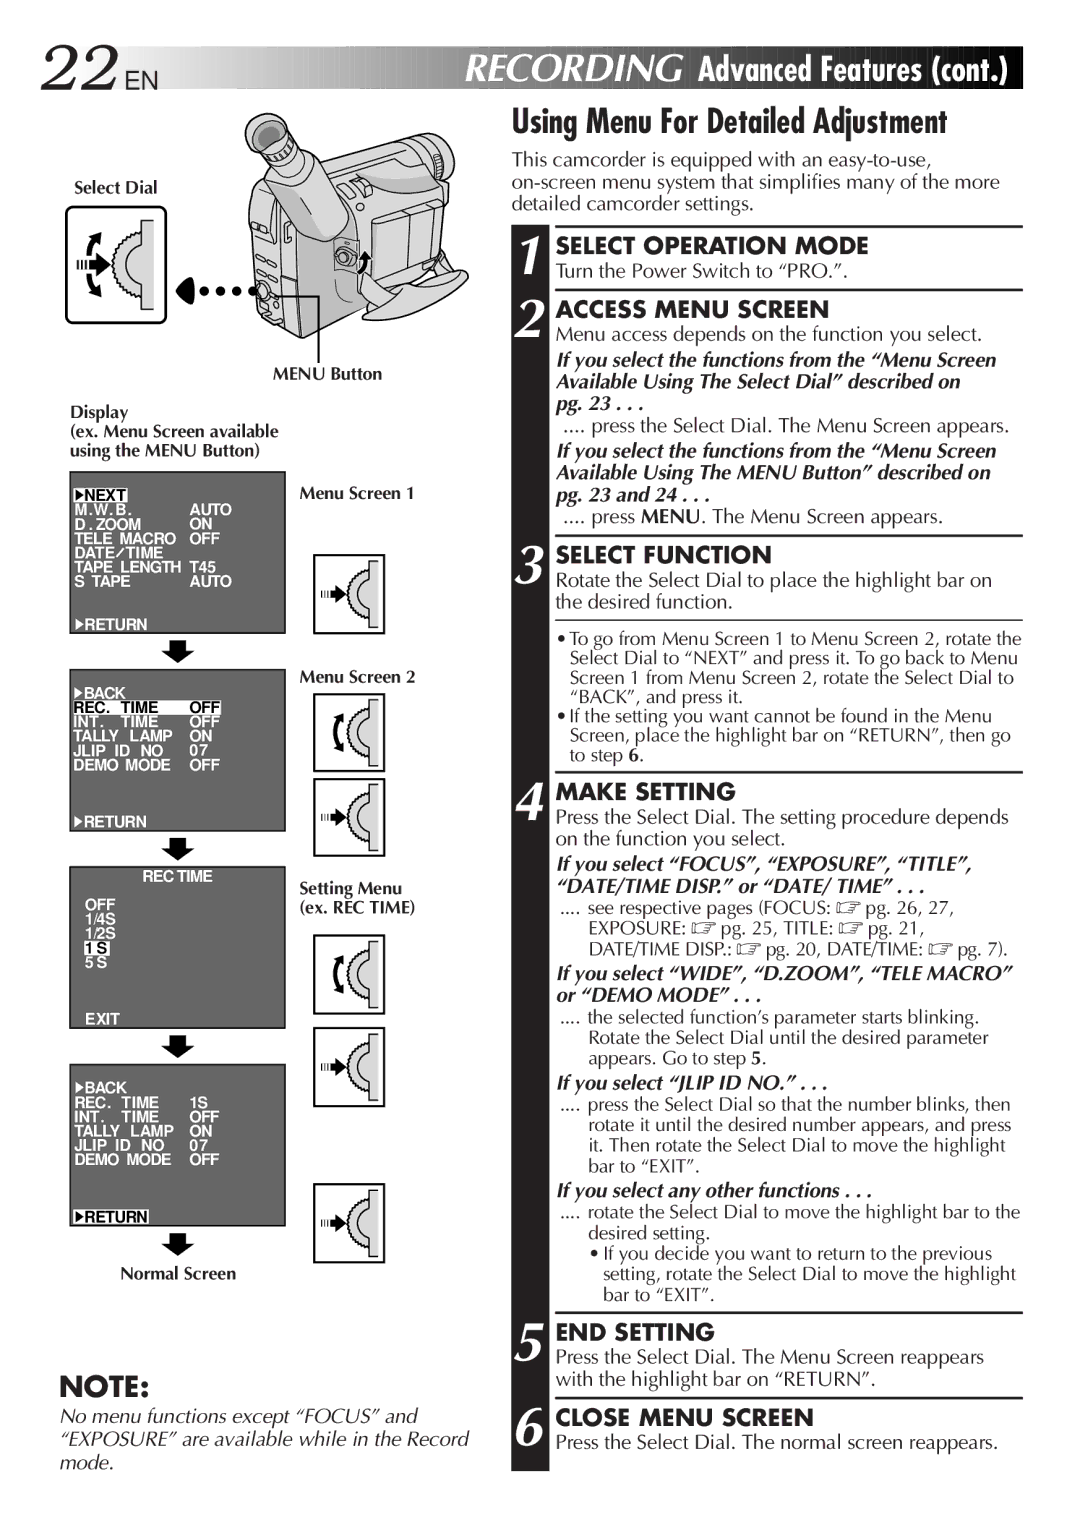
The GR-SX20 is equipped with a vibrant and clear LCD screen that simplifies framing shots and navigating through menus. This LCD display, combined with a 0.5-inch viewfinder, provides added versatility for shooting in various lighting conditions, as users can choose their preferred viewing method. Additionally, the camcorder's intuitive control layout enhances usability, making it easier for beginners to operate and access essential settings.

In terms of connectivity, the JVC GR-SX20 comes with composite video outputs, allowing users to easily transfer their footage to televisions or VCRs for playback. It also supports external microphones, giving users the option to enhance audio quality, which is crucial for capturing dialogue and ambient sounds during recordings.

Another significant feature is the camcorder's red-eye reduction and various shooting modes, which help users adapt to different environments and creative needs. The night shot mode allows for video recording in low-light conditions, making it suitable for nighttime events, while the digital effects and scene transitions offer opportunities for creative storytelling.

Overall, the JVC GR-SX20 is a versatile and capable camcorder that combines ease of use, excellent video quality, and a host of features, making it an appealing choice for aspiring videographers in the late ’90s and beyond. Its combination of performance and convenience helped it carve a niche in the ever-evolving world of video technology.