MENU SETTINGS
3)Press 3/8 ( and engage the VCR’s Record mode.
4)Engage the VCR’s
•Repeat steps 2) through 4) for additional editing, then stop the VCR and camcorder when finished.
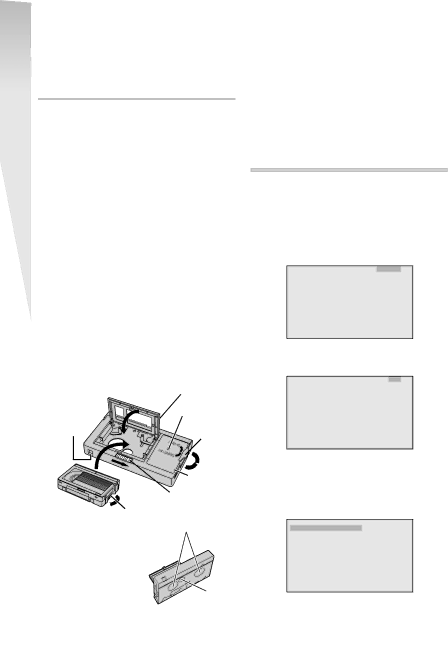
Using The Cassette Adapter
Use this to play back an
1)Slide the latch 1 to open the compartment
door, then insert the cassette and close the compartment door 2.
•If the colour shown in the window 4 is green or red, turn the dial 5 in the direction of “UNLOADING” so that colour changes to blue.
2)Turn the dial 5 in the direction of “LOADING” all the way until it stops.
•The color shown in the window 4 changes from blue \ red \ green (indicating playback is possible).
3)Load the cassette adapter into the VCR and play the tape back.
•To record on a VCR using a compact cassette and the adapter, cover the adapter’s recording safety hole with Adhesive tape.
4)To unload the cassette, turn the dial 5 in the direction of “UNLOADING” all the way until it stops.
•The color shown in the window 4 changes from green \ red \ blue (indicating unloading is possible).
5)Slide the latch 1 to open the compartment door, then insert your finger in the hole 6, and push up and remove the cassette.
6)Close the compartment door 2.
2 Compartment door
4 Window
Recording |
|
safety hole | 5 Dial |
| |
| The protec- |
| tion sheet is |
| 1 Latch affixed |
3 Gear | 7 Reels |
| |
Compact video cassette |
|
6 Hole
•If there is slack in the video tape when inserting the compact cassette into the
adapter, the tape may become damaged. To take up slack in the tape, turn the gear 3 in the direction of the arrow.
•During tape loading and unloading, do not touch the reels 7 for safety and tape protection.
•Tapes recorded in
•During
MENU SETTINGS
This Menu Screen cannot be accessed while recording.
1)Set the Power Switch $ to “![]() ” while pressing down the Lock Button #.
” while pressing down the Lock Button #.
2)Press the MENU Wheel 1 in. The TOP MENU Screen appears. Rotate the MENU Wheel 1 to select the desired menu or function and press it.
|
| T O P | M E N U |
E | X P O | S U R E | A U T O |
L I G H T | O F F | ||
P . A E | O F F | ||
D I G I F E C T | O F F | ||
F A D E / W I P E O F F | |||
R E C M O D E | S P | ||
2 T O C A M E R A M E N U 2 T O S Y S T E M M E N U
2 E X I T
•To go from TOP MENU to CAMERA MENU, rotate the MENU Wheel 1 to select “3 TO CAMERA MENU” and press it.
|
| C A M E R A | M E N U | ||
S | T A | B I L I Z E R | O F F | ||
S . L X | M A X . | ||||
D . Z O O M | 5 | 0 | x | ||
W I D E | O F F | ||||
T E L E M A C R O | O F F | ||||
2 M . W . B . | A U T O | ||||
2 T I T L E |
|
|
| ||
2 T I T L E S E T U P
2E X I T
•To go from TOP MENU to SYSTEM MENU, rotate the MENU Wheel 1 to select “3 TO SYSTEM MENU” and press it. SYSTEM MENU has 2 pages. To go to the next page, rotate the MENU Wheel 1 to select “3 TO SYSTEM MENU 2” and press it.
![]() S Y S T E M M E N U 1
S Y S T E M M E N U 1 ![]() T A P E L E N G T H T 3 0
T A P E L E N G T H T 3 0
D I S P L A YF U L L
O S D O U T P U T O N L C D B R I G H T
2 D A T E / T I M E D I S P .
2 D A T E / T I M E S E T
2 T O S Y S T E M M E N U 2
2 E X I T
3)Rotate the Menu Wheel 1 to select the desired setting and press it.
4)Press “3 EXIT” to exit from any menu.
12
