36NENUTTIGEFUNCTIES(vervolg)

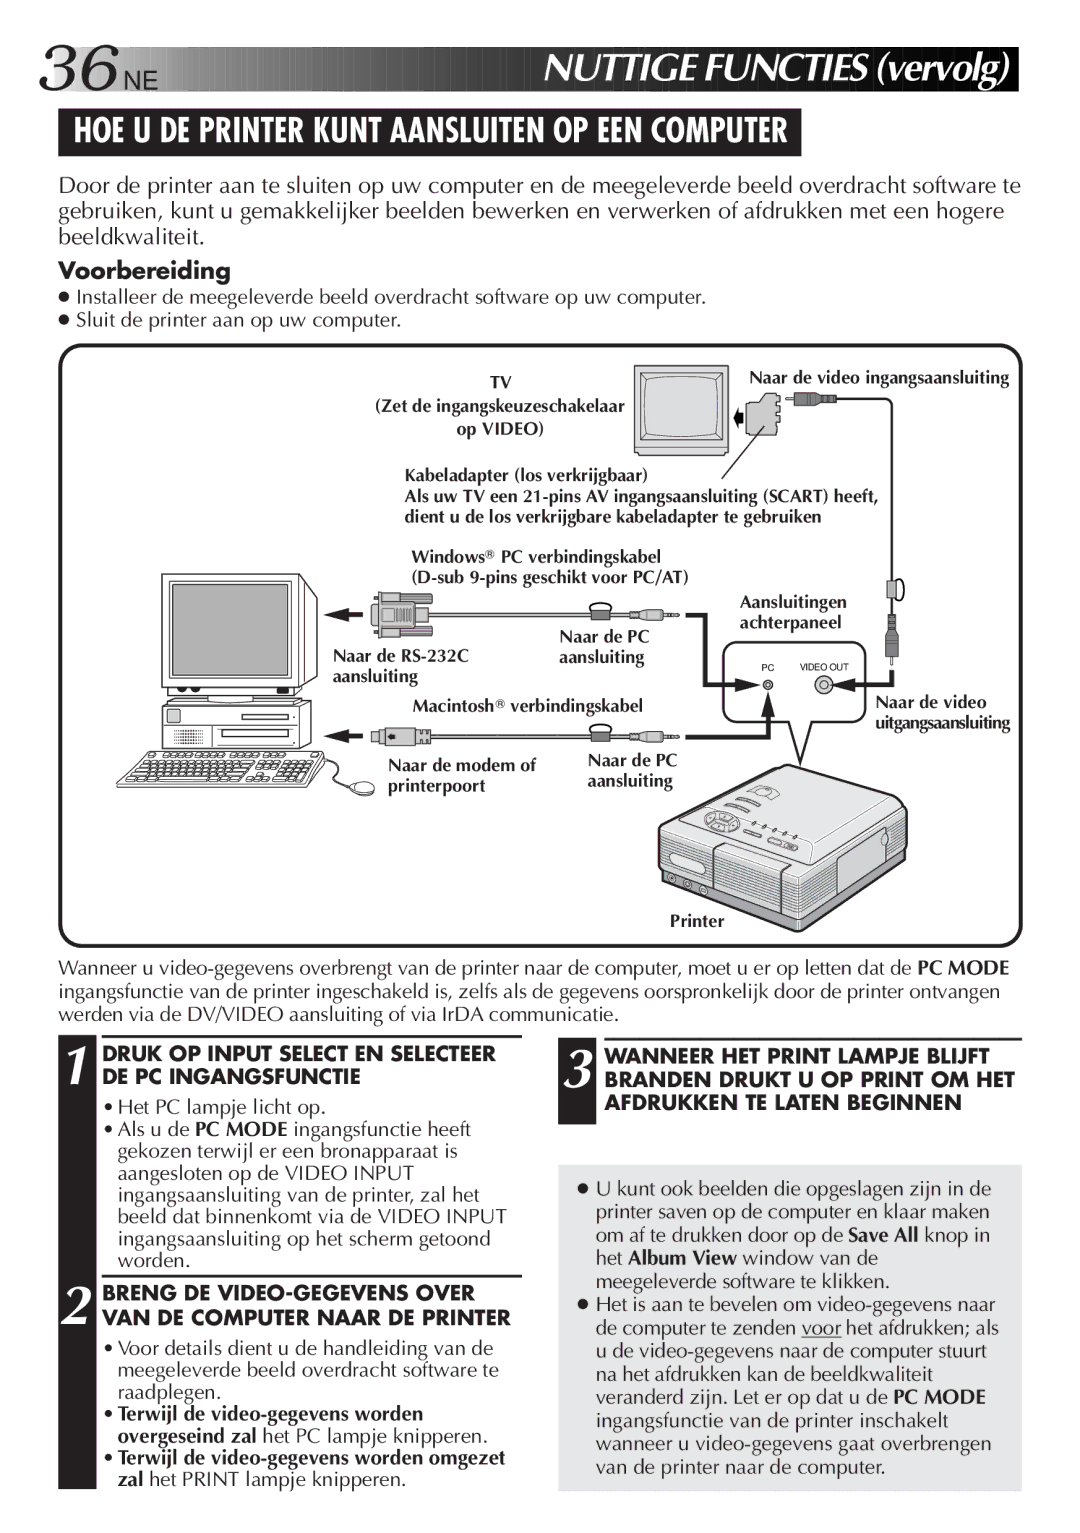
HOE U DE PRINTER KUNT AANSLUITEN OP EEN COMPUTER

Door de printer aan te sluiten op uw computer en de meegeleverde beeld overdracht software te gebruiken, kunt u gemakkelijker beelden bewerken en verwerken of afdrukken met een hogere beeldkwaliteit.

Voorbereiding

Installeer de meegeleverde beeld overdracht software op uw computer.

Sluit de printer aan op uw computer.

TV

(Zet de ingangskeuzeschakelaar

op VIDEO)

Naar de video ingangsaansluiting

Kabeladapter (los verkrijgbaar)

Als uw TV een 21-pins AV ingangsaansluiting (SCART) heeft, dient u de los verkrijgbare kabeladapter te gebruiken

Windows® PC verbindingskabel (D-sub 9-pins geschikt voor PC/AT)

Naar de RS-232C

Naar de PC

aansluiting

aansluiting


Macintosh® verbindingskabel

Naar de modem of

Naar de PC

printerpoort

aansluiting

Aansluitingen achterpaneel

PC

VIDEO OUT


Naar de video uitgangsaansluiting

Printer

Wanneer u video-gegevens overbrengt van de printer naar de computer, moet u er op letten dat de PC MODE ingangsfunctie van de printer ingeschakeld is, zelfs als de gegevens oorspronkelijk door de printer ontvangen werden via de DV/VIDEO aansluiting of via IrDA communicatie.

1

2

DRUK OP INPUT SELECT EN SELECTEER DE PC INGANGSFUNCTIE

Het PC lampje licht op.

Als u de PC MODE ingangsfunctie heeft gekozen terwijl er een bronapparaat is aangesloten op de VIDEO INPUT ingangsaansluiting van de printer, zal het beeld dat binnenkomt via de VIDEO INPUT ingangsaansluiting op het scherm getoond worden.

BRENG DE VIDEO-GEGEVENS OVER VAN DE COMPUTER NAAR DE PRINTER

Voor details dient u de handleiding van de meegeleverde beeld overdracht software te raadplegen.

Terwijl de video-gegevens worden overgeseind zal het PC lampje knipperen.

Terwijl de video-gegevens worden omgezet zal het PRINT lampje knipperen.

3 WANNEER HET PRINT LAMPJE BLIJFT BRANDEN DRUKT U OP PRINT OM HET AFDRUKKEN TE LATEN BEGINNEN

U kunt ook beelden die opgeslagen zijn in de printer saven op de computer en klaar maken om af te drukken door op de Save All knop in het Album View window van de meegeleverde software te klikken.

Het is aan te bevelen om video-gegevens naar de computer te zenden voor het afdrukken; als u de video-gegevens naar de computer stuurt na het afdrukken kan de beeldkwaliteit veranderd zijn. Let er op dat u de PC MODE ingangsfunctie van de printer inschakelt wanneer u video-gegevens gaat overbrengen van de printer naar de computer.

Page 36
Image 36
JVC GV-DT3 manual HOE U DE Printer Kunt Aansluiten OP EEN Computer, Druk OP Input Select EN Selecteer DE PC Ingangsfunctie

GV-DT3 specifications

The JVC GV-DT3 is a sophisticated digital video recorder designed to meet the needs of both amateur and professional videographers. It stands out for its compact design, ease of use, and advanced features that enhance video recording and playback. One of the key characteristics of the GV-DT3 is its ability to handle various video formats, including MiniDV and DV tapes, making it a versatile tool for users who may be working with a range of media.

Equipped with a high-quality LCD screen, the GV-DT3 allows for easy monitoring of footage during recording and playback. The screen is bright and clear, ensuring that users can accurately assess image quality and make adjustments on the fly. Another significant feature is the built-in digital image stabilization technology, which helps to minimize shaky footage, resulting in smoother and more professional-looking videos.

The GV-DT3 also boasts a host of connectivity options, including USB and FireWire ports. This versatility allows for seamless transfer of video files to computers for editing and archiving. Users can easily share their content with others or edit their projects using a variety of video editing software applications. Additionally, the device supports both NTSC and PAL formats, widening its usability across different regions.

An important aspect of the JVC GV-DT3 is its user-friendly interface. The layout of the controls is intuitive, allowing users to quickly access essential functions without navigating complicated menus. This ease of use is particularly advantageous for those who are new to video production, as it lowers the barriers to capturing high-quality footage.

In terms of build quality, the GV-DT3 is designed to be lightweight yet durable, making it a practical option for on-the-go videographers. Its robust construction ensures that it can withstand the rigors of frequent use without compromising performance. Overall, the JVC GV-DT3 is a compelling choice for anyone looking to record high-quality video with flexibility and ease. With its blend of advanced technology, practical features, and user-friendly design, it remains a popular option within the digital video recorder market.