NE 19

Normaal zult u afdrukken van goede kwaliteit krijgen door gewoon het afdruktype en het papierformaat in te stellen. Door de hieronder beschreven menu’s te gebruiken kunt u echter afdrukken van nog hogere kwaliteit krijgen.

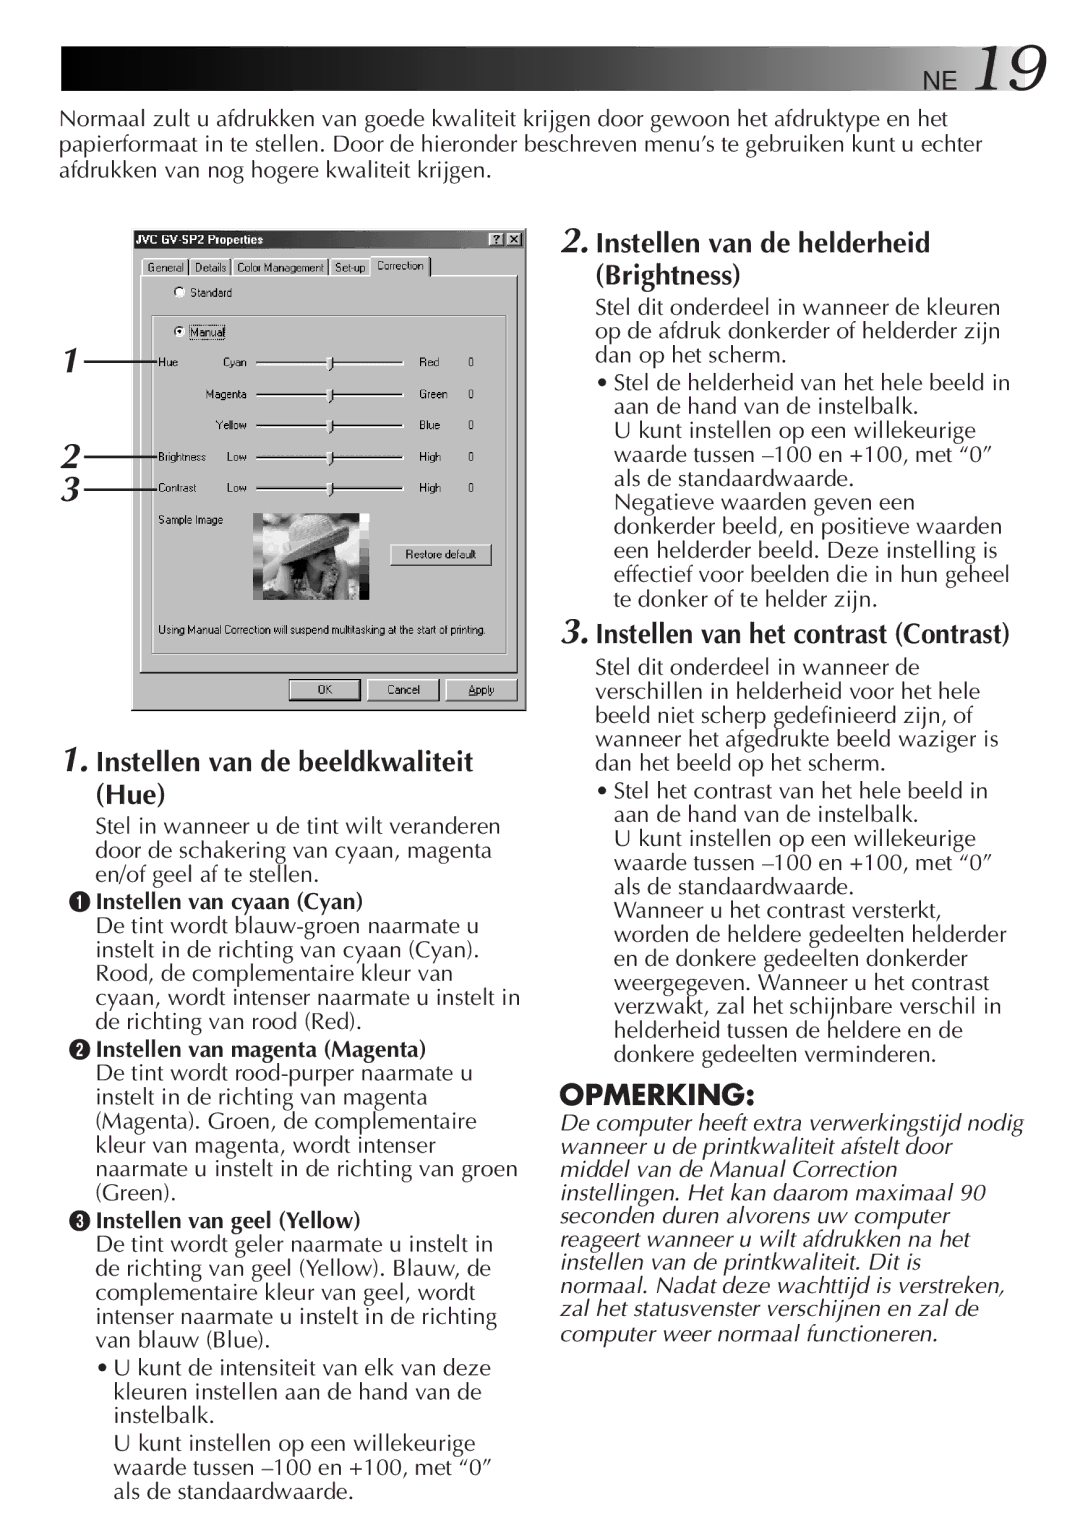
1

2

3

1.Instellen van de beeldkwaliteit

(Hue)

Stel in wanneer u de tint wilt veranderen door de schakering van cyaan, magenta en/of geel af te stellen.

1Instellen van cyaan (Cyan)

De tint wordt blauw-groen naarmate u instelt in de richting van cyaan (Cyan). Rood, de complementaire kleur van cyaan, wordt intenser naarmate u instelt in de richting van rood (Red).

2Instellen van magenta (Magenta)

De tint wordt rood-purper naarmate u instelt in de richting van magenta (Magenta). Groen, de complementaire kleur van magenta, wordt intenser naarmate u instelt in de richting van groen (Green).

3Instellen van geel (Yellow)

De tint wordt geler naarmate u instelt in de richting van geel (Yellow). Blauw, de complementaire kleur van geel, wordt intenser naarmate u instelt in de richting van blauw (Blue).

U kunt de intensiteit van elk van deze kleuren instellen aan de hand van de instelbalk.

U kunt instellen op een willekeurige waarde tussen –100 en +100, met “0” als de standaardwaarde.

2.Instellen van de helderheid

(Brightness)

Stel dit onderdeel in wanneer de kleuren op de afdruk donkerder of helderder zijn dan op het scherm.

Stel de helderheid van het hele beeld in aan de hand van de instelbalk.

U kunt instellen op een willekeurige waarde tussen –100 en +100, met “0” als de standaardwaarde.

Negatieve waarden geven een donkerder beeld, en positieve waarden een helderder beeld. Deze instelling is effectief voor beelden die in hun geheel te donker of te helder zijn.

3.Instellen van het contrast (Contrast)

Stel dit onderdeel in wanneer de verschillen in helderheid voor het hele beeld niet scherp gedefinieerd zijn, of wanneer het afgedrukte beeld waziger is dan het beeld op het scherm.

Stel het contrast van het hele beeld in aan de hand van de instelbalk.

U kunt instellen op een willekeurige waarde tussen –100 en +100, met “0” als de standaardwaarde.

Wanneer u het contrast versterkt, worden de heldere gedeelten helderder en de donkere gedeelten donkerder weergegeven. Wanneer u het contrast verzwakt, zal het schijnbare verschil in helderheid tussen de heldere en de donkere gedeelten verminderen.

OPMERKING:

De computer heeft extra verwerkingstijd nodig wanneer u de printkwaliteit afstelt door middel van de Manual Correction instellingen. Het kan daarom maximaal 90 seconden duren alvorens uw computer reageert wanneer u wilt afdrukken na het instellen van de printkwaliteit. Dit is normaal. Nadat deze wachttijd is verstreken, zal het statusvenster verschijnen en zal de computer weer normaal functioneren.

Page 19
Image 19
JVC GV-SP2 manual Instellen van cyaan Cyan, Instellen van magenta Magenta, Instellen van geel Yellow

GV-SP2 specifications

The JVC GV-SP2 is a versatile and compact video production tool designed for content creators and professionals seeking high-quality output. Its lightweight design and robust features make it an ideal choice for live event production, streaming, and video recording.

One of the standout features of the JVC GV-SP2 is its ability to support 4K video recording. With a resolution of 3840 x 2160 pixels, users can capture incredibly sharp images and videos with vibrant colors and detailed textures. This makes it suitable for high-definition broadcasts and professional content creation. In addition to 4K capabilities, the GV-SP2 also supports various HD recording formats, providing flexibility depending on the project requirements.

The GV-SP2 is equipped with a built-in streaming encoder, allowing for real-time streaming to popular platforms such as YouTube and Facebook Live. This functionality is essential for today’s digital landscape where live engagement with audiences is paramount. The encoder supports various streaming protocols, ensuring compatibility with a range of streaming services and network infrastructures.

Another notable feature of the GV-SP2 is its user-friendly interface. The device features a touchscreen display, making it easy to navigate through settings and options. Users can quickly adjust parameters such as resolution, frame rate, and audio settings with minimal effort. This intuitive design ensures that even those with limited technical knowledge can operate the device effectively.

In terms of connectivity, the JVC GV-SP2 offers multiple input and output options. It includes HDMI inputs for connecting cameras and other video sources, as well as audio inputs for integrating high-quality sound. The device also features Ethernet and USB ports, which facilitate easy file transfer and network connectivity. This versatility in connectivity options makes it easy to integrate the GV-SP2 into various production workflows.

Battery life is another critical consideration for video production, and the GV-SP2 is equipped with a long-lasting battery, ensuring that users can record extended sessions without interruption. This feature is particularly useful for field productions or events where charging opportunities may be limited.

In conclusion, the JVC GV-SP2 is an advanced video production tool that combines high-definition recording, real-time streaming capabilities, and user-friendly operation. Its versatility and range of features make it a standout choice for professionals in the video production industry, ready to meet the demands of modern content creation.