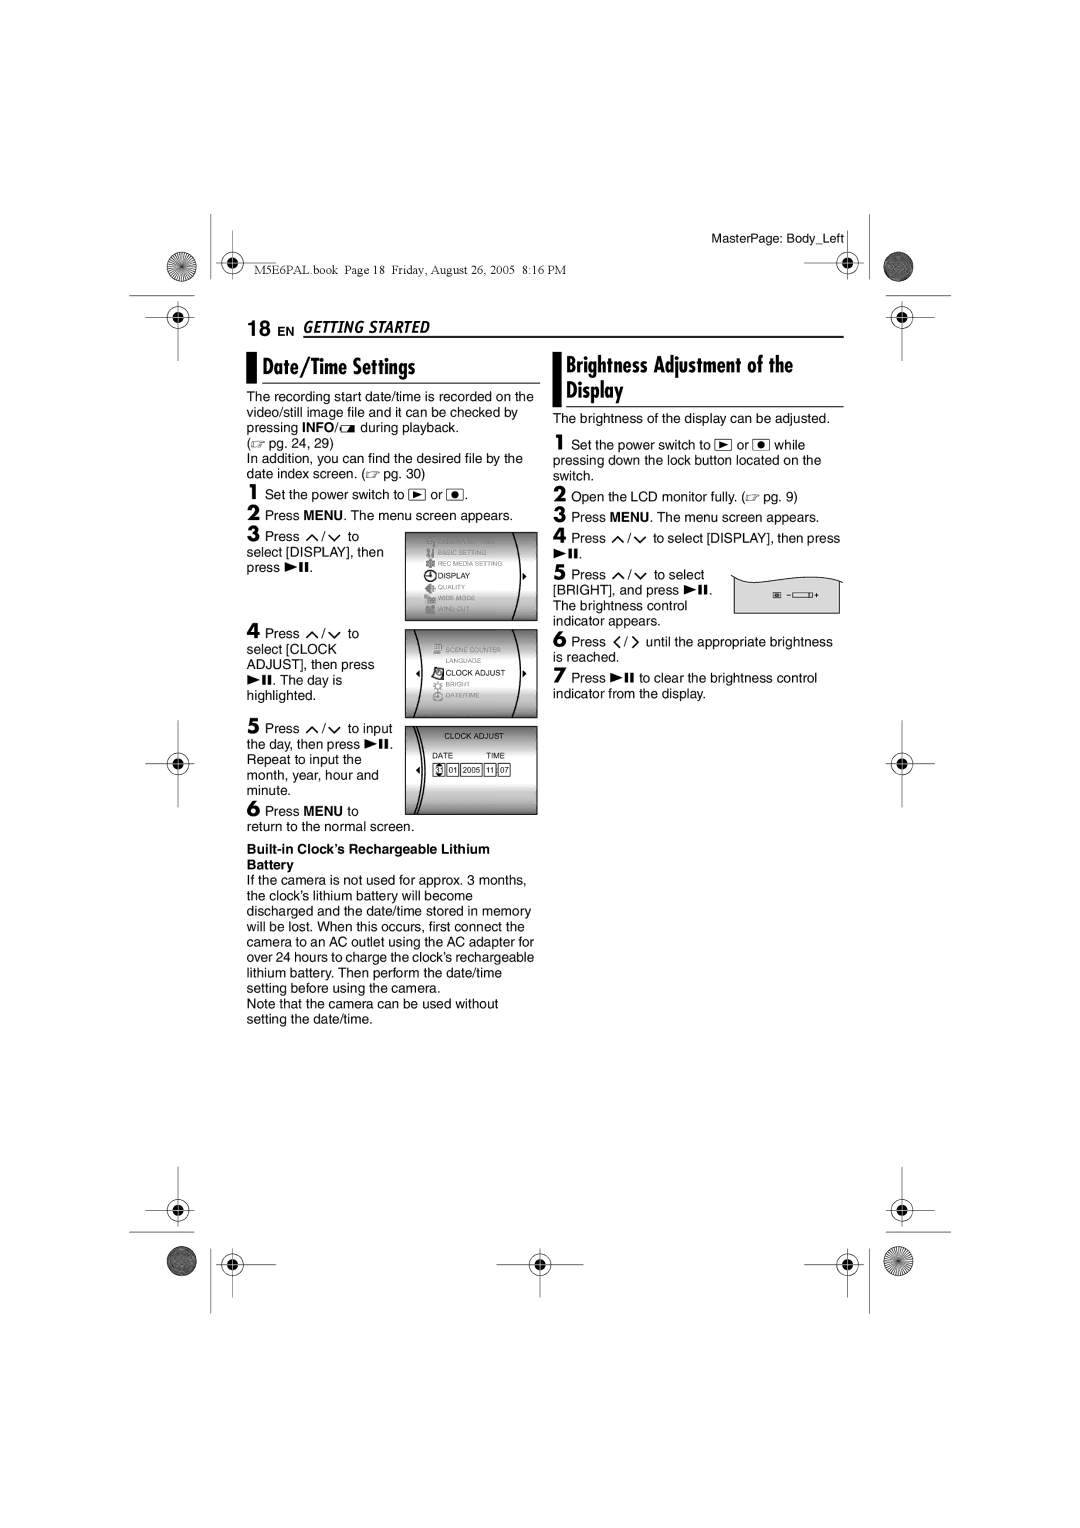
JVC GZ-MG70EK manual Date/Time Settings Brightness Adjustment, Display

Models: GZ-MG70E GZ-MG70EK

1 64
Download 64 pages 13.18 Kb
Page 18
Image 18

MasterPage: Body_Left M5E6PAL.book Page 18 Friday, August 26, 2005 8:16 PM

18 EN GETTING STARTED


Date/Time Settings


Brightness Adjustment of the


Display


The recording start date/time is recorded on the


video/still image file and it can be checked by


The brightness of the display can be adjusted.


pressing INFO/


during playback.


( pg. 24, 29)


1 Set the power switch to

or

while


In addition, you can find the desired file by the


pressing down the lock button located on the


date index screen. ( pg. 30)


switch.


1 Set the power switch to

or .


2 Open the LCD monitor fully. ( pg. 9)


2 Press MENU. The menu screen appears.


3 Press MENU. The menu screen appears.


3 Press

/


to


4 Press

/

to select [DISPLAY], then press


CAMERA SETTING


select [DISPLAY], then


BASIC SETTING

49


.


press 49.


REC MEDIA SETTING


5 Press

/

to select


DISPLAY


QUALITY


[BRIGHT], and press 49.


WIDE MODE


The brightness control


WIND CUT


4 Press


indicator appears.


/


to


6 Press

/

until the appropriate brightness


select [CLOCK


SCENE COUNTER


is reached.


ADJUST], then press


LANGUAGE


CLOCK ADJUST


7 Press 49 to clear the brightness control


49. The day is


BRIGHT


highlighted.


DATE/TIME


indicator from the display.


5 Press

/


to input


CLOCK ADJUST


the day, then press 49.


DATE

TIME


Repeat to input the


month, year, hour and


31 01

2005

11 : 07


minute.


6 Press MENU to


return to the normal screen.


Built-in Clock’s Rechargeable Lithium


Battery


If the camera is not used for approx. 3 months,


the clock’s lithium battery will become


discharged and the date/time stored in memory


will be lost. When this occurs, first connect the


camera to an AC outlet using the AC adapter for


over 24 hours to charge the clock’s rechargeable


lithium battery. Then perform the date/time


setting before using the camera.


Note that the camera can be used without


setting the date/time.


Page 18
Image 18
JVC GZ-MG70EK manual Date/Time Settings Brightness Adjustment, Display, Built-in Clock’s Rechargeable Lithium Battery

GZ-MG70E, GZ-MG70EK specifications

The JVC GZ-MG70EK and GZ-MG70E are part of JVC's popular Everio line of camcorders that captures the essence of convenience and high-quality video recording. Launched in the mid-2000s, these models are renowned for their user-friendly interface and robust features that cater to both amateur videographers and seasoned professionals seeking a reliable compact camcorder.

One of the standout features of the GZ-MG70EK and GZ-MG70E is their 30GB built-in hard disk drive. This generous storage capacity allows users to record hours of high-quality video without the need to carry extra tapes or memory cards. The hard disk drive technology ensures smooth recording and playback, while also providing quick access to your video library. The devices also support recording in MPEG-2 format, which strikes a balance between file size and quality, making it easy to share videos online or transfer them to other devices.

Both models boast a powerful 1/6-inch CCD sensor, which captures vivid images with a resolution of up to 640x480 pixels. This sensor contributes to a vibrant color reproduction and enhances low-light performance, making the camcorders suitable for various lighting conditions. Additionally, the GZ-MG70EK and GZ-MG70E come equipped with JVC's powerful 16x optical zoom lens, allowing users to get close to their subjects without a loss in quality. This feature is particularly useful for capturing distant subjects or action shots without sacrificing detail.

The ergonomic design of the GZ-MG70EK and GZ-MG70E ensures that they are comfortable to hold for extended periods. The intuitive controls are positioned for easy access, allowing users to adjust settings on the fly. The built-in 2.5-inch LCD screen provides a clear view of your subjects, making it easy to frame shots accurately. Furthermore, the devices include digital image stabilization technology, which helps minimize shaky footage, a common concern for handheld videography.

Connectivity options on the GZ-MG70EK and GZ-MG70E include USB and AV outputs, facilitating easy transfer of videos to computers or televisions for sharing with friends and family. The devices also support SD card slots for additional storage flexibility, catering to users who require more space for their recordings.

Overall, the JVC GZ-MG70EK and GZ-MG70E stand out in their category for their impressive features, reliability, and ease of use, making them suitable options for a wide range of video recording needs. Whether capturing family moments or documenting events, these camcorders provide an enjoyable recording experience with professional-quality results.