Timer Recording
Up to 8 timer recording programs can be made using Express timer programing method as far as a year in advance. Remember, the clock must be set before you can program the timer.
NOTES:
●If all the 8 programs have already been set, “PROGRAM FULL” or “Full” appears on the TV screen or the display panel.
●After timer recording is completed, the VCR turns off automatically.
●You can program the timer recording while a regular recording is in progress; the menu screens will not be recorded.
●To
●Even if a power failure occurs, the VCR keeps your timer programs. However, the clock time, channel settings, and other menu settings are lost. As a result, when the power is supplied again to this VCR after the power failure, this VCR starts the Plug&Play setting automatically to restore the clock time and channel setting. If the clock time and channel setting are restored correctly, each timer program you have made will start at its start time unless its end time has elapsed.
CPress OK or PROG..
●If “PROGRAM NOT COMPLETED PROGRAM OVERLAP” appears, see “Program overlap warning display”.
DPress TIMER. The VCR turns off automatically and “#” is displayed on the display panel.
To use the VCR while it is in timer recording standby mode
Press TIMER, then press POWER. After you use the VCR, press TIMER again to put the VCR into timer recording standby mode.
Checking, canceling or changing program settings
ADisengage timer
Press TIMER, then press POWER.
●When “AUTO TIMER” is set to “ON”, you do not have to press
TIMER.
Express Timer Programing
Load a cassette with the record safety tab intact. The VCR turns on, and the counter is reset, automatically.
BAccess Program Check screen
Press PROG. CHECK.
CAccess Program screen
Press PROG. CHECK again. Each time you press PROG. CHECK, the next program’s Program screen appears.
PR START | STOP | CH | DATE | ||||||
1 | 8:00P | 10:00 | 12 |
| 12/24 | ||||
2 | 10:00A | 10:45 | 40 |
| 12/25 | ||||
3 | 11:30P | 1:00 | 125 |
| 12/25 | ||||
4 |
|
|
|
|
|
|
|
|
|
5 |
|
|
|
|
|
|
|
|
|
6 |
|
|
|
|
|
|
|
|
|
7 |
|
|
|
|
|
|
|
|
|
8 |
|
|
|
|
|
|
|
|
|
| PRESS (CHECK) TO NEXT | ||||||||
| PROGRAM 1 |
|
|
| |||||
| START |
|
|
| STOP |
|
|
| |
| 8:00 PM |
|
|
| 10:00 PM |
| |||
| DATE |
|
|
| CH |
|
|
| |
| 12/24/00 |
|
|
| 12 |
| SP |
|
|
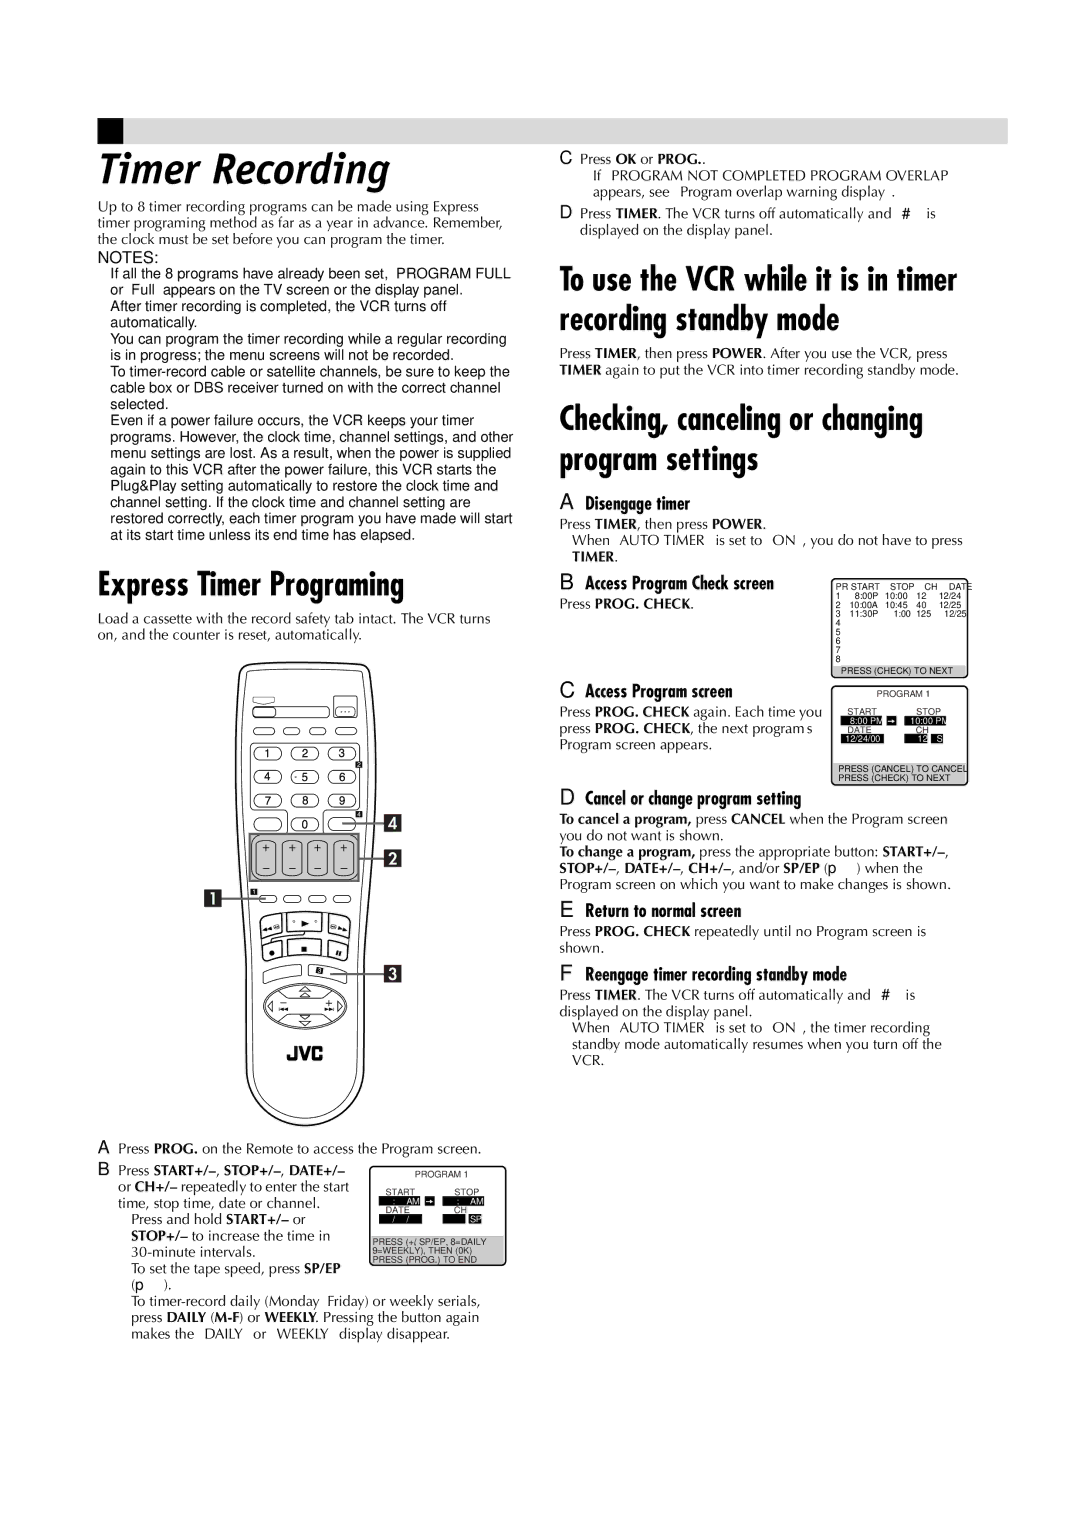
APress PROG. on the Remote to access the Program screen.
B Press |
| PROGRAM 1 |
| ||||||||
or CH+/– repeatedly to enter the start |
| START | STOP |
| |||||||
time, stop time, date or channel. |
| – |
|
|
| – |
| ||||
| DATE | CH |
| ||||||||
● Press and hold START+/– or |
|
| |||||||||
| – |
|
|
| – – – |
| SP |
|
| ||
|
|
| |||||||||
STOP+/– to increase the time in |
|
| |||||||||
PRESS |
| ||||||||||
9=WEEKLY), THEN (0K) |
| ||||||||||
● To set the tape speed, press SP/EP | PRESS (PROG.) TO END |
| |||||||||
|
|
|
|
|
|
|
|
|
|
| |
(p).
● To
PRESS (CANCEL) TO CANCEL
PRESS (CHECK) TO NEXT
DCancel or change program setting
To cancel a program, press CANCEL when the Program screen you do not want is shown.
To change a program, press the appropriate button:
EReturn to normal screen
Press PROG. CHECK repeatedly until no Program screen is shown.
FReengage timer recording standby mode
Press TIMER. The VCR turns off automatically and “#” is displayed on the display panel.
●When “AUTO TIMER” is set to “ON”, the timer recording standby mode automatically resumes when you turn off the VCR.