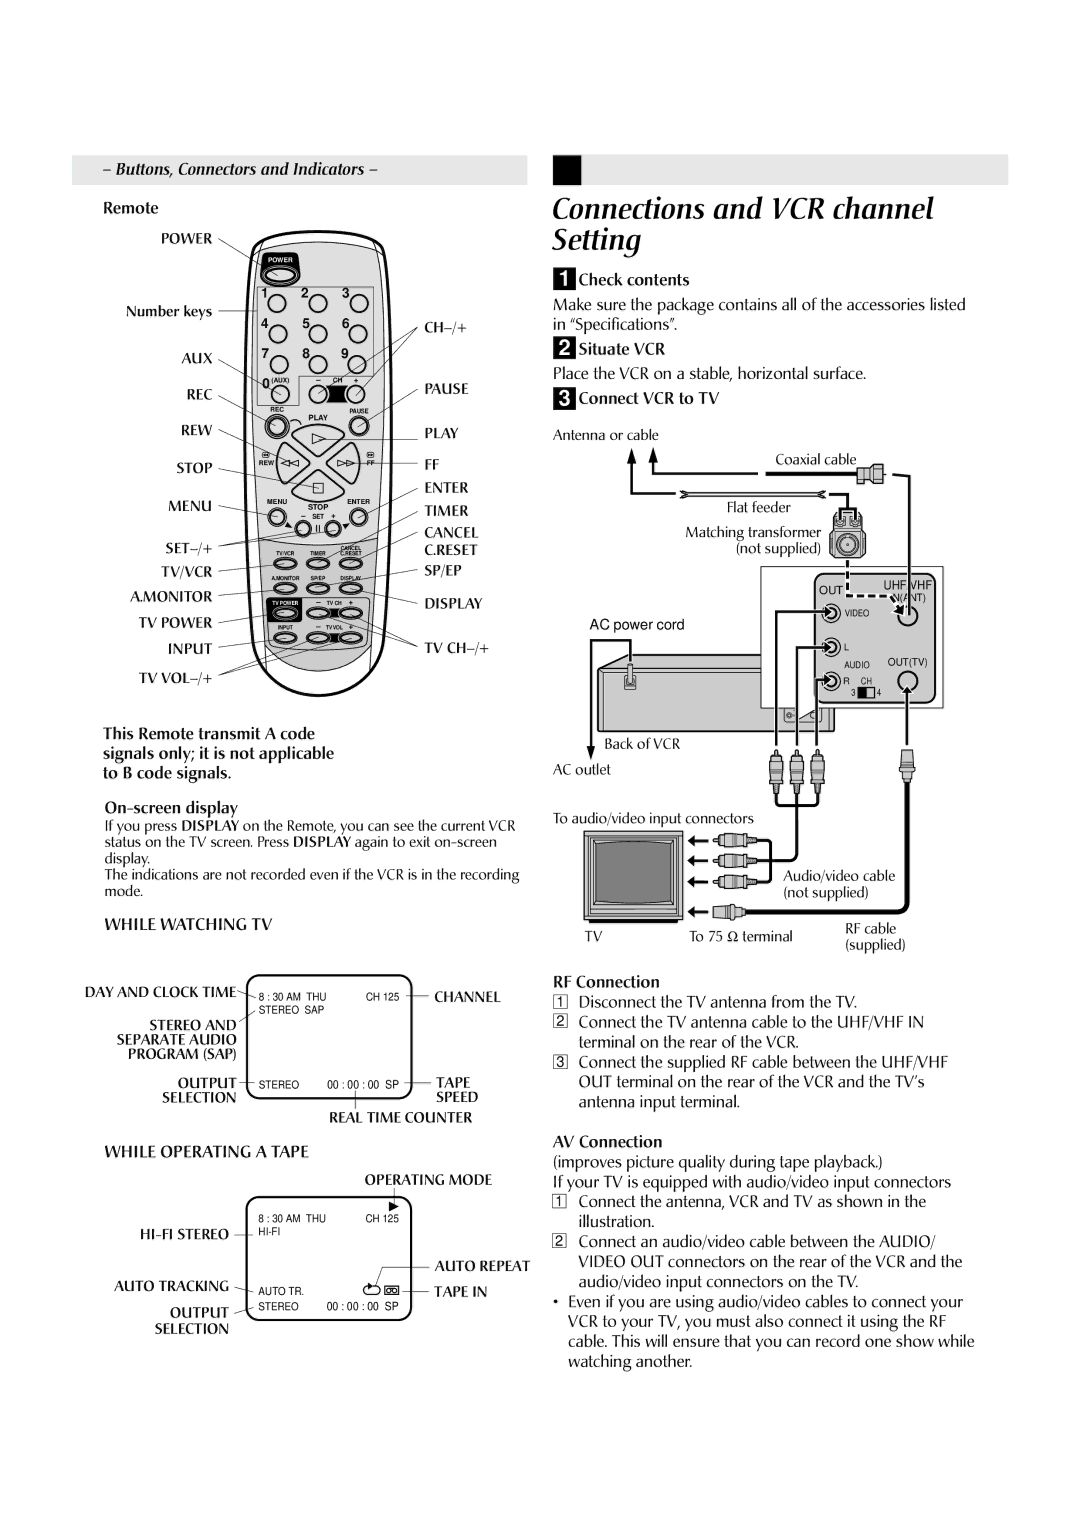
– Buttons, Connectors and Indicators –

Remote

POWER

Number keys

AUX

REC

REW

STOP

POWER

1 2 3

4

5

6


CH–/+

7

8

9


0 (AUX)

CH

+

PAUSE


REC

PLAY


PAUSE


PLAY

REW


FF

FF

ENTER

Connections and VCR channel Setting

1Check contents

Make sure the package contains all of the accessories listed in “Specifications”.

2Situate VCR

Place the VCR on a stable, horizontal surface.

3Connect VCR to TV

Antenna or cable

Coaxial cable

MENU

MENU

STOP

ENTER

TIMER

+


SET

SET–/+


CANCEL

TV/VCR

TIMER

CANCEL

C.RESET

C.RESET

TV/VCR

A.MONITOR

SP/EP

DISPLAY

SP/EP

Flat feeder

Matching transformer (not supplied)

A.MONITOR

TV POWER

TV CH +

DISPLAY


TV POWER

INPUT

TV VOL +


INPUT


TV CH–/+

TV VOL–/+


This Remote transmit A code signals only; it is not applicable to B code signals.

AC power cord

Back of VCR

AC outlet

OUT

UHF/VHF

IN(ANT)


VIDEO


L


AUDIO

OUT(TV)

R CH


3

4

R

On-screen display

If you press DISPLAY on the Remote, you can see the current VCR status on the TV screen. Press DISPLAY again to exit on-screen display.

The indications are not recorded even if the VCR is in the recording mode.

WHILE WATCHING TV

DAY AND CLOCK TIME


8 : 30 AM THU


CH 125


CHANNEL

STEREO AND


STEREO SAP


SEPARATE AUDIO


PROGRAM (SAP)


OUTPUT


STEREO

00 : 00 : 00 SP


TAPE


SELECTION


SPEED

REAL TIME COUNTER

WHILE OPERATING A TAPE


OPERATING MODE


8 : 30 AM THU

CH 125

HI-FI STEREO


HI-FI


AUTO REPEAT


AUTO TRACKING


AUTO TR.


TAPE IN


OUTPUT


STEREO

00 : 00 : 00 SP


SELECTION


To audio/video input connectors


Audio/video cable


(not supplied)

TV

To 75

terminal

RF cable

(supplied)


RF Connection

1Disconnect the TV antenna from the TV.

2Connect the TV antenna cable to the UHF/VHF IN terminal on the rear of the VCR.

3Connect the supplied RF cable between the UHF/VHF OUT terminal on the rear of the VCR and the TV’s antenna input terminal.

AV Connection

(improves picture quality during tape playback.)

If your TV is equipped with audio/video input connectors

1Connect the antenna, VCR and TV as shown in the illustration.

2Connect an audio/video cable between the AUDIO/ VIDEO OUT connectors on the rear of the VCR and the audio/video input connectors on the TV.

Even if you are using audio/video cables to connect your VCR to your TV, you must also connect it using the RF cable. This will ensure that you can record one show while watching another.

Page 4
Image 4
JVC HR-A590U Connections and VCR channel Setting, Remote, On-screen display, While Watching TV, While Operating a Tape

HR-A590U specifications

The JVC HR-A590U is a high-performance VHS VCR that combines a vintage aesthetic with advanced technology, catering to both casual viewers and avid collectors of video content. Released during an era when VHS was the dominant medium for home entertainment, the HR-A590U stands out due to its robust features and reliable performance.

One of the main highlights of the JVC HR-A590U is its advanced playback capabilities. The VCR supports both long play (LP) and standard play (SP) modes, allowing users to choose between extended recording times or enhanced playback quality. This versatility makes it an ideal choice for recording movies, TV shows, or personal content, ensuring that users can maximize tape usage without sacrificing picture quality.

The HR-A590U boasts a robust tracking system that provides clear, stable playback. JVC's dynamic tracking technology helps maintain picture integrity, reducing distortions and providing a clearer image even on older tapes. This feature is particularly vital for collectors who want to preserve and enjoy their VHS library without minor flaws interrupting their viewing experience.

Another notable characteristic of this VCR is its compatibility with various tape formats. It effortlessly plays standard VHS tapes, and it is also drop-in compatible with EP mode tapes. This flexibility ensures that users can transition between different recording formats without trouble.

In addition to its playback features, the JVC HR-A590U is equipped with a timer recording function, allowing users to schedule recordings conveniently. This feature is simple to set up and helps users enjoy their favorite shows or movies, even when they're away from home.

The model also has a reliable built-in tuner, which enables users to watch and record live television broadcasts seamlessly. Furthermore, the device supports various input options, including composite and S-video connections, enhancing compatibility with modern TVs and devices.

Moreover, the compact design of the JVC HR-A590U makes it easy to integrate into home entertainment systems without occupying excessive space. This VCR remains a perfect choice for anyone seeking a dependable, high-quality machine to enjoy their VHS collection, embodying the essence of retro technology with modern reliability.