20ENTIMERRECORDING(cont.)

Regular Timer Programming

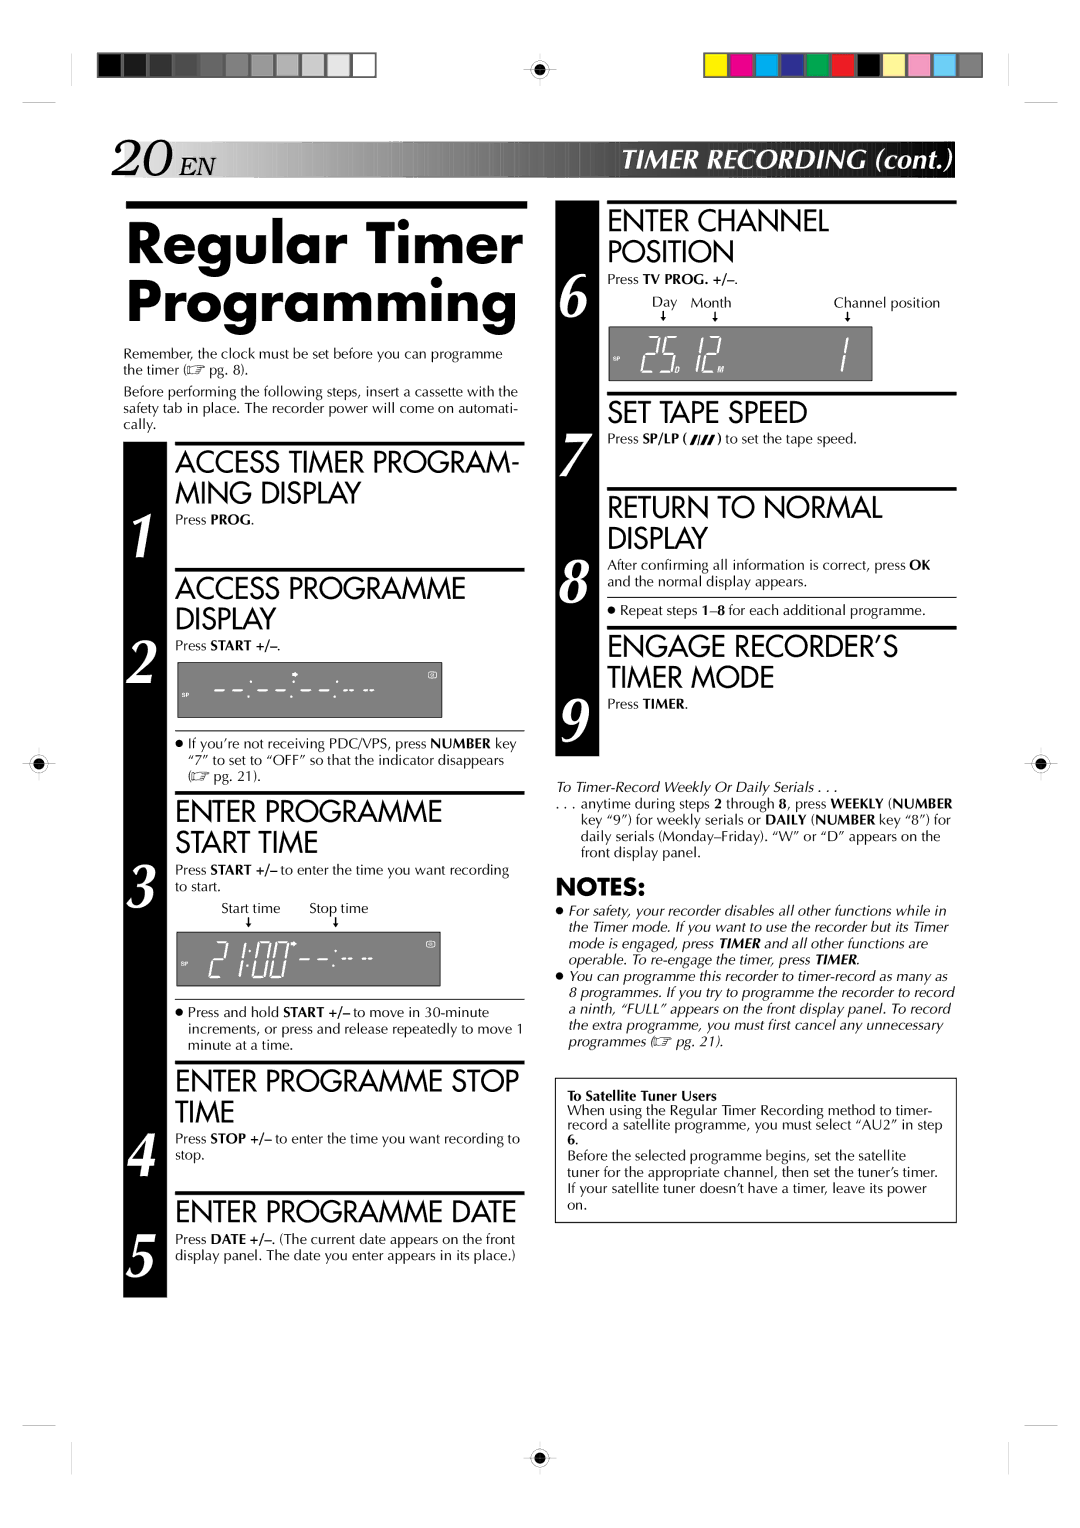
Remember, the clock must be set before you can programme the timer (pg. 8).

Before performing the following steps, insert a cassette with the safety tab in place. The recorder power will come on automati- cally.

ACCESS TIMER PROGRAM- MING DISPLAY

1 Press PROG.

ACCESS PROGRAMME

DISPLAY

2


SP


Press START +/–.


If you’re not receiving PDC/VPS, press NUMBER key

“7” to set to “OFF” so that the indicator disappears (pg. 21).


ENTER PROGRAMME


START TIME


Press START +/– to enter the time you want recording

3 to start.Start time

Stop time

-

-


SP


Press and hold START +/– to move in 30-minute increments, or press and release repeatedly to move 1 minute at a time.

ENTER PROGRAMME STOP TIME

4 Press STOP +/– to enter the time you want recording to stop.

ENTER PROGRAMME DATE

5 Press DATE +/–. (The current date appears on the front display panel. The date you enter appears in its place.)


ENTER CHANNEL


6

POSITION


Press TV PROG. +/–.


Day

Month

Channel position

-

-

-


SP


D

M


SET TAPE SPEED


7 Press SP/LP (

) to set the tape speed.


RETURN TO NORMAL

8

DISPLAY


After confirming all information is correct, press OK

and the normal display appears.


Repeat steps 18for each additional programme.

ENGAGE RECORDER’S

TIMER MODE

9 Press TIMER.

To Timer-Record Weekly Or Daily Serials . . .

. . . anytime during steps 2 through 8, press WEEKLY (NUMBER key “9”) for weekly serials or DAILY (NUMBER key “8”) for daily serials (Monday–Friday). “W” or “D” appears on the front display panel.

NOTES:

For safety, your recorder disables all other functions while in the Timer mode. If you want to use the recorder but its Timer mode is engaged, press TIMER and all other functions are operable. To re-engage the timer, press TIMER.

You can programme this recorder to timer-record as many as 8 programmes. If you try to programme the recorder to record a ninth, “FULL” appears on the front display panel. To record

the extra programme, you must first cancel any unnecessary programmes (pg. 21).

To Satellite Tuner Users

When using the Regular Timer Recording method to timer- record a satellite programme, you must select “AU2” in step 6.

Before the selected programme begins, set the satellite tuner for the appropriate channel, then set the tuner’s timer. If your satellite tuner doesn’t have a timer, leave its power on.

Page 20
Image 20
JVC HR-A637EH setup guide Regular Timer Programming

HR-A637EH, HR-A637E specifications

The JVC HR-A637E and HR-A637EH are part of JVC's renowned lineup of VCRs that cater to both audio and video enthusiasts seeking quality performance and reliable technology. These models are designed for users who appreciate the nostalgia of tape-based video recording while also benefiting from modern enhancements that improve functionality.

At the core of these VCRs is their ability to play and record in multiple formats, primarily VHS. They are equipped with JVC’s advanced video processing technology, which ensures that playback quality is sharp, and images are vibrant, enhancing the viewing experience. The HR-A637E and HR-A637EH models support high-quality playback of standard VHS tapes, making them an excellent choice for preserving and viewing classic home videos.

One of the standout features of these VCRs is their built-in Time Base Corrector (TBC). This technology minimizes jitter, enhances stability, and allows for smoother playback of older tapes, ensuring that the recorded material looks as good as possible. Additionally, both models include a digital noise reduction function, helping to eliminate unwanted artifacts from the video signal, resulting in a cleaner picture.

The convenience of everyday use is highlighted through their user-friendly interfaces and remote control capabilities. The HR-A637E and HR-A637EH come with programmable timer recording functions, allowing users to set their VCR to record shows automatically, ensuring they never miss a favorite program. Additionally, the on-screen programming capabilities enhance usability, guiding users through the recording process seamlessly.

For those who wish to convert their VHS collection to digital formats, these models feature composite video outputs that can be connected to a capture device, making it easier to digitize treasured memories. Furthermore, the system is compatible with a variety of accessories, including VHS-C adapters that enable the playback of compact VHS tapes.

An important characteristic of the JVC HR-A637E and HR-A637EH is their robust build quality, which ensures durability and longevity. With precision mechanics and reliable components, users can trust that these models will perform well over time.

Overall, the JVC HR-A637E and HR-A637EH are exemplary VCRs that serve as a bridge between classic video recording technology and the needs of contemporary users, combining functionality, reliability, and ease of use in one compact package. Whether for nostalgic purposes or practical video recording, these models remain a solid choice in a world increasingly dominated by digital formats.