– Initial Settings –

Setting clock semiautomatically

— Semiauto Clock Set

You can change the host channel/D.S.T. (Daylight Saving Time)/ time zone setting manually. First follow steps 1 to 2 in “Preparations” above, then go to the following steps.

NOTE:

The time set previously will be erased when “AUTO CLOCK”, “HOST CH”, “D.S.T.” or “TIME ZONE” setting is changed.

A Set Auto Clock to ON


CLOCK SET


Press OK or eon the Remote repeatedly

TIME

DATE

YEAR

to move the highlight bar to “AUTO

1:00PM

12/24


04 FRI

AUTO CLOCK : ON


(CATV)


HOST CH

: AUTO

Setting clock manually

— Manual Clock Set

First follow steps 1 to 2 in “Preparations” ( pg. 7), then go to the following steps.

A Set time, date and year


CLOCK SET


Press rtuntil the desired time appears,


TIME


DATE

YEAR


then press OK or e. Set the date and year


–:– –AM


1/ 1

04


AUTO CLOCK : ON


in the same way.


HOST CH


: AUTO

(CATV)


D.S.T.


: AUTO


Holding rtchanges the time in 30-


TIME ZONE

: AUTO


PRESS (

,

), THEN (OK)

minute intervals, or changes the date in


PRESS (MENU) TO END


15-day intervals.

CLOCK”, then press rtso that “ON” is

D.S.T.

: AUTO

selected.

TIME ZONE

: AUTO

PRESS ( ,

), THEN (OK)


PRESS (MENU) TO END

BSelect host channel

You can either select “AUTO” or enter a PBS channel number. Press OK or eto move the highlight bar to “HOST CH”, then press rtrepeatedly until “AUTO” or the desired PBS channel number is selected.

BSelect D.S.T. mode

Press OK or eto move the highlight bar to “D.S.T.”, then press rtto select the desired setting.

ON: Adjustment will be made by the built-in clock itself.

OFF: Select when Daylight Saving Time does not apply to you.


CLOCK SET


TIME

DATE

YEAR


1:00AM

12/ 24

04 FRI

AUTO CLOCK

: OFF


D.S.T.

: ON


PRESS ( , ), THEN (OK)

PRESS (MENU) TO END

CSelect D.S.T. mode

Press OK or eto move the highlight bar to “D.S.T.”, then press rtrepeatedly until the desired setting is selected.

AUTO: Select if you want to adjust your VCR’s clock automatically by the incoming signal from the host channel. (Auto Daylight Saving Time enables automatic adjustment of the VCR’s clock at the start and end of Daylight Saving Time.) Be sure to select the correct time zone manually in step 4.

ON: Adjustment will be made by the built-in clock itself.

OFF: Select when Daylight Saving Time does not apply to you.

DSelect time zone

Press OK or eto move the highlight bar to “TIME ZONE”, then press rtrepeatedly until “AUTO” or the desired time zone is selected. Each time you press the button, the time zone changes as follows:

{AUTO {ATLANTIC {EASTERN {CENTRAL

{MOUNTAIN {PACIFIC {ALASKA {HAWAII

{(back to the beginning)

EComplete Semiauto Clock Set

Press MENU to return to normal screen. Turn off the VCR. “Aut” will appear on the display panel while the clock is being set. The current clock time will appear automatically when the clock setting is complete.

Selections of host channel, D.S.T. mode and time zone will be reset to “AUTO” after a power failure occurs.

CStart clock

Press MENU and normal screen appears.

To make corrections any time during the process

Press OK or erepeatedly until the item you want to change blinks, then press rt.

The clock set manually will be lost after a power failure occurs.

Tuner Setting

Turn on the VCR and TV, and select the VCR channel (or AV mode).

Setting channels automatically

— Auto Channel Set

Perform Auto Channel Set only if channels have not been set correctly by the Plug&Play setting.

A Access Main Menu screen, then Tuner

MAIN MENU

Set screen

TUNER SET


FUNCTION SET


Press MENU on the Remote. Press rtto

INITIAL SET


move the highlight bar (arrow) to “TUNER


SET”, then press OK or e.


PRESS ( , ), THEN (OK)


PRESS (MENU) TO END

BPerform Auto Channel Set

Press rtto move the highlight bar (arrow) to “AUTO CHANNEL SET”, then press OK or e. The VCR selects the correct band (TV or CATV) automatically during Auto Channel Set.

When Auto Channel Set is complete, “SCAN COMPLETED” appears on screen.

If the scan was unsuccessful, “SCAN COMPLETED–NO SIGNAL–” appears on screen. Check the connections and

start again.

Press MENU to return to normal screen.

TUNER SET

BANDCATV

AUTO CHANNEL SET MANUAL CHANNEL SET

SELECT WITH ( , ) AND (OK)

PRESS (MENU) TO END

AUTO CHANNEL SET

SCANNING...

PRESS (MENU) TO END

— 8 —

CONTINUED ON NEXT PAGE

Page 8
Image 8
JVC HR-J693U Tuner Setting, Setting clock semiautomatically Semiauto Clock Set, Setting clock manually Manual Clock Set

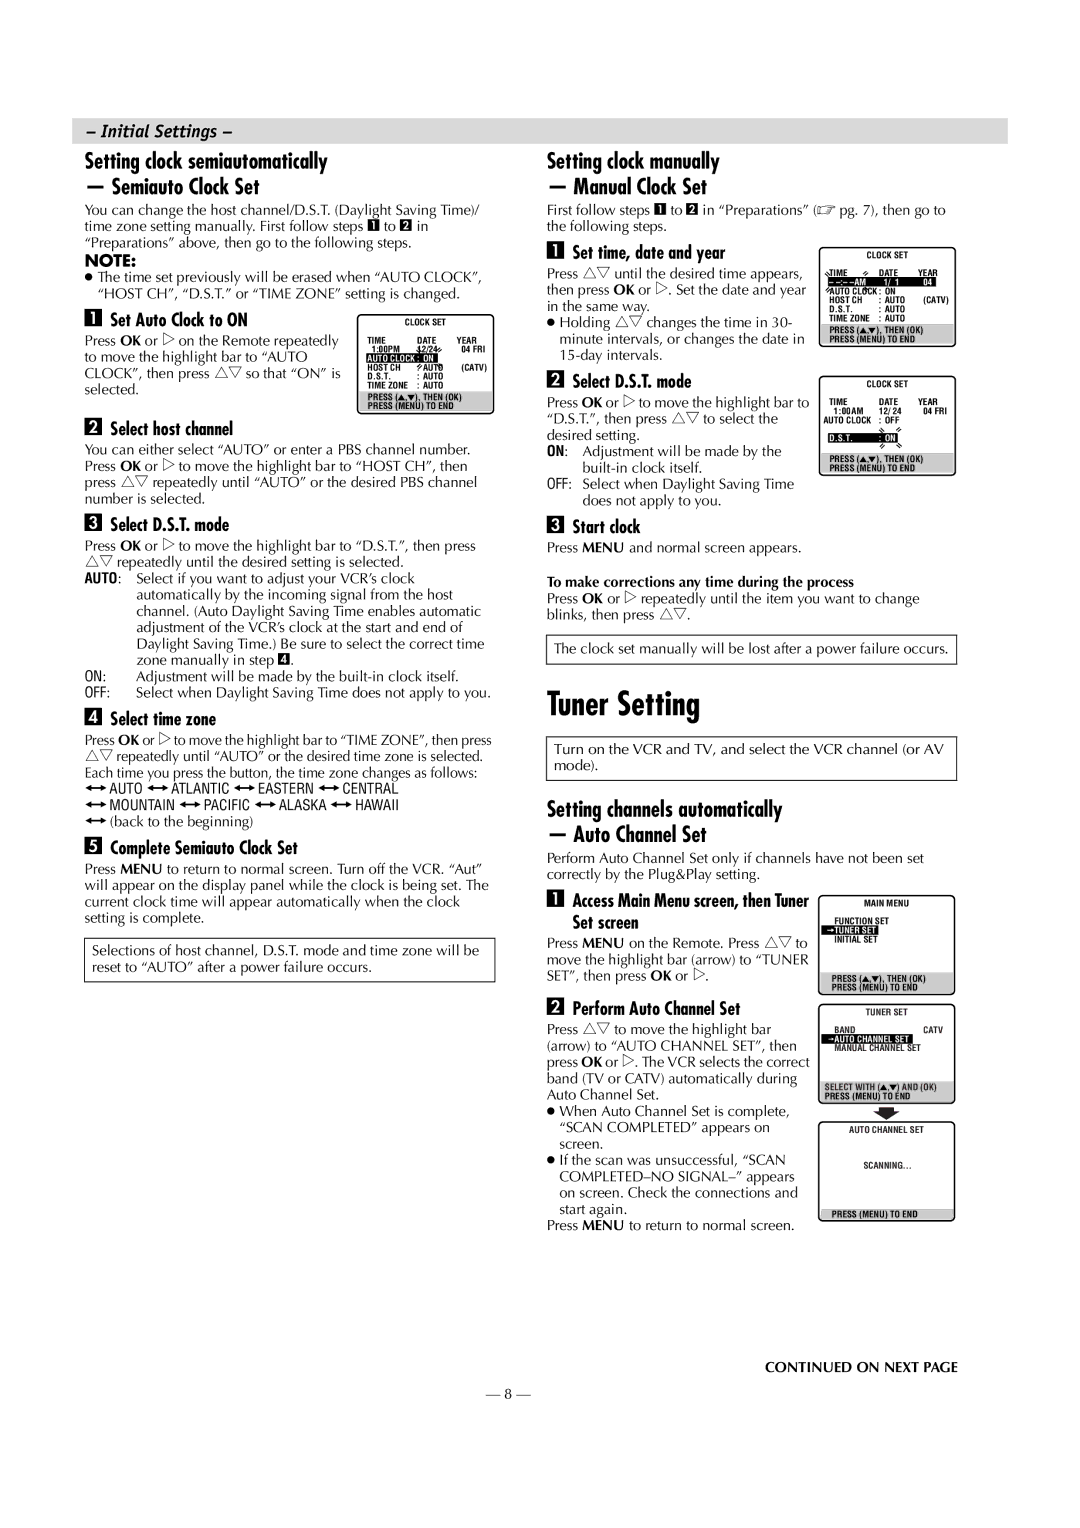
HR-J693U specifications

The JVC HR-J693U is a sophisticated VHS VCR designed to offer a seamless combination of functionality, ease of use, and high-quality video playback. Released during an era characterized by the rise of home video technology, this model captures the essence of JVC's commitment to delivering exceptional performance in the VCR market.

At the heart of the HR-J693U is its versatile playback capabilities. The VCR supports a variety of tape formats, including VHS and S-VHS, allowing users to enjoy a wide range of video content. One of the standout features of this model is its Super VHS (S-VHS) playback compatibility. This technology significantly enhances the video resolution and provides clearer image quality, making it a preferred choice for those seeking superior playback results.

Equipped with a built-in TBC (Time Base Corrector), the HR-J693U minimizes video noise and improves picture stability, resulting in a smoother viewing experience. The TBC function is particularly beneficial for older tapes, which may exhibit some degradation over time. This feature ensures that viewers enjoy the best possible quality from their existing video library.

Another notable characteristic of the JVC HR-J693U is its user-friendly interface. The front panel is designed for easy access to key functions, including tape loading and control buttons. Additionally, the remote control enhances the viewing experience by allowing users to navigate through their tapes and set recordings from the comfort of their couch.

This model also includes a range of recording features. With its ability to record up to 6 hours in standard mode, users can capture their favorite shows or events without worrying about running out of tape space. The VCR is equipped with a programmable timer, allowing for scheduled recordings, which is perfect for busy individuals who want to ensure they don't miss their favorite programs.

For connectivity, the HR-J693U offers composite video and audio outputs, facilitating connections to standard televisions and audio systems. Its integrated video stabilizer further improves playback quality, making it ideal for older or damaged tapes.

In summary, the JVC HR-J693U is a comprehensive VHS VCR that combines advanced features, user-friendly design, and superior playback capabilities. Its support for S-VHS playback, built-in TBC, extensive recording options, and intuitive controls make it a great addition to any home entertainment setup. Whether for preserving cherished memories on tape or enjoying classic films, the HR-J693U exemplifies the best of JVC's video technology innovations.