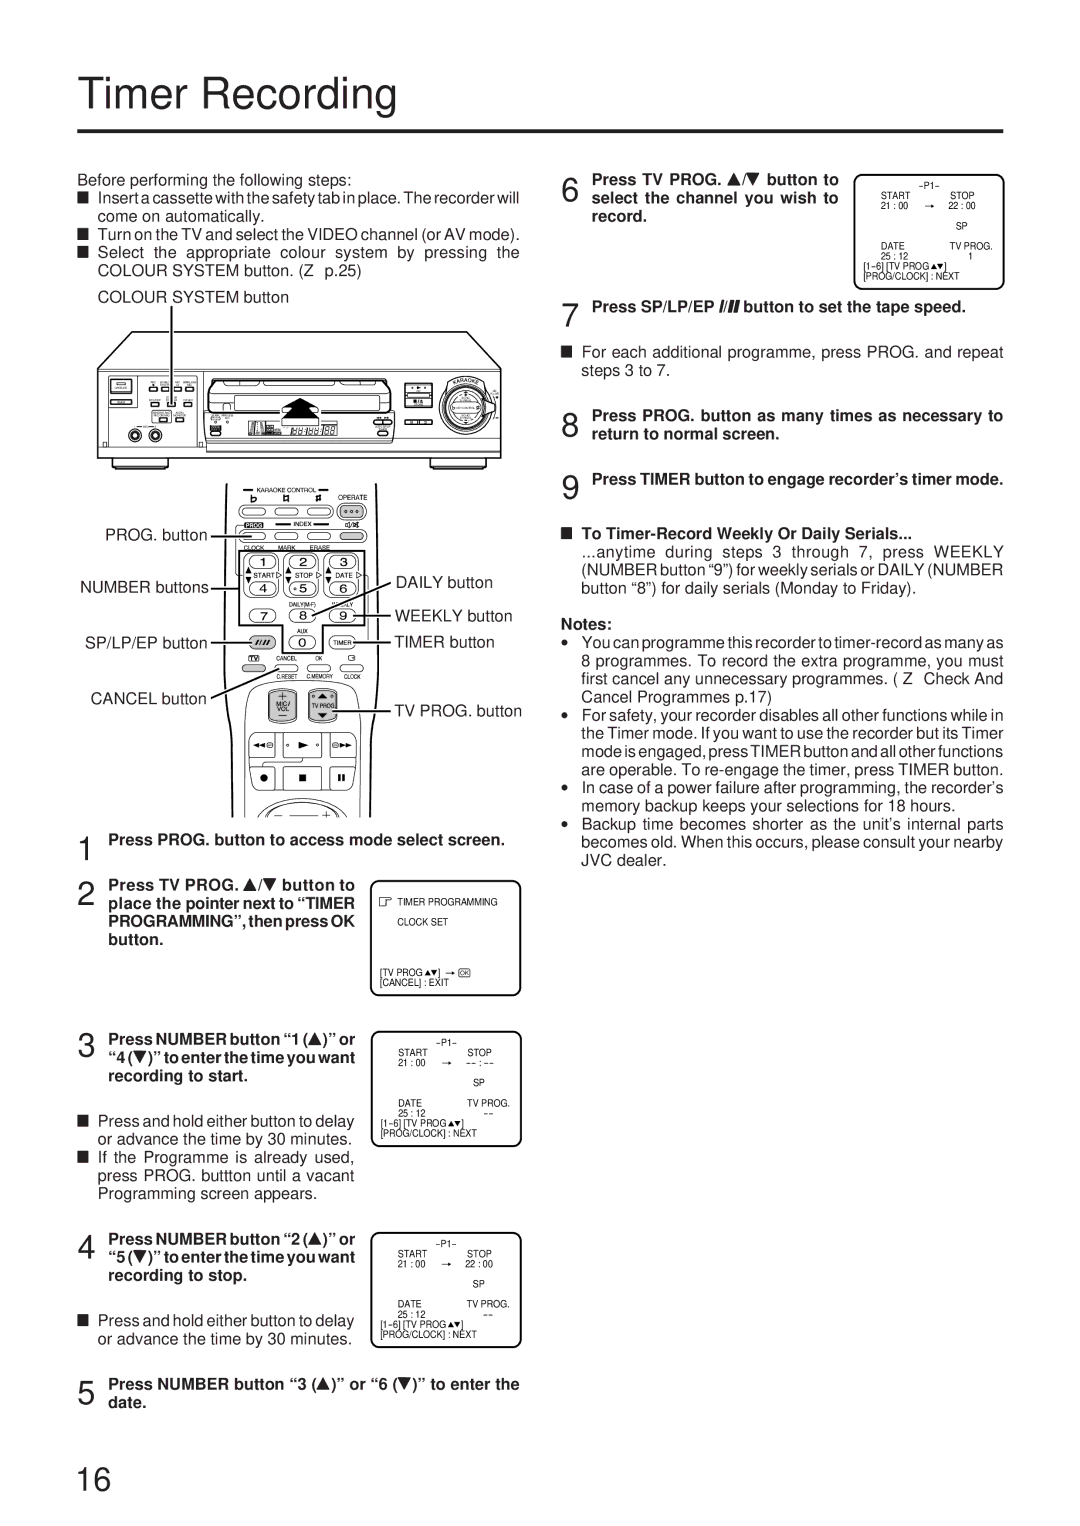
Press PROG. button to access mode select screen.

Timer Recording

Before performing the following steps:

LInsert a cassette with the safety tab in place. The recorder will come on automatically.

LTurn on the TV and select the VIDEO channel (or AV mode).

LSelect the appropriate colour system by pressing the COLOUR SYSTEM button. (p.25)

COLOUR SYSTEM button

REC SEARCH

MIC

WIRELESS

SYSTEM

1/2

MIC

OPERATE


OK

MIC


VOLUME


COLOUR


ECHO

TIMER


SP/LP/EP SYSTEM

CH SET


STORE

TV PROG.


KEY CONTROL


SINGING AND

AUDIO

BLANK WIRELESS


ECHO


RECORDING

MONITOR


SEARCH

MIC


TV PROG.


SYSTEM


1

MIC

2


WIDE


AUTO SP/LP


QUALITY


TIMER


PROG. button

NUMBER buttons

DAILY button


WEEKLY button

SP/LP/EP button

TIMER button

CANCEL button

TV PROG. button

Press TV PROG. 8/9 button to

-P1-

22 : 00

6 select the channel you wish to

21 : 00


START

STOP

record.


SP


DATE

TV PROG.


25 : 12


1


[1-6] [TV PROG

]


[PROG/CLOCK] : NEXT

7 Press SP/LP/EP 7/J button to set the tape speed.

LFor each additional programme, press PROG. and repeat steps 3 to 7.

8 Press PROG. button as many times as necessary to return to normal screen.

9 Press TIMER button to engage recorder’s timer mode.

LTo Timer-Record Weekly Or Daily Serials...

...anytime during steps 3 through 7, press WEEKLY (NUMBER button “9”) for weekly serials or DAILY (NUMBER button “8”) for daily serials (Monday to Friday).

Notes:

You can programme this recorder to timer-record as many as

8 programmes. To record the extra programme, you must

first cancel any unnecessary programmes. ( Check And

Cancel Programmes p.17)

For safety, your recorder disables all other functions while in

the Timer mode. If you want to use the recorder but its Timer

mode is engaged, press TIMER button and all other functions

are operable. To re-engage the timer, press TIMER button.

In case of a power failure after programming, the recorder’s

memory backup keeps your selections for 18 hours.

Backup time becomes shorter as the unit’s internal parts

1

2 Press TV PROG. 8/9 button to place the pointer next to “TIMER PROGRAMMING”, then press OK button.

3

Press NUMBER button “1 ( 8)” or

“4 ( 9)” to enter the time you want

recording to start.

LPress and hold either button to delay or advance the time by 30 minutes.

LIf the Programme is already used, press PROG. buttton until a vacant Programming screen appears.

4

Press NUMBER button “2 ( 8)” or

“5 ( 9)” to enter the time you want

recording to stop.

LPress and hold either button to delay or advance the time by 30 minutes.

TIMER PROGRAMMING

CLOCK SET

[TV PROG] OK [CANCEL] : EXIT

-P1-


START

STOP

21 : 00


-- : --


SP

DATE

TV PROG.

25 : 12


--

[1-6] [TV PROG

]

[PROG/CLOCK] : NEXT

-P1-


START

STOP

21 : 00


22 : 00


SP

DATE

TV PROG.

25 : 12


--

[1-6] [TV PROG

]

[PROG/CLOCK] : NEXT

becomes old. When this occurs, please consult your nearby

JVC dealer.

5 Pressdate. NUMBER button “3 ( 8)” or “6 ( 9)” to enter the

16

Page 16
Image 16
JVC HR-J73MS manual Timer Recording

HR-J73MS specifications

The JVC HR-J73MS is a notable addition to JVC's line of VHS players and recorders that gained popularity in the 1990s. This model captures the essence of the VHS home entertainment experience, offering a blend of functionality, user-friendly features, and solid performance.

One of the main features of the HR-J73MS is its capability to play and record in 4-head Hi-Fi stereo. This technology ensures superior audio quality, allowing users to enjoy their favorite shows and movies with rich sound. With its 19-micron head, the JVC HR-J73MS provides enhanced picture clarity and reduces the likelihood of tape wear, which was often a concern with VHS tapes.

The HR-J73MS comes equipped with various recording modes. The standard SP mode allows for the highest quality recording but occupies more tape space, while the LP mode effectively doubles the tape duration with a slight decrease in quality. This versatility in recording options offers users the flexibility to choose based on their needs, whether for long recordings like family events or high-quality playback for special movies.

Another standout feature is the built-in timer for programmable recording. Users can easily schedule their recordings, making it convenient to capture shows airing at inconvenient hours. The VCR's on-screen display simplifies navigation, allowing users to access settings, programming, and playback options with ease.

The design of the JVC HR-J73MS also reflects the era's aesthetics, featuring a sleek, compact body that fits seamlessly into any home entertainment setup. The front panel is equipped with straightforward controls and a digital clock, enhancing the unit's user-friendliness. Additionally, the VCR includes a variety of input and output options, including standard composite video, ensuring compatibility with various TV models and video devices.

In summary, the JVC HR-J73MS is a well-rounded VHS player and recorder that exemplifies the capabilities of its time. With features such as 4-head Hi-Fi stereo sound, multiple recording modes, programmable timer functionality, and an intuitive design, it remains a beloved choice for those who appreciate the analog charm of VHS tapes. Whether for nostalgia or practical use, the HR-J73MS encapsulates the spirit of home video entertainment in a compact and efficient package.