Tuner Setting

Setting channels automatically

— Auto Channel Set

Perform Auto Channel Set only if channels have not been set correctly by the Plug&Play setting.

Cable Box and/or DBS Receiver Control Setting

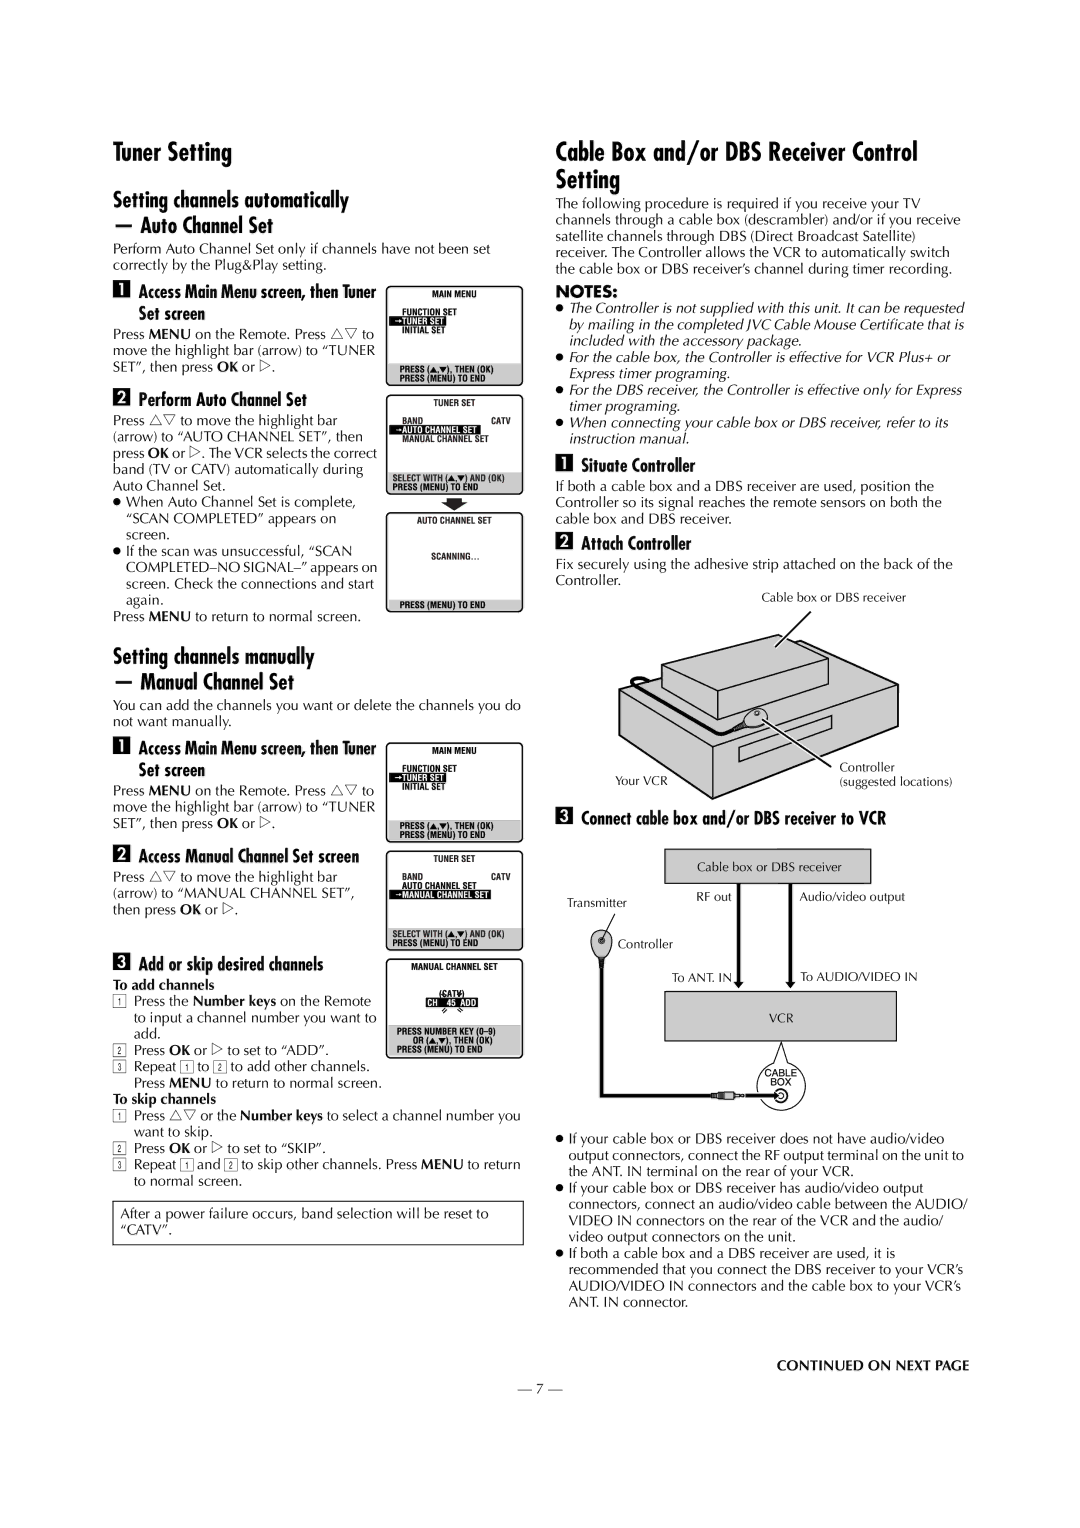
The following procedure is required if you receive your TV channels through a cable box (descrambler) and/or if you receive satellite channels through DBS (Direct Broadcast Satellite) receiver. The Controller allows the VCR to automatically switch the cable box or DBS receiver’s channel during timer recording.

A Access Main Menu screen, then Tuner

Set screen

Press MENU on the Remote. Press rt to move the highlight bar (arrow) to “TUNER SET”, then press OK or e.

B Perform Auto Channel Set

Press rt to move the highlight bar (arrow) to “AUTO CHANNEL SET”, then press OK or e. The VCR selects the correct band (TV or CATV) automatically during Auto Channel Set.

When Auto Channel Set is complete, “SCAN COMPLETED” appears on screen.

If the scan was unsuccessful, “SCAN COMPLETED–NO SIGNAL–” appears on screen. Check the connections and start again.

Press MENU to return to normal screen.

Setting channels manually

— Manual Channel Set

You can add the channels you want or delete the channels you do not want manually.

A Access Main Menu screen, then Tuner

Set screen

Press MENU on the Remote. Press rt to move the highlight bar (arrow) to “TUNER SET”, then press OK or e.

B Access Manual Channel Set screen

Press rt to move the highlight bar (arrow) to “MANUAL CHANNEL SET”, then press OK or e.

C Add or skip desired channels

To add channels

A Press the Number keys on the Remote to input a channel number you want to add.

B Press OK or e to set to “ADD”.

CRepeat A to B to add other channels. Press MENU to return to normal screen.

To skip channels

APress rtor the Number keys to select a channel number you want to skip.

BPress OK or e to set to “SKIP”.

CRepeat A and B to skip other channels. Press MENU to return to normal screen.

After a power failure occurs, band selection will be reset to “CATV”.

NOTES:

The Controller is not supplied with this unit. It can be requested by mailing in the completed JVC Cable Mouse Certificate that is included with the accessory package.

For the cable box, the Controller is effective for VCR Plus+ or Express timer programing.

For the DBS receiver, the Controller is effective only for Express timer programing.

When connecting your cable box or DBS receiver, refer to its instruction manual.

ASituate Controller

If both a cable box and a DBS receiver are used, position the Controller so its signal reaches the remote sensors on both the cable box and DBS receiver.

BAttach Controller

Fix securely using the adhesive strip attached on the back of the Controller.

Cable box or DBS receiver

Your VCR

Controller

(suggested locations)

CConnect cable box and/or DBS receiver to VCR


Cable box or DBS receiver

Transmitter

RF out

Audio/video output


Controller


To ANT. IN

To AUDIO/VIDEO IN


VCR

If your cable box or DBS receiver does not have audio/video output connectors, connect the RF output terminal on the unit to the ANT. IN terminal on the rear of your VCR.

If your cable box or DBS receiver has audio/video output connectors, connect an audio/video cable between the AUDIO/ VIDEO IN connectors on the rear of the VCR and the audio/ video output connectors on the unit.

If both a cable box and a DBS receiver are used, it is recommended that you connect the DBS receiver to your VCR’s AUDIO/VIDEO IN connectors and the cable box to your VCR’s ANT. IN connector.

CONTINUED ON NEXT PAGE

— 7 —

Page 7
Image 7
JVC HR-S5911U Tuner Setting, Cable Box and/or DBS Receiver Control Setting, Setting channels manually Manual Channel Set

HR-S5911U specifications

The JVC HR-S5911U is a high-performance VHS VCR that epitomizes the quality and technology of the early 1990s video recording era. Known for its reliability and enhanced features, this model has made a significant mark in the market, especially among enthusiasts of analog video equipment.

One of the HR-S5911U's standout features is its S-VHS playback capability. This allows users to enjoy higher-resolution video playback, delivering crystal-clear image quality compared to standard VHS. The VCR also supports S-VHS ET (Extended Technology), which enables users to record S-VHS quality on regular VHS tapes, providing versatility and convenience in choosing media for recording.

The HR-S5911U is equipped with the JVC Advanced Digital Noise Reduction (ADNR) technology, which significantly reduces noise and improves video clarity during playback and recording. This technology ensures that users can enjoy bright images, reduced artifacts, and improved overall quality, making it ideal for preserving personal recordings and movies.

Another significant aspect of the HR-S5911U is its users-friendly features, including programmable time recording and a built-in timer, enabling users to record their favorite shows automatically, even when they are not at home. Additionally, the VCR features a Multi-Function on-screen display that makes operation straightforward, allowing users to navigate easily through various functions and settings.

The HR-S5911U includes various input and output options, such as composite, S-Video, and audio outputs, which provide flexibility in connecting to different televisions and audio systems. This compatibility ensures that the VCR can integrate seamlessly into various home entertainment setups, enhancing user experience.

Durability and build quality also characterize the HR-S5911U. Designed to withstand regular use, this model has proven to be reliable over the years. Overall, the JVC HR-S5911U encapsulates a classic era of home video technology, offering a blend of advanced features, user-friendliness, and reliable performance, making it a treasured device for collectors and nostalgia seekers alike.