EN 13

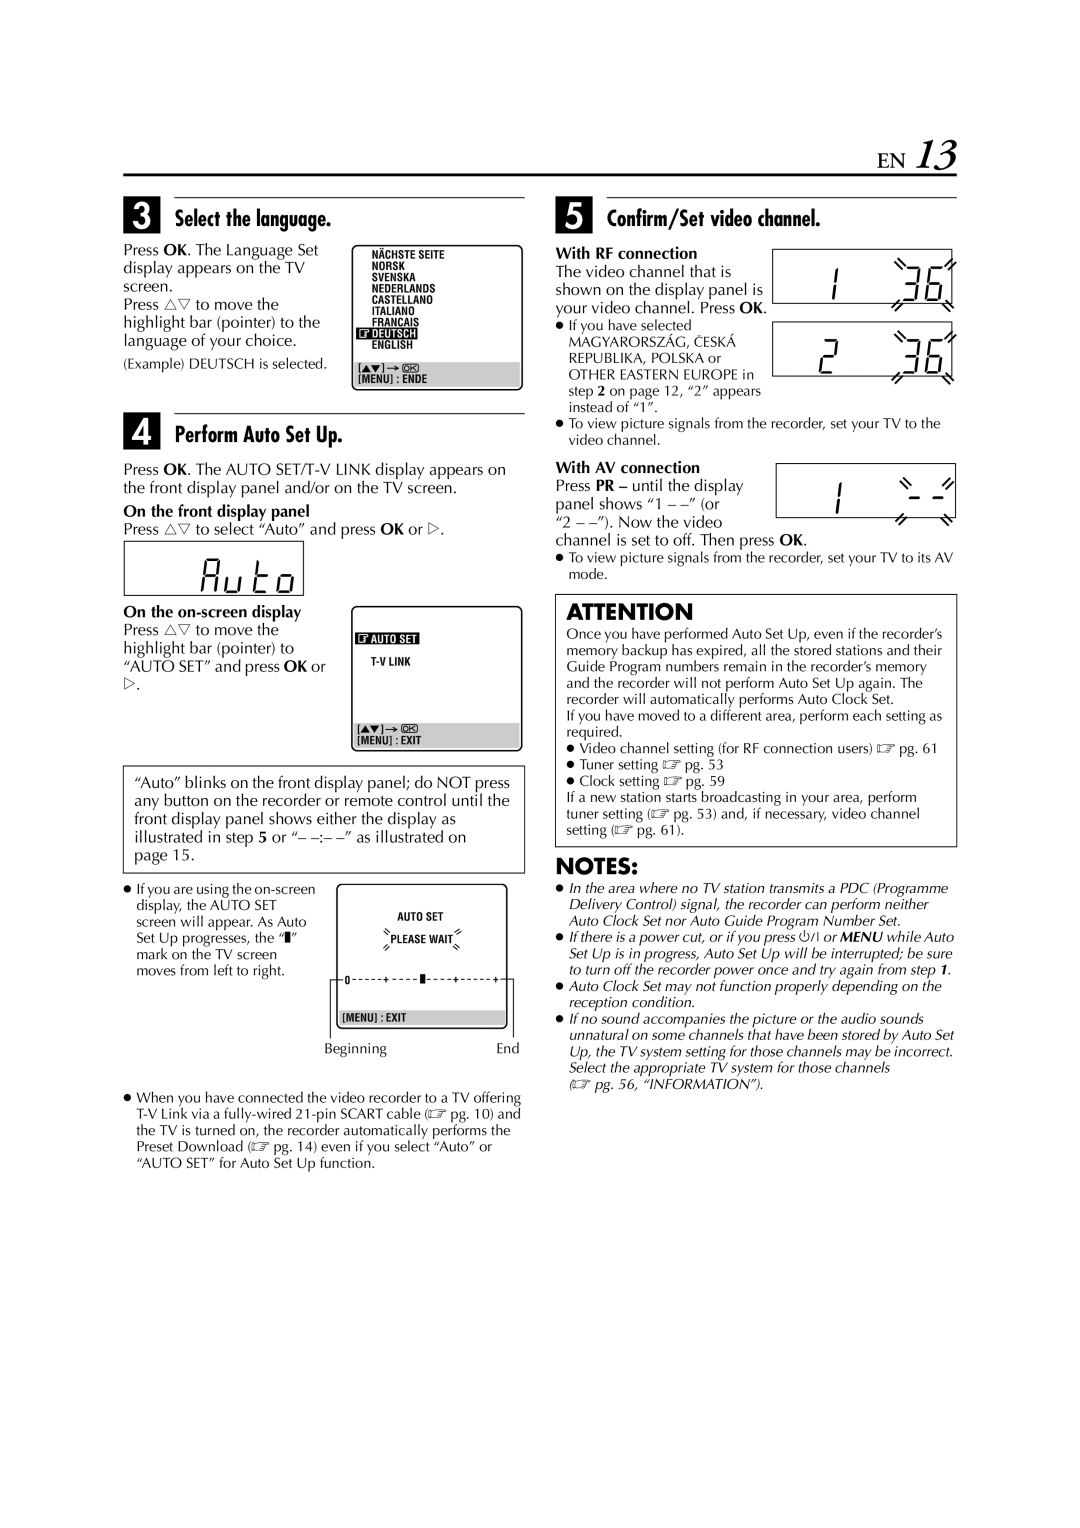
C Select the language.

Press OK. The Language Set display appears on the TV screen.

Press rt to move the highlight bar (pointer) to the language of your choice.

(Example) DEUTSCH is selected.

D Perform Auto Set Up.

Press OK. The AUTO SET/T-V LINK display appears on the front display panel and/or on the TV screen.

On the front display panel

Press rt to select “Auto” and press OK or e.

E Confirm/Set video channel.

With RF connection The video channel that is shown on the display panel is your video channel. Press OK.

If you have selected

MAGYARORSZÁG, CESKÁ REPUBLIKA, POLSKA or OTHER EASTERN EUROPE in step 2 on page 12, “2” appears instead of “1”.

To view picture signals from the recorder, set your TV to the video channel.

With AV connection Press PR – until the display panel shows “1 – –” (or “2 – –”). Now the video

channel is set to off. Then press OK.

To view picture signals from the recorder, set your TV to its AV mode.

On the on-screen display

Press rt to move the highlight bar (pointer) to “AUTO SET” and press OK or e.

“Auto” blinks on the front display panel; do NOT press any button on the recorder or remote control until the front display panel shows either the display as illustrated in step 5 or “– –:– –” as illustrated on page 15.

If you are using the on-screen display, the AUTO SET

screen will appear. As Auto Set Up progresses, the “q” mark on the TV screen moves from left to right.

BeginningEnd

When you have connected the video recorder to a TV offering T-V Link via a fully-wired 21-pin SCART cable ( pg. 10) and

the TV is turned on, the recorder automatically performs the Preset Download ( pg. 14) even if you select “Auto” or “AUTO SET” for Auto Set Up function.

ATTENTION

Once you have performed Auto Set Up, even if the recorder’s memory backup has expired, all the stored stations and their Guide Program numbers remain in the recorder’s memory and the recorder will not perform Auto Set Up again. The recorder will automatically performs Auto Clock Set.

If you have moved to a different area, perform each setting as required.

Video channel setting (for RF connection users)  pg. 61

Tuner setting  pg. 53

Clock setting  pg. 59

If a new station starts broadcasting in your area, perform tuner setting ( pg. 53) and, if necessary, video channel setting ( pg. 61).

NOTES:

In the area where no TV station transmits a PDC (Programme Delivery Control) signal, the recorder can perform neither Auto Clock Set nor Auto Guide Program Number Set.

If there is a power cut, or if you press 1 or MENU while Auto Set Up is in progress, Auto Set Up will be interrupted; be sure to turn off the recorder power once and try again from step 1.

Auto Clock Set may not function properly depending on the reception condition.

If no sound accompanies the picture or the audio sounds unnatural on some channels that have been stored by Auto Set Up, the TV system setting for those channels may be incorrect.

Select the appropriate TV system for those channels ( pg. 56, “INFORMATION”).

Page 13
Image 13
JVC HR-S7960E Select the language, Perform Auto Set Up, Confirm/Set video channel, On the front display panel

HR-S7960E specifications

The JVC HR-S7960E is a standout model in the world of VHS players and recorders, particularly noted for its impressive blend of features, technologies, and characteristics that resonate well with enthusiasts of vintage video. As part of JVC's esteemed line of S-VHS recorders, the HR-S7960E was designed to meet the needs of users who demand high-quality playback and recording capabilities.

One of the primary features of the HR-S7960E is its S-VHS playback and recording capability. S-VHS offers a superior resolution compared to standard VHS, allowing for clearer and more vibrant images. This feature is particularly beneficial for users seeking to preserve older videotapes with enhanced visual fidelity. The HR-S7960E also supports standard VHS formats, providing versatility in handling various tape formats.

A notable characteristic of the HR-S7960E is its built-in Time Base Corrector (TBC) function. This technology minimizes video artifacts such as jitter and shearing, ensuring smoother playback of tapes that may have suffered degradation over time. The TBC feature is essential for video preservation, especially for films and home videos that are decades old.

The HR-S7960E is equipped with a dual-head playback system, which contributes to improved picture quality while reducing the risk of wear on the tape over time. This design maximizes the lifespan of both the machine and the tapes it plays, a vital consideration for collectors and archivists.

Additionally, the VCR comes with advanced video processing technology, such as the Frame Creation and Digital Noise Reduction features. These enhancements work to improve the quality of the video output by reducing noise and enhancing detail, making a noticeable difference, especially when playing back older tapes that may not have had the best recording conditions.

Connectivity is another strong point for the HR-S7960E. The unit includes various inputs and outputs, including S-Video, composite, and RF connections. This broad range of options allows users to seamlessly connect to a variety of televisions and editing equipment.

Overall, the JVC HR-S7960E embodies the pinnacle of VHS technology, encapsulating a nostalgia for an era of video while providing modern users with the means to enjoy and preserve their video collections. With its impressive array of features, the HR-S7960E remains a cherished choice among videophiles and collectors alike.