– Other Functions –

AUTO SP]LP TIMER — ON / OFF

When this function is set to “ON”, the recorder automatically switches to LP mode to allow complete recording if there is not enough tape to record the entire program while timer-recording in SP mode.

For Example, Recording a PAL-broadcast programme of 210 minutes in length onto a 180-minute tape.

Approximately 150 minutes

Approximately 60 minutes

SP mode

LP mode


Total 210 minutes

NOTES:

If you have programed the recorder to timer-record 2 or more programs, do not use this function, but change the tape speed manually during timer programing.

There may be some noise and sound disturbance where the tape speed switches from SP to LP mode on the tape.

The Auto SP]LP Timer feature is not available during ITR (Instant Timer Recording), and the feature will not work properly with any tapes longer than E-180 or with some tapes of shorter lengths.

Satellite Auto Recording

You can automatically record a satellite program which is timer- programed on your satellite receiver.

AConnect a satellite receiver to the AUDIO/VIDEO IN connectors on the rear panel. You can also connect the cable box if it has a timer.

BSet timer program on satellite receiver referring to its instruction manual.

CLoad a cassette with the record safety tab intact.

DPress SP/LP/EP (p) to set the tape speed.

EPress REC LINK for more than 2 seconds. The recorder turns off automatically and enter the Satellite Auto Recording standby mode (the REC LINK indicator lights up). When signals come into the recorder from the satellite receiver, the recorder starts recording (the REC LINK indicator blinks), and stops recording (the REC LINK indicator stops blinking) when signals stop coming in.

NOTES:

Be sure not to turn on the satellite receiver before the program starts broadcasting; otherwise, the recorder will start recording when the satellite receiver is turned on.

To disengage the Satellite Auto Recording standby mode, press REC LINK (the REC LINK indicator goes off).

Depending on the type of satellite receiver, Satellite Auto Recording may not be compatible.

B.E.S.T does not work when the satellite auto recording mode is engaged.

Multi-Brand Remote Control

This remote control can control some functions of remote controllable TVs, cable boxes, satellite receivers or DVD sets listed below. Without setting, you can control a JVC TV.

NOTES:

Some unit’s brands have more than one code. If the unit does not function with a specified code, try other codes.

Depending on the type of unit, some or all functions cannot be operated using this remote control.

It’s not possible to operate a unit not equipped with a remote sensor.

It’s not possible to set the remote control for two units at the same time.

Once you have set the remote control to operate the unit, you do not have to set it until you replace the batteries from the remote control.

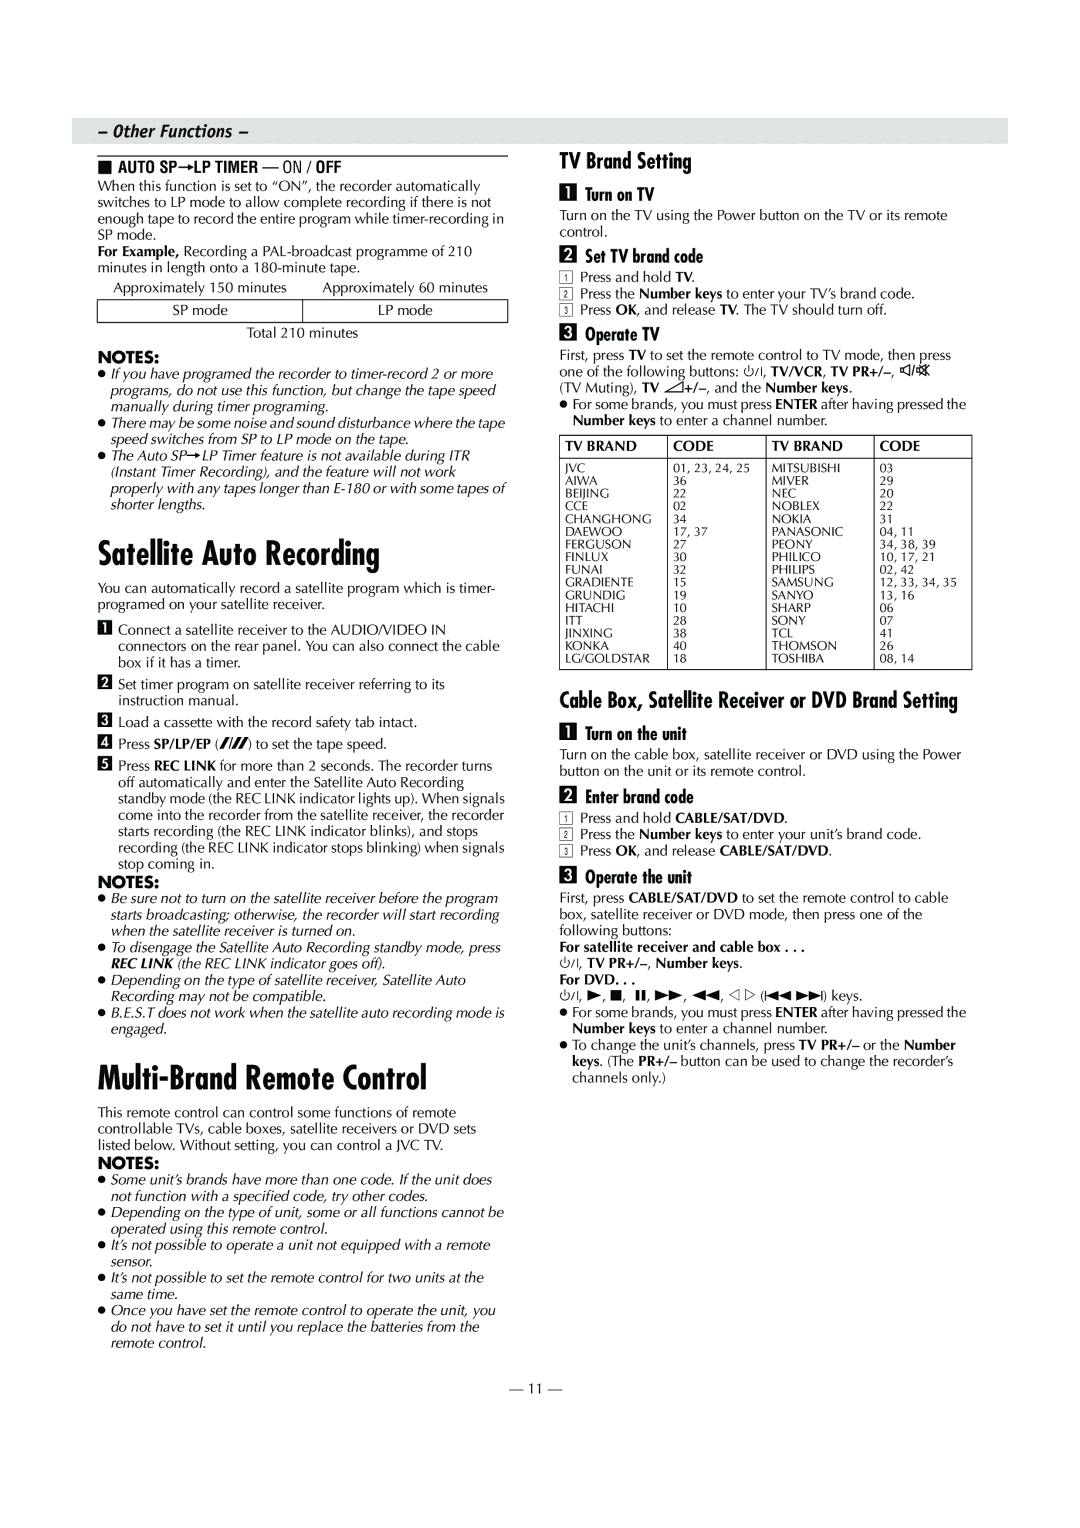
TV Brand Setting

ATurn on TV

Turn on the TV using the Power button on the TV or its remote control.

BSet TV brand code

APress and hold TV.

BPress the Number keys to enter your TV’s brand code. C Press OK, and release TV. The TV should turn off.

COperate TV

First, press TV to set the remote control to TV mode, then press one of the following buttons: 1, TV/VCR, TV PR+/–, ^ (TV Muting), TV %+/–, and the Number keys.

For some brands, you must press ENTER after having pressed the Number keys to enter a channel number.

TV BRAND

CODE

TV BRAND

CODE


JVC

01, 23, 24, 25

MITSUBISHI

03

AIWA

36

MIVER

29

BEIJING

22

NEC

20

CCE

02

NOBLEX

22

CHANGHONG

34

NOKIA

31

DAEWOO

17, 37

PANASONIC

04, 11

FERGUSON

27

PEONY

34, 38, 39

FINLUX

30

PHILICO

10, 17, 21

FUNAI

32

PHILIPS

02, 42

GRADIENTE

15

SAMSUNG

12, 33, 34, 35

GRUNDIG

19

SANYO

13, 16

HITACHI

10

SHARP

06

ITT

28

SONY

07

JINXING

38

TCL

41

KONKA

40

THOMSON

26

LG/GOLDSTAR

18

TOSHIBA

08, 14


Cable Box, Satellite Receiver or DVD Brand Setting

ATurn on the unit

Turn on the cable box, satellite receiver or DVD using the Power button on the unit or its remote control.

BEnter brand code

APress and hold CABLE/SAT/DVD.

BPress the Number keys to enter your unit’s brand code. C Press OK, and release CABLE/SAT/DVD.

COperate the unit

First, press CABLE/SAT/DVD to set the remote control to cable box, satellite receiver or DVD mode, then press one of the following buttons:

For satellite receiver and cable box . . .

1, TV PR+/–,Number keys.

For DVD. . .

1, 4, 8, 9, 5, 3, w e (2 6) keys.

For some brands, you must press ENTER after having pressed the Number keys to enter a channel number.

To change the unit’s channels, press TV PR+/– or the Number keys. (The PR+/– button can be used to change the recorder’s channels only.)

— 11 —

Page 11
Image 11
JVC HR-V600AG, HR-V600AA Satellite Auto Recording, Multi-Brand Remote Control, TV Brand Setting, Other Functions

HR-V600AA, HR-V600AG specifications

The JVC HR-V600AG and HR-V600AA are VCR models that exemplify the quality and innovation synonymous with the JVC brand. These models are particularly noteworthy for their robust design and the array of features that cater to both casual users and video enthusiasts alike.

One of the main features of the JVC HR-V600 series is its S-VHS capability. This allows the devices to play S-VHS tapes, significantly enhancing video quality compared to standard VHS. The S-VHS format provides a higher resolution, offering clearer and more vibrant images. For users who own S-VHS tapes, this is a notable advantage, making the HR-V600AG and HR-V600AA essential for preserving memories on high-quality formats.

Additionally, both models are equipped with a 19-micron head that plays a crucial role in improving picture clarity. This precision feature minimizes distortion and enhances the overall viewing experience. The sophisticated video processing capabilities ensure that users enjoy vivid playback, regardless of the tape condition.

The JVC HR-V600 series also includes a built-in digital noise reduction (DNR) system that effectively minimizes unwanted noise and grain artifacts during playback. This feature is particularly valuable when watching older, worn tapes, enhancing the overall viewing experience and making it closer to the original recording quality.

A relevant feature for convenience is the One-Touch Timer Recording function, which simplifies the process of scheduling recordings. Users can easily program the device to capture their favorite shows or movies without the hassle of complex setups. The dual-speed recording capability is another benefit, allowing for SP (Standard Play) and EP (Extended Play) modes. This flexibility helps users manage tape usage better based on their needs.

In terms of design, the JVC HR-V600AG and HR-V600AA exhibit a compact and user-friendly layout. The front panel includes straightforward buttons and an LED display, making navigation effortless, even for those less familiar with technology.

The JVC HR-V600 series underscores the brand's commitment to quality and user satisfaction. With features like S-VHS playback, precise head technology, digital noise reduction, and user-friendly operation, it remains a strong choice for anyone looking to experience or preserve video content with clarity and ease. Whether for home use or for archiving important media, the HR-V600AG and HR-V600AA serve as reliable and efficient options in the realm of VCR technology.