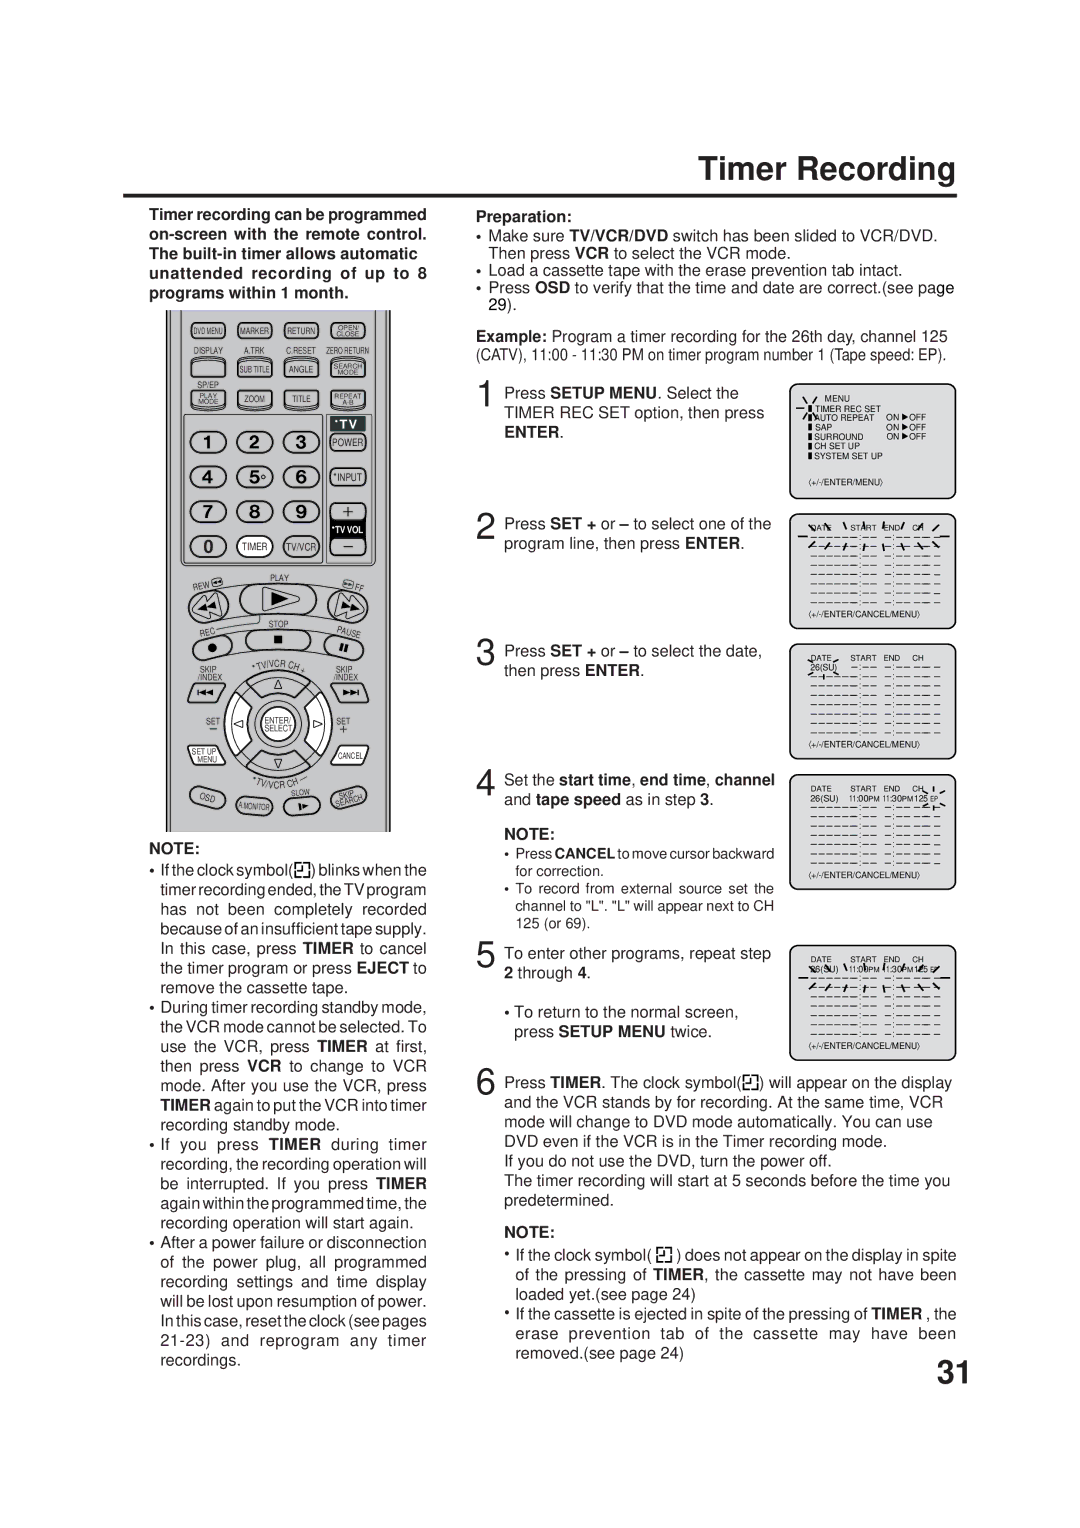
Timer recording can be programmed on-screen with the remote control. The built-in timer allows automatic unattended recording of up to 8 programs within 1 month.

DVD MENU

MARKER

RETURN

OPEN/

CLOSE

DISPLAY

A.TRK

C.RESET

ZERO RETURN


SUB TITLE

ANGLE

SEARCH


MODE

Timer Recording

Preparation:

Make sure TV/VCR/DVD switch has been slided to VCR/DVD. Then press VCR to select the VCR mode.

Load a cassette tape with the erase prevention tab intact.

Press OSD to verify that the time and date are correct.(see page 29).

Example: Program a timer recording for the 26th day, channel 125

(CATV), 11:00 - 11:30 PM on timer program number 1 (Tape speed: EP).

SP/EP


PLAY

ZOOM

TITLE

REPEAT

MODE

A-B


TV


POWER


INPUT


TV VOL

0

TIMER


TV/VCR


REW


PLAY


FF


REC


STOP


PAUSE


/VCR

CH


SKIP


TV


+

SKIP

/INDEX


/INDEX

SET


ENTER/


SET


SELECT


SET UP


CANCEL

MENU


T


H


V/VCR C


OSD


SLOW

SKIP


A.

MONITOR


SEARCH


NOTE:

If the clock symbol( ) blinks when the timer recording ended, the TV program has not been completely recorded because of an insufficient tape supply.

1

2

3

4

Press SETUP MENU. Select the TIMER REC SET option, then press

ENTER.

Press SET + or to select one of the program line, then press ENTER.

Press SET + or to select the date, then press ENTER.

Set the start time, end time, channel and tape speed as in step 3.

NOTE:

Press CANCEL to move cursor backward for correction.

To record from external source set the channel to "L". "L" will appear next to CH 125 (or 69).


MENU


TIMER REC SET


AUTO REPEAT

ON

OFF


SAP


ON

OFF


SURROUND

ON

OFF


CH SET UP


SYSTEM SET UP


+/-/ENTER/MENU


DATE

START

END

CH

— — — — — —

— : — — — : — — — —

— —

— — — — — —

— : — — — : — — — —

— —

— — — — — —

— : — — — : — — — —

— —

— — — — — —

— : — — — : — — — —

— —

— — — — — —

— : — — — : — — — —

— —

— — — — — —

— : — — — : — — — —

— —

— — — — — —

— : — — — : — — — —

— —

— — — — — —

— : — — — : — — — —

— —

+/-/ENTER/CANCEL/MENU

DATE

START

END

CH

26(SU)

— : — —

— : — — — —

— —

— — — — — —

— : — — — : — — — —

— —

— — — — — —

— : — — — : — — — —

— —

— — — — — —

— : — — — : — — — —

— —

— — — — — —

— : — — — : — — — —

— —

— — — — — —

— : — — — : — — — —

— —

— — — — — —

— : — — — : — — — —

— —

— — — — — —

— : — — — : — — — —

— —

+/-/ENTER/CANCEL/MENU

DATE

START

END

CH

26(SU)

11:00PM 11:30PM125 EP

— — — — — —

— : — — — : — — — —

— —

— — — — — —

— : — — — : — — — —

— —

— — — — — —

— : — — — : — — — —

— —

— — — — — —

— : — — — : — — — —

— —

— — — — — —

— : — — — : — — — —

— —

— — — — — —

— : — — — : — — — —

— —

— — — — — —

— : — — — : — — — —

— —

+/-/ENTER/CANCEL/MENU

In this case, press TIMER to cancel the timer program or press EJECT to remove the cassette tape.

During timer recording standby mode, the VCR mode cannot be selected. To use the VCR, press TIMER at first, then press VCR to change to VCR mode. After you use the VCR, press TIMER again to put the VCR into timer recording standby mode.

If you press TIMER during timer recording, the recording operation will be interrupted. If you press TIMER again within the programmed time, the recording operation will start again.

After a power failure or disconnection of the power plug, all programmed recording settings and time display will be lost upon resumption of power. In this case, reset the clock (see pages 21-23) and reprogram any timer recordings.

5

To enter other programs, repeat step

DATE

START

END

CH


2 through 4.

26(SU)

11:00PM 11:30PM125 EP


— — — — — —

— : — —

— : — — — —


— — — — — —

— : — — — : — — — —

— —


— — — — — —

— : — — — : — — — —

— —


To return to the normal screen,

— — — — — —

— : — — — : — — — —

— —


— — — — — —

— : — —

— : — — — —


press SETUP MENU twice.

— — — — — —

— : — — — : — — — —

— —


— — — — — —

— : — —

— : — — — —

+/-/ENTER/CANCEL/MENU

6 Press TIMER. The clock symbol( ) will appear on the display and the VCR stands by for recording. At the same time, VCR mode will change to DVD mode automatically. You can use DVD even if the VCR is in the Timer recording mode.

If you do not use the DVD, turn the power off.

The timer recording will start at 5 seconds before the time you predetermined.

NOTE:

If the clock symbol( ) does not appear on the display in spite of the pressing of TIMER, the cassette may not have been loaded yet.(see page 24)

If the cassette is ejected in spite of the pressing of TIMER , the erase prevention tab of the cassette may have been removed.(see page 24)

31

Page 31
Image 31
JVC HR-XVC1UJ manual Timer Recording, To enter other programs, repeat step, Through

HR-XVC1UJ specifications

The JVC HR-XVC1UJ is a versatile and innovative device that combines the functionality of a VCR and a DVD player into one sleek chassis. This unit is designed for those who appreciate the nostalgia of VHS tapes while also wanting the convenience and clarity of DVDs. The HR-XVC1UJ serves as a bridge between old and new technologies, making it an attractive choice for home entertainment enthusiasts.

One of the standout features of the HR-XVC1UJ is its ability to play and record both VHS and DVD formats. This dual functionality allows users to watch their favorite movies from both formats without the need for multiple devices. With its integrated video cassette recorder, users can still enjoy their cherished VHS collections while taking advantage of the advanced playback options available with DVDs.

The device supports a variety of recording modes with VHS, giving the user flexibility in terms of recording time and quality. It features standard play, long play, and extended play modes, allowing users to choose the balance between recording time and picture quality according to their needs.

Another significant aspect of the JVC HR-XVC1UJ is its user-friendly interface, which guides users through setup and playback with ease. The inclusion of a remote control enhances this experience, allowing users to navigate through tapes and discs conveniently.

The HR-XVC1UJ is also equipped with various connectivity options, including composite video and audio outputs, making it compatible with traditional televisions. This feature ensures that even older TV models can benefit from the capabilities of this hybrid device. It also includes an S-Video output for those who wish to enhance their video quality further.

Additionally, the JVC HR-XVC1UJ boasts advanced technologies like "Adaptive Picture Control," which optimizes the picture quality based on the content being played, providing a clearer and more engaging viewing experience. The integrated timer function allows users to schedule recordings, ensuring they never miss their favorite shows or movies.

In conclusion, the JVC HR-XVC1UJ stands out as a multifunctional device that caters to both contemporary and nostalgic viewing preferences. With its combination of VHS and DVD playback, user-friendly controls, and various connectivity options, it is an excellent addition to any home entertainment system, making it easy to enjoy the best of both worlds.