Power Supply Preparations
Using rechargeable batteries |
| 3 When recharging is complete, unplug the | ||
(supplied for the U.K.) |
| AC adaptor from the AC power outlet and | ||
|
| the DC IN jack. | ||
Be sure to recharge the rechargeable batteries before using them. | ||||
|
|
| ||
| Notes: |
| ||
|
|
| ||
Battery indicator
Battery indicator
Recharging procedure
1Insert the rechargeable batteries.
* Insert the battery as you push it in the indicated direction.
Caution:
Do not forcibly open the battery lid too wide.
2Connect the AC adaptor (supplied for the U.K.).
AC power outlet
AC adaptor
DC IN jack (DC IN 4.5 V ![]() )
)
Recharging will be completed after 10 hours.
•Rechargeable batteries have a service life of approximately 300
•You can recharge the batteries only when the unit is turned off.
•The AC adaptor and rechargeable batteries may become warm while recharging is in progress. This is normal and is not a malfunction.
If the battery lid | Removing batteries |
compartment |
|
comes loose |
|
Slide the lid back into |
|
place horizontally. |
|
Using the AC adaptor (supplied for the U.K.)
Connect the AC adaptor.
Refer to “Using rechargeable batteries” for connection instruc- tions.
Note:
Even if the unit is turned off, small power is consumed as long as the AC adaptor is connected to the AC power outlet.
Using dry-cell batteries (not supplied)
After disconnecting the AC adaptor, insert two “R6” (LR6) alka- line batteries.
The procedure for inserting and removing
This indicator lights when the batteries are almost out of power. Power will be shut off a short while later.
Note:
Turning off the
If the unit malfunctions or freezes during use, dis- connect the AC adaptor and batteries. Then, con- nect the AC adaptor and batteries, and operate the unit again.
AC adaptor (for multi voltage area) (not supplied)
Before use
Make sure the present voltage of your AC adaptor fits to your local voltage before plugging it into the AC power outlet. If it doesn’t, shift the AC
VOLTAGE |
|
ADJUSTOR |
|
AC 110V | AC 220V |
~127V | ~240V |
If the power plug will not fit your socket, use the AC plug adaptor.
How to use the AC plug adaptor (not sup- plied)
Note:
When you want to purchase the AC adaptor and the AC plug adaptor, see page 2.
About MP3 files
MP3 File Compatibility |
| Playing order of MP3 files |
•This player can read MP3 files that are recorded in the format that is compliant with ISO 9660.
•The player can read or play an MP3 file with the extension code
•Group/track title can be displayed.
•ID3* tags can be shown on the display.
*An MP3 file can contain file information called “ID3 Tag” where its album name, artist, title, etc. are recorded.
This player can handle only
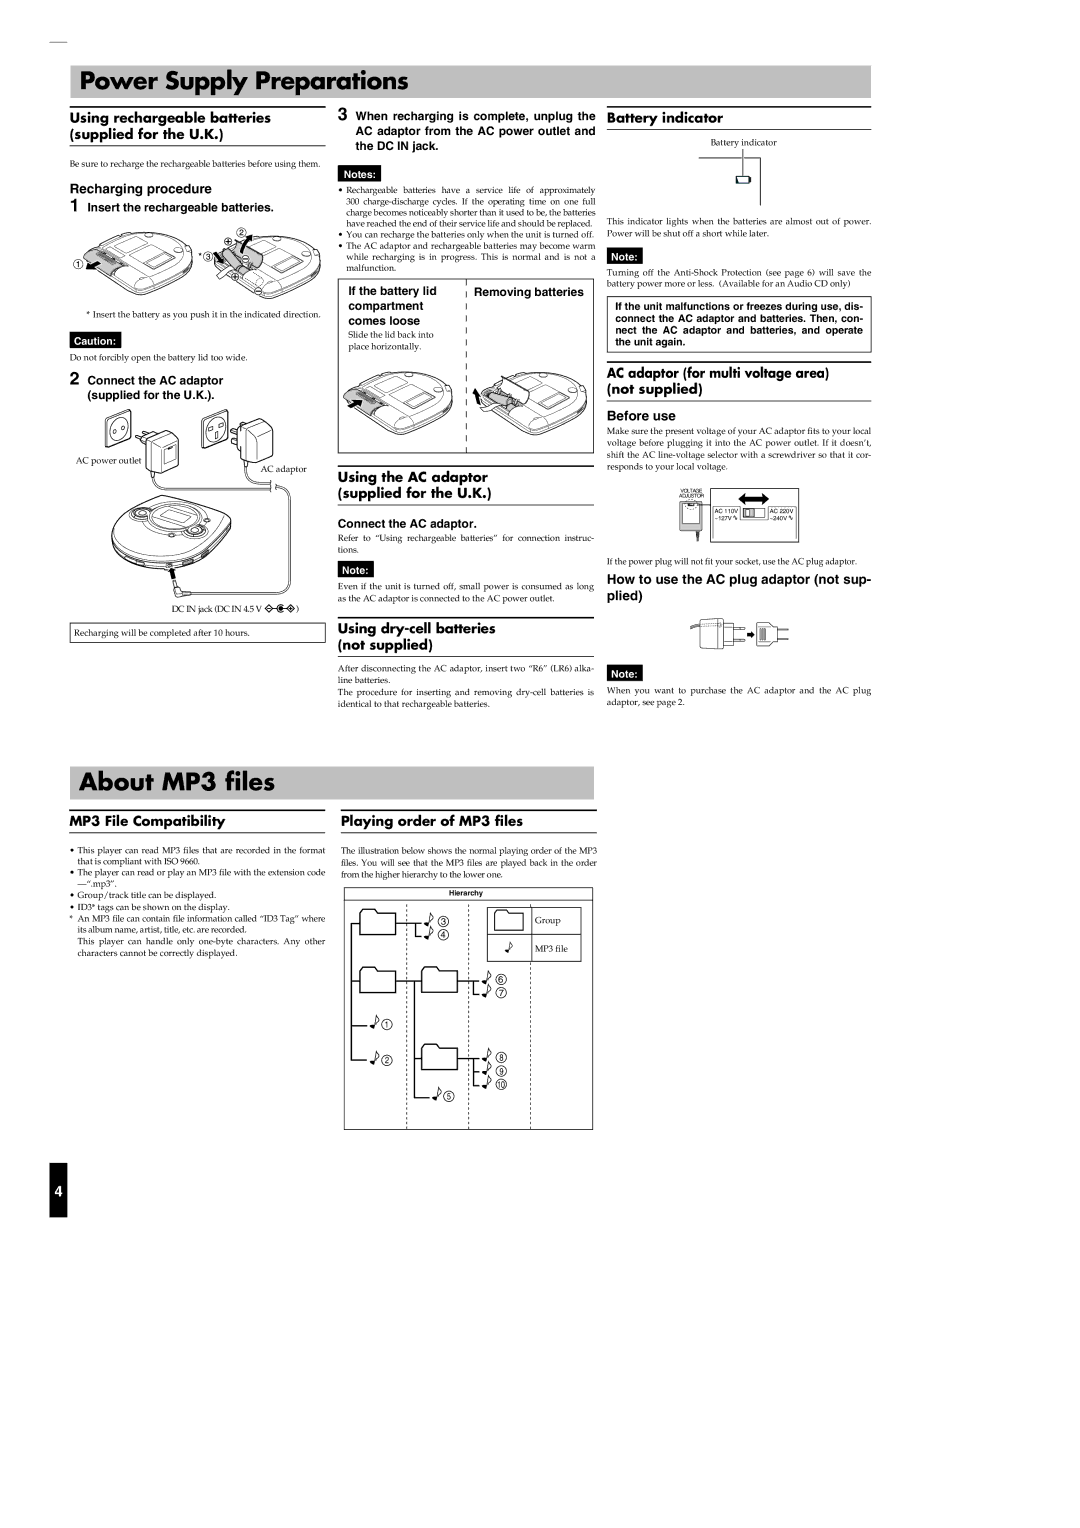
The illustration below shows the normal playing order of the MP3 files. You will see that the MP3 files are played back in the order from the higher hierarchy to the lower one.
| Hierarchy |
3 | Group |
4 |
|
| MP3 file |
| 6 |
| 7 |
1 |
|
2 | 8 |
| 9 |
| 10 |
| 5 |
4