CHARGING BATTERY PACK
ASSEMBLY
CHARGE BATTERY PACK:
1. Plug the charger into the nearest 120 volt electrical outlet.
BATTERY PACK
![]() Be aware that this tool is always in an operating condition because it does not have to be plugged into an electrical outlet. Always turn the switch “OFF” and remove the battery pack before changing bits.
Be aware that this tool is always in an operating condition because it does not have to be plugged into an electrical outlet. Always turn the switch “OFF” and remove the battery pack before changing bits.
2. Make sure the trigger |
|
on the Cordless Drill |
|
is in the “OFF” | LED |
position and remove | LIGHT |
the battery pack from |
|
the Cordless Drill. |
|
3. Insert the battery pack |
|
into the charger. Be sure | BATTERY |
that the battery pack is | CHARGER |
fully seated in the charger. |
|
Do not force. |
|
4. | The red indicator light should come “ON” indicating that the battery pack is in |
| a “Fast Charge” mode. If the green indicator light comes “ON”, then the battery |
| is already fully charged. |
5. | After approximately one hour of charging, the red indicator light should go |
INSTALLING DRILL BIT INTO KEYLESS CHUCK
WARNING
Before inserting a drill bit or other accessory, make sure the forward/reverse and trigger lock lever is in the center “OFF” position to prevent accidental starts that may result in injury.
Do not attempt to tighten drill bits (or any other accessory) by gripping the front of the chuck and turning the tool on. This may cause personal injury
and/or damage to the chuck.
When removing the bit from the tool, avoid contact with skin and use proper protective gloves when grasping the bit or accessory. Accessories may be hot after prolonged use.
“OFF” and the green light should come “ON” indicating that the battery is fully |
charged and the charger is now in a “Trickle Charge” mode. |
6. The battery can be left in a “Trickle Charge” mode until ready to use. |
IMPORTANT INFORMATION FOR RECHARGING HOT BATTERIES
When using your Cordless Drill continuously, the batteries in your battery pack will become hot. You should let a hot battery pack cool down for approximately 30 minutes before attempting to recharge. When the battery pack becomes discharged and is hot, the red light on the charger will flash. When the battery pack cools down, the red light will glow continuously to indicate fast charging mode,
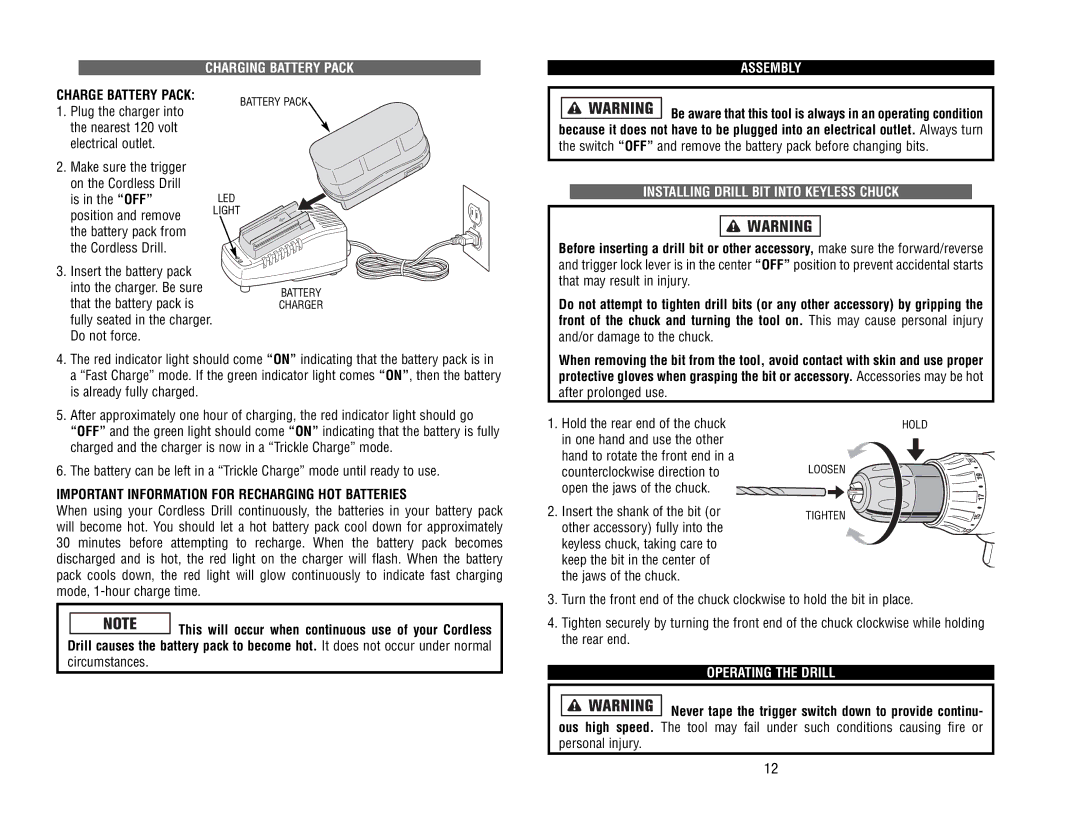
1.Hold the rear end of the chuck in one hand and use the other hand to rotate the front end in a counterclockwise direction to
open the jaws of the chuck.
2.Insert the shank of the bit (or other accessory) fully into the keyless chuck, taking care to keep the bit in the center of the jaws of the chuck.
HOLD
LOOSEN
TIGHTEN
This will occur when continuous use of your Cordless Drill causes the battery pack to become hot. It does not occur under normal
circumstances.
3.Turn the front end of the chuck clockwise to hold the bit in place.
4.Tighten securely by turning the front end of the chuck clockwise while holding the rear end.
OPERATING THE DRILL
Never tape the trigger switch down to provide continu-
ous high speed. The tool may fail under such conditions causing fire or personal injury.
12