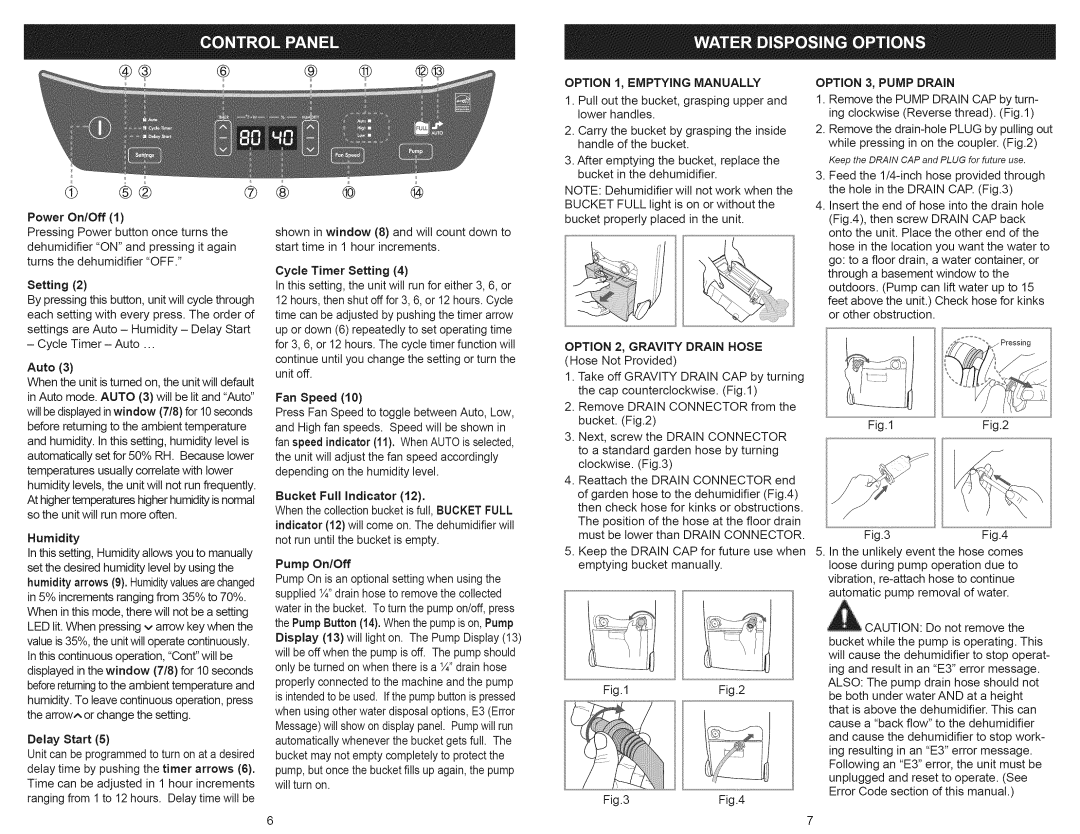
®® ® ® ® ®®

OPTION 1, EMPTYING MANUALLY

1.Pull out the bucket, grasping upper and lower handles.

2.Carry the bucket by grasping the inside handle of the bucket.

3.After emptying the bucket, replace the bucket in the dehumidifier.

OPTION 3, PUMP DRAIN

1.Remove the PUMP DRAIN CAP by turn- ing clockwise (Reverse thread). (Fig.l)

2.Remove the drain-hole PLUG by pulling out while pressing in on the coupler. (Fig.2)

Keep the DRAIN CAP and PLUG for future use.

3. Feed the 1/4-inch hose provided through

Power On/Off (1)

Pressing Power button once turns the dehumidifier "ON" and pressing it again turns the dehumidifier "OFF."

Setting (2)

By pressing this button, unit will cycle through each setting with every press. The order of settings are Auto - Humidity - Delay Start - Cycle Timer - Auto ...

Auto (3)

When the unit is turned on, the unit will default in Auto mode. AUTO (3) will be lit and "Auto" will be displayedinwi ndow (7/8) for 10seconds before retuming to the ambient temperature and humidity. In this setting, humidity level is automatically set for 50% RH. Because lower temperatures usually correlate with lower humidity levels, the unit will not run frequently. At higher temperatureshigherhumidity is normal so the unit will run more often.

Humidity

In this setting, Humidity allows you to manually set the desired humidity level by using the humidity arrows (9). Humidityvaluesarechanged in 5% increments ranging from 35% to 70%. When in this mode, there will not be a setting

shown in window (8) and will count down to start time in 1 hour increments.

Cycle Timer Setting (4)

In this setting, the unit will run for either 3, 6, or 12 hours, then shut off for 3, 6, or 12 hours. Cycle time can be adjusted by pushing the timer arrow up or down (6) repeatedly to set operating time for 3, 6, or 12 hours. The cycle timer function will

continue until you change the setting or turn the unit off.

Fan Speed (10)

Press Fan Speed to toggle between Auto, Low, and High fan speeds. Speed will be shown in fan speed indicator (11). WhenAUTO is selected, the unit will adjust the fan speed accordingly depending on the humidity level.

Bucket Full Indicator (12).

When the collection bucket isfull, BUCKET FULL indicator (12) will come on. The dehumidifier will not run until the bucket is empty.

Pump On/Off

Pump On is an optional setting when using the supplied IA"drain hose to remove the collected water in the bucket. To turn the pump on/off, press

NOTE: Dehumidifier will not work when the BUCKET FULL light is on or without the bucket properly placed in the unit.

OPTION 2, GRAVITY DRAIN HOSE (Hose Not Provided)

1.Take off GRAVITY DRAIN CAP by turning the cap counterclockwise. (Fig.l)

2.Remove DRAIN CONNECTOR from the bucket. (Fig.2)

3.Next, screw the DRAIN CONNECTOR to a standard garden hose by turning clockwise. (Fig.3)

4.Reattach the DRAIN CONNECTOR end

of garden hose to the dehumidifier (Fig.4) then check hose for kinks or obstructions.

The position of the hose at the floor drain must be lower than DRAIN CONNECTOR.

5.Keep the DRAIN CAP for future use when emptying bucket manually.

the hole in the DRAIN CAR (Fig.3)

4. Insert the end of hose into the drain hole

(Fig.4), then screw DRAIN CAP back

onto the unit. Place the other end of the

hose in the location you want the water to

go: to a floor drain, a water container, or

through a basement window to the

outdoors. (Pump can lift water up to 15

feet above the unit.) Check hose for kinks

or other obstruction.

Fig.1Fig.2

Fig.3Fig.4

5.In the unlikely event the hose comes loose during pump operation due to vibration, re-attach hose to continue automatic pump removal of water.

LED lit. When pressing v arrow key when the valueis 35%, the unit will operate continuously. In this continuous operation, "Cont" will be displayed in the window (7/8) for 10 seconds beforereturningto the ambient temperature and humidity. To leave continuous operation, press the arrow,*,or change the setting.

Delay Start (5)

Unit can be programmed to turn on at a desired delay time by pushing the timer arrows (6). Time can be adjusted in 1 hour increments ranging from 1 to 12 hours. Delaytime will be

the Pump Button (14).Whenthe pump is on, Pump Display (13)will light on. The Pump Display (13) will be off when the pump is off. The pump should only be turned on when there is a 1A"drain hose properly connected to the machine and the pump is intendedto be used. Ifthe pump buttonis pressed when usingother water disposal options, E3 (Error Message)will show on display panel. Pumpwill run automatically whenever the bucket gets full. The bucket may not empty completely to protect the pump, but once the bucket fills up again, the pump will turn on,

6

Fig.1Fig.2

Fig.3Fig.4

_1t, CAUTION: Do not remove the

bucket while the pump is operating. This will cause the dehumidifier to stop operat- ing and result in an "E3" error message. ALSO: The pump drain hose should not be both under waterAND at a height that is above the dehumidifier. This can cause a "back flow" to the dehumidifier and cause the dehumidifier to stop work- ing resulting in an "E3" error message. Following an "E3" error, the unit must be unplugged and reset to operate. (See Error Code section of this manual.)

7

Page 4
Image 4
Kenmore 251.90701 manual Option 1, Emptying Manually, Option 3, Pump Drain

251.90701 specifications

The Kenmore 251.90701 is a versatile and efficient air conditioning unit designed to provide optimum comfort in homes and commercial spaces. With its sleek design and advanced features, this model stands out in the competitive market of cooling solutions.

One of the key features of the Kenmore 251.90701 is its powerful cooling capacity. The unit is equipped with a robust compressor that ensures rapid cooling, making it ideal for hot summer days. With a BTU rating of 10,000, it effectively cools rooms up to 450 square feet, providing a comfortable environment even in the most sweltering conditions.

The Kenmore model also incorporates energy-saving technologies, making it an eco-friendly choice for consumers conscious of their energy consumption. It is designed with an Energy Efficiency Ratio (EER) that meets and often exceeds industry standards. This means that users can enjoy a cooler space while also reducing their electricity bills. Additionally, the unit features an auto-restart function, which allows it to resume operation at the last settings used after a power outage, ensuring uninterrupted comfort.

Another significant characteristic of the Kenmore 251.90701 is its user-friendly interface. It comes with a remote control that allows for easy adjustments from anywhere in the room. The LCD display provides clear visibility of the current settings, including temperature and fan speed. The unit also supports programmable timers, enabling users to set specific times for the AC to turn on and off, further enhancing convenience and efficiency.

Moreover, the air conditioner includes multiple fan speeds and cooling modes, allowing for customizable comfort. Users can choose from several operation modes, including cool, fan, and dry modes, depending on their specific needs. The adjustable airflow is an essential feature, as it allows for directional cooling, ensuring that every corner of the room receives adequate airflow.

The filtration system of the Kenmore 251.90701 also deserves mention, as it is designed to capture dust and allergens, improving indoor air quality. The washable filter is easy to maintain, contributing to the longevity of the unit and ensuring that it operates efficiently over time.

In summary, the Kenmore 251.90701 air conditioning unit combines powerful cooling capabilities with energy-efficient technologies and user-friendly features, making it a remarkable choice for anyone seeking to enhance their indoor comfort. Its robust design, along with its commitment to efficiency and air quality, makes it a reliable companion in the fight against heat.