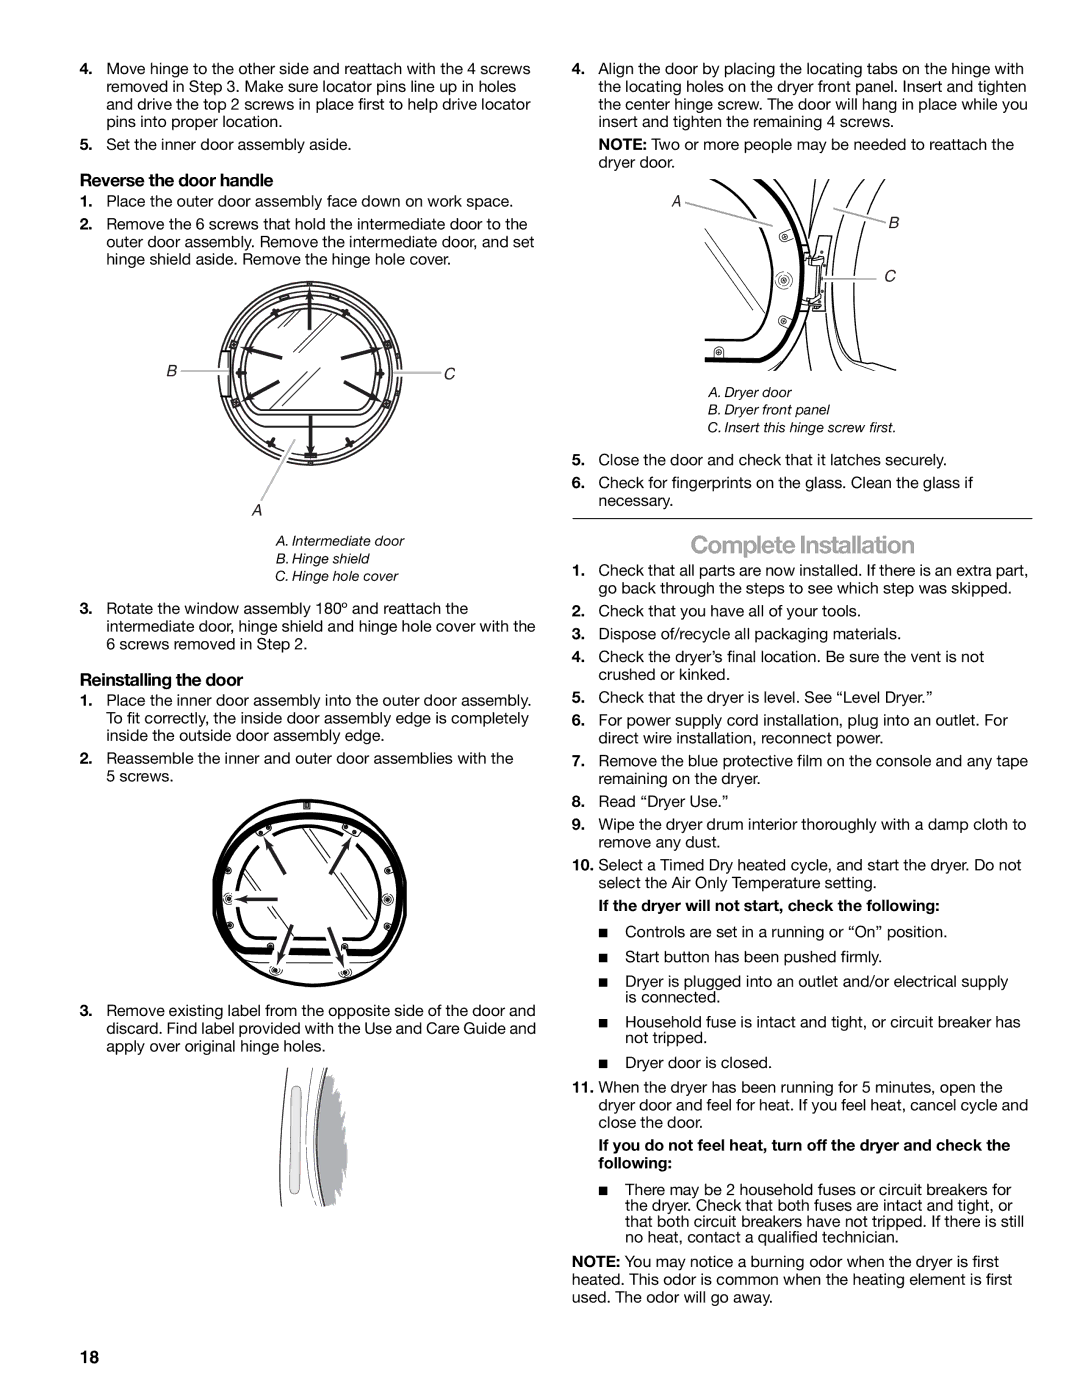
4.Move hinge to the other side and reattach with the 4 screws removed in Step 3. Make sure locator pins line up in holes and drive the top 2 screws in place first to help drive locator pins into proper location.

5.Set the inner door assembly aside.

Reverse the door handle

1.Place the outer door assembly face down on work space.

2.Remove the 6 screws that hold the intermediate door to the outer door assembly. Remove the intermediate door, and set hinge shield aside. Remove the hinge hole cover.

B

C

A

A. Intermediate door

B. Hinge shield

C. Hinge hole cover

3.Rotate the window assembly 180º and reattach the intermediate door, hinge shield and hinge hole cover with the 6 screws removed in Step 2.

Reinstalling the door

1.Place the inner door assembly into the outer door assembly. To fit correctly, the inside door assembly edge is completely inside the outside door assembly edge.

2.Reassemble the inner and outer door assemblies with the 5 screws.

3.Remove existing label from the opposite side of the door and discard. Find label provided with the Use and Care Guide and apply over original hinge holes.

4.Align the door by placing the locating tabs on the hinge with the locating holes on the dryer front panel. Insert and tighten the center hinge screw. The door will hang in place while you insert and tighten the remaining 4 screws.

NOTE: Two or more people may be needed to reattach the dryer door.

A

B

C

A. Dryer door

B. Dryer front panel

C. Insert this hinge screw first.

5.Close the door and check that it latches securely.

6.Check for fingerprints on the glass. Clean the glass if necessary.

Complete Installation

1.Check that all parts are now installed. If there is an extra part, go back through the steps to see which step was skipped.

2.Check that you have all of your tools.

3.Dispose of/recycle all packaging materials.

4.Check the dryer’s final location. Be sure the vent is not crushed or kinked.

5.Check that the dryer is level. See “Level Dryer.”

6.For power supply cord installation, plug into an outlet. For direct wire installation, reconnect power.

7.Remove the blue protective film on the console and any tape remaining on the dryer.

8.Read “Dryer Use.”

9.Wipe the dryer drum interior thoroughly with a damp cloth to remove any dust.

10.Select a Timed Dry heated cycle, and start the dryer. Do not select the Air Only Temperature setting.

If the dryer will not start, check the following:

Controls are set in a running or “On” position.

Start button has been pushed firmly.

Dryer is plugged into an outlet and/or electrical supply is connected.

Household fuse is intact and tight, or circuit breaker has not tripped.

Dryer door is closed.

11.When the dryer has been running for 5 minutes, open the dryer door and feel for heat. If you feel heat, cancel cycle and close the door.

If you do not feel heat, turn off the dryer and check the following:

There may be 2 household fuses or circuit breakers for the dryer. Check that both fuses are intact and tight, or that both circuit breakers have not tripped. If there is still no heat, contact a qualified technician.

NOTE: You may notice a burning odor when the dryer is first heated. This odor is common when the heating element is first used. The odor will go away.

18

Page 18
Image 18
Kenmore 8789, 110.8787 manual Complete Installation, Reverse the door handle, Reinstalling the door

8789, 110.8787 specifications

The Kenmore 110.8787 and 110.8789 are prominent models in the Kenmore washing machine lineup, designed to provide efficiency, durability, and advanced cleaning performance. These machines are known for their stylish design and user-friendly features that cater to various laundry needs.

One of the standout characteristics of the Kenmore 110.8787 and 110.8789 is their capacity. With a sizable drum, these washers can accommodate larger loads, making them ideal for families or individuals who frequently wash bulky items like bedding and towels. This larger capacity not only saves time by allowing users to wash more items per load but also promotes better water and energy efficiency.

These machines feature a range of wash cycles designed to handle different fabric types and soil levels. With options such as normal, delicate, heavy-duty, and quick wash, users can customize their laundry experience based on their needs. The intuitive control panel simplifies the process, ensuring that selecting the appropriate cycle is straightforward.

Another significant technological advancement in the Kenmore 110.8787 and 110.8789 is their advanced agitation system. These washers utilize a combination of traditional agitator motion and modern washing technologies, which provide optimal cleaning performance while being gentle on clothes. The machines also incorporate smart sensors that adjust water levels and wash times according to the load size, ensuring resource efficiency.

Energy efficiency is a key selling point for both models, which are designed to consume less water and electricity compared to older washing machines. With ENERGY STAR certifications, users can expect lower utility bills without compromising on performance. The durable construction of the Kenmore 110.8787 and 110.8789 also means that these machines are built to last, featuring high-quality components that withstand regular use.

In addition to performance and efficiency, convenience features such as delay start, end-of-cycle signal, and lint filters make these washers very user-friendly. The sleek design fits well in any laundry room environment, enhancing aesthetics while providing top-notch functionality.

In summary, the Kenmore 110.8787 and 110.8789 washing machines stand out for their impressive capacity, multiple wash cycles, energy efficiency, and thoughtful design. Whether tackling everyday laundry or dealing with particular items, these machines offer a reliable and effective solution for all household washing needs.