Installation

FOR RESIDENTIAL USE ONLY NOT TO BE INSTALLED OVER GAS GRILLS PLEASE READ ENTIRE INSTRUCTIONS BEFORE PROCEEDING. INSTALLATION MUST COMPLY WITH ALL LOCAL CODES.

IMPORTANT: Save these Instructions for the Local Electrical Inspector’s use. INSTALLER: Please leave these Instructions with this unit for the owner. OWNER: Please retain these instructions for future reference. SAFETY WARNING: Turn off power circuit at the service entrance and lock out panel, before wiring this appliance. REQUIREMENT: 120 V AC, 60 Hz. 15 or 20 Amp

Dimensions


Before Installing Hood


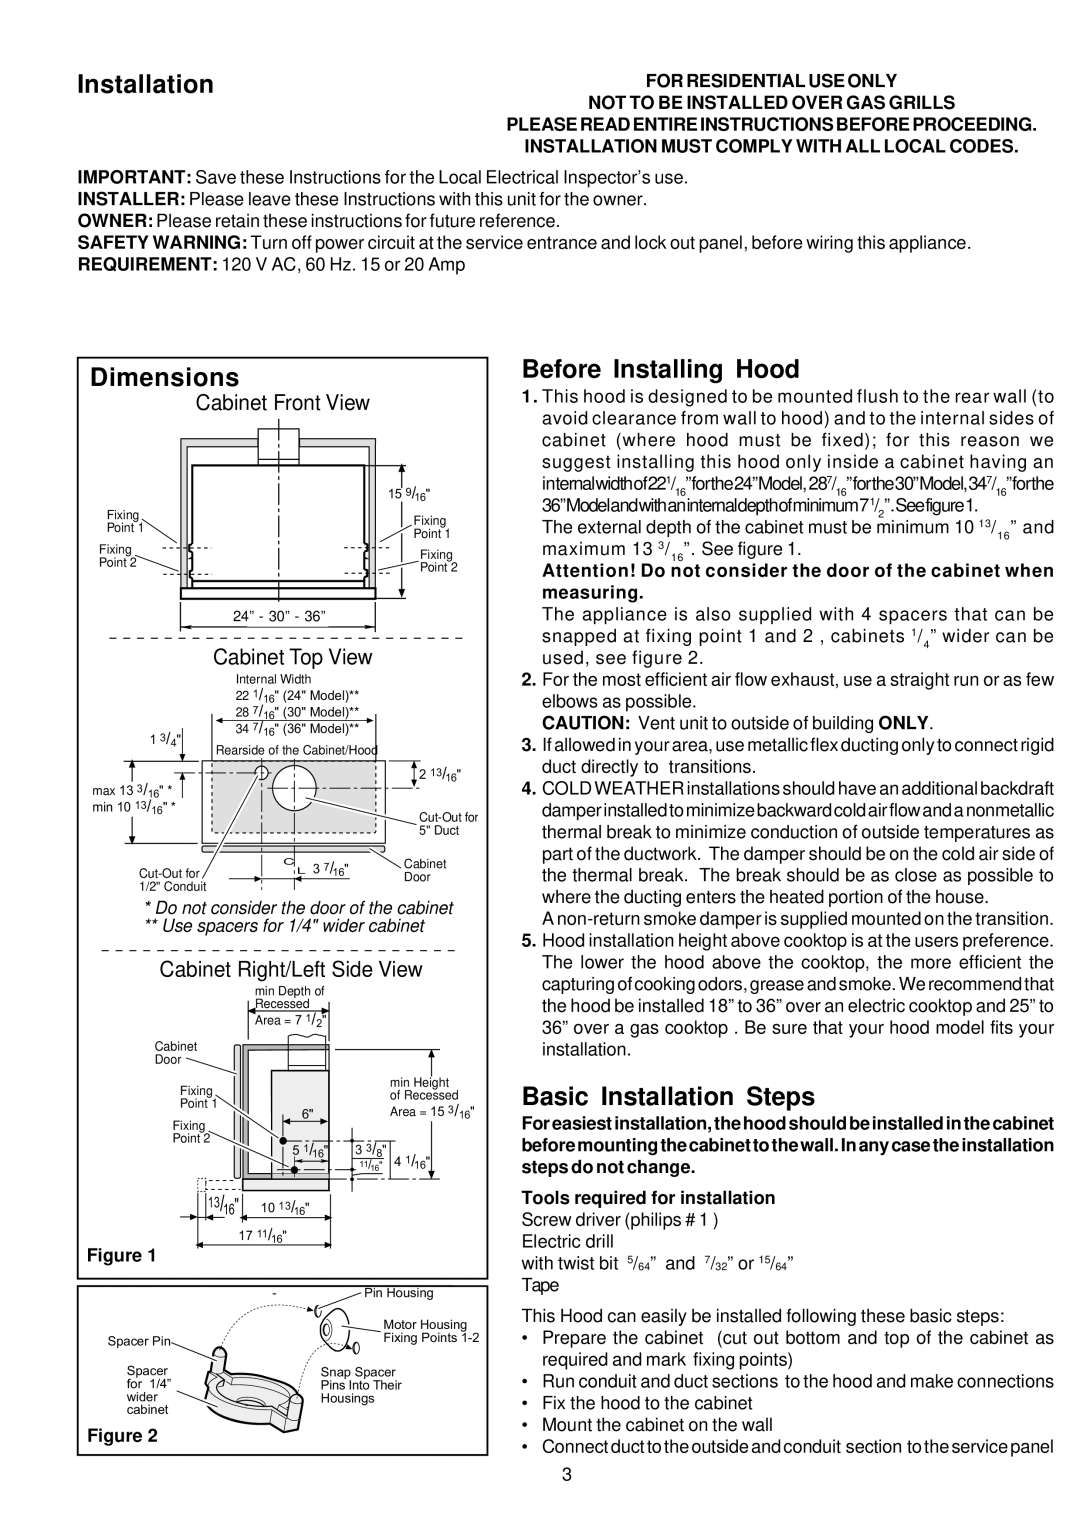
1. This hood is designed to be mounted flush to the rear wall (to

Cabinet Front View


avoid clearance from wall to hood) and to the internal sides of


cabinet (where hood must be fixed); for this reason we


suggest installing this hood only inside a cabinet having an


1


7


7

”forthe


15 9/16"


internalwidthof22

/

”forthe24”Model,28 / ”forthe30”Model,34

/


16


16


16


1


Fixing


36”Modelandwithaninternaldepthofminimum7 / ”.Seefigure1.


Fixing


2


The external depth of the cabinet must be minimum

10

13

/


” and

Point 1


Point 1


16


maximum 13

3

/


” . See figure 1.


Fixing


Fixing


16


Point 2


Point 2


Attention! Do not consider the door of the cabinet when


measuring.


24”

- 30”

- 36”


The appliance is also supplied with 4 spacers that can be


snapped at fixing point 1 and 2 , cabinets

1

/

” wider can be


Cabinet Top View


used, see figure 2.


4


2.

For the most efficient air flow exhaust, use a straight run or as few


Internal Width


22 1/16" (24" Model)**


elbows as possible.


28 7/16" (30" Model)**


CAUTION: Vent unit to outside of building ONLY.


1 3/4"

34 7/16" (36" Model)**


3.

If allowed in your area, use metallic flex ducting only to connect rigid

Rearside of the Cabinet/Hood


duct directly to

transitions.


2 13/16"


max 13 3/16" *


4.

COLD WEATHER installations should have an additional backdraft

min 10 13/16" *


Cut-Out for


damper installed to minimize backward cold air flow and a nonmetallic


thermal break to minimize conduction of outside temperatures as


5" Duct


C


Cabinet


part of the ductwork. The damper should be on the cold air side of

Cut-Out for


L 3 7/16"


the thermal break. The break should be as close as possible to


Door


1/2" Conduit


where the ducting enters the heated portion of the house.


* Do not consider the door of the cabinet


A non-return smoke damper is supplied mounted on the transition.

** Use spacers for 1/4" wider cabinet


5.

Hood installation height above cooktop is at the users preference.


Cabinet Right/Left Side View


The lower the hood above the cooktop, the more efficient the


capturing of cooking odors, grease and smoke. We recommend that


min Depth of


Recessed


the hood be installed 18” to 36” over an electric cooktop and 25” to


Area = 7 1/2"


36” over a gas cooktop

. Be sure that your hood model fits your


Cabinet


installation.


Door


Fixing


min Height


Basic Installation Steps


of Recessed


Point 1


6"


Area = 15 3/


"


Fixing


16

For easiest installation, the hood should be installed in the cabinet

Point 2


5 1/16"

3 3/8"


before mounting the cabinet to the wall. In any case the installation


4 1/ "


11

/ "


steps do not change.


16


16


13/

"

10 13

"


Tools required for installation


16


/16


Screw driver (philips # 1 )


17 11/16"


Figure 1


Electric drill


with twist bit

5

/64


and

7

/32

or

15

/64


Pin

Housing


Tape


Motor Housing

This Hood can easily be installed following these basic steps:


Prepare the cabinet


(cut out bottom and top of the cabinet as

Spacer Pin


Fixing Points


1-2


Spacer


Snap Spacer


required and mark fixing points)


Run conduit and duct sections to the hood and make connections

for 1/4”


Pins

Into

Their


wider


Housings


Fix the hood to the cabinet


cabinet


Mount the cabinet on the wall


Figure 2


Connect duct to the outside and conduit section to the service panel


3


Page 3
Image 3
Kenyon B81200 Series manual Dimensions Before Installing Hood, Basic Installation Steps

B81200 Series specifications

The Kenyon B81200 Series represents a significant advancement in portable electric cooking technology, catering to the needs of modern culinary enthusiasts. This series of cooktops stands out for its innovative design, high efficiency, and user-friendly features, making it a popular choice for both home cooks and professional chefs.

One of the main features of the Kenyon B81200 Series is its sleek, elegant design that seamlessly blends with any kitchen décor. The ceramic glass surface not only enhances its aesthetic appeal but also provides a smooth cooking area that is easy to clean. The series is available in various sizes, allowing users to select a model that fits their specific cooking space requirements.

Technologically, the Kenyon B81200 incorporates high-quality induction cooking technology, which ensures fast and efficient heating. This method allows for rapid temperature adjustments and precise control, resulting in better cooking outcomes. With induction cooking, energy is directly transferred to the cookware, minimizing heat loss and leading to a more eco-friendly cooking process.

The B81200 Series also features multiple cooking zones, each equipped with individual controls. This allows users to cook multiple dishes simultaneously with precision. The intuitive control panel is easy to navigate, with clear indicators of temperature settings and cooking times. Moreover, the series is designed with safety in mind; it includes features like automatic shut-off, overheat protection, and child lock functions, ensuring a safe cooking environment.

Another notable characteristic of the Kenyon B81200 Series is its versatility. It supports a wide range of cookware types, including stainless steel, cast iron, and some non-ferrous materials. This flexibility makes it suitable for various cooking styles, from simmering sauces to searing meats.

Additionally, the series is compact and portable, making it ideal for small kitchens, RVs, and outdoor cooking. Its lightweight design does not compromise durability, as it is constructed from high-quality materials built to withstand everyday use.

In summary, the Kenyon B81200 Series is a remarkable blend of style, safety, and functionality. With its induction technology, multiple cooking zones, and user-friendly features, it meets the demands of today's culinary landscape while promoting energy efficiency and ease of use. Whether for casual home cooking or gourmet meal preparation, this series is poised to elevate any cooking experience.