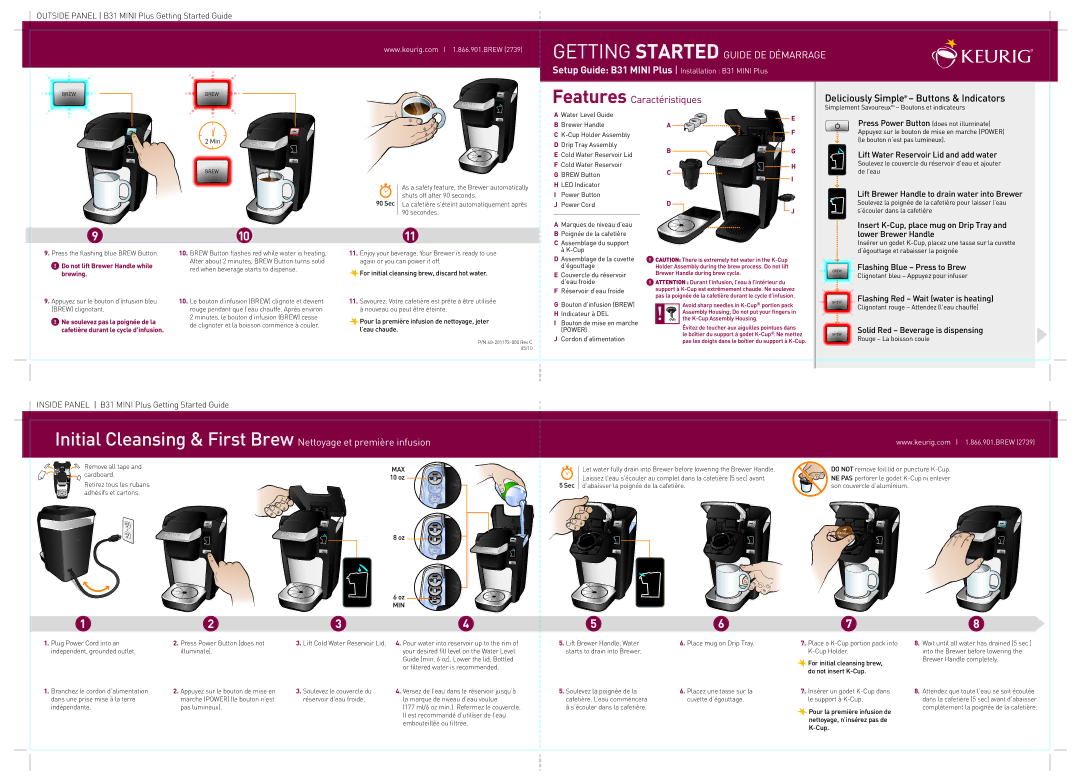
OUTSIDE PANEL B31 MINI Plus Getting Started Guide

www.keurig.com I 1.866.901.BREW (2739)

GETTING STARTED GUIDE DE DÉMARRAGE

Setup Guide: B31 MINI Plus Installation : B31 MINI Plus

BREW

BREW

Features Caractéristiques

Deliciously Simple® – Buttons & Indicators

Simplement SavoureuxMC – Boutons et indicateurs

2 Min

BREW

90 Sec

As a safety feature, the Brewer automatically shuts off after 90 seconds.

La cafetière s’éteint automatiquement après 90 secondes.

AWater Level Guide

BBrewer Handle

CK-Cup Holder Assembly

DDrip Tray Assembly

ECold Water Reservoir Lid

FCold Water Reservoir

GBREW Button

HLED Indicator

IPower Button

JPower Cord

A


E


F


B


G


C


H


I


D


J


Press Power Button (does not illuminate) Appuyez sur le bouton de mise en marche (POWER) (le bouton n’est pas lumineux).

Lift Water Reservoir Lid and add water

Soulevez le couvercle du réservoir d’eau et ajouter de l’eau

Lift Brewer Handle to drain water into Brewer

Soulevez la poignée de la cafetière pour laisser l’eau s’écouler dans la cafetière

9

10

11

A

Marques de niveau d’eau

B

Poignée de la cafetière

Insert K-Cup, place mug on Drip Tray and lower Brewer Handle

9.Press the flashing blue BREW Button.

!Do not lift Brewer Handle while brewing.

9.Appuyez sur le bouton d’infusion bleu (BREW) clignotant.

!Ne soulevez pas la poignée de la cafetière durant le cycle d’infusion.

10.BREW Button flashes red while water is heating. After about 2 minutes, BREW Button turns solid red when beverage starts to dispense.

10.Le bouton d’infusion (BREW) clignote et devient rouge pendant que l’eau chauffe. Après environ 2 minutes, le bouton d’infusion (BREW) cesse de clignoter et la boisson commence à couler.

11.Enjoy your beverage. Your Brewer is ready to use again or you can power it off.

For initial cleansing brew, discard hot water.

11.Savourez. Votre cafetière est prête à être utilisée à nouveau ou peut être éteinte.

Pour la première infusion de nettoyage, jeter l’eau chaude.

P/N 60-201173-000 Rev C 05/10

C Assemblage du support

à K-Cup

D Assemblage de la cuvette

d’égouttage

! CAUTION: There is extremely hot water in the K-Cup

Holder Assembly during the brew process. Do not lift

Brewer Handle during brew cycle.

BREW

Insérer un godet K-Cup, placez une tasse sur la cuvette d’égouttage et rabaisser la poignée

Flashing Blue – Press to Brew

E Couvercle du réservoir

d’eau froide

F Réservoir d’eau froide

G Bouton d’infusion (BREW)

H Indicateur à DEL

I Bouton de mise en marche

! ATTENTION : Durant l’infusion, l’eau à l’intérieur du

support à K-Cup est extrêmement chaude. Ne soulevez

pas la poignée de la cafetière durant le cycle d’infusion.

Avoid sharp needles in K-Cup®portion pack Assembly Housing; Do not put your fingers in the K-Cup Assembly Housing.

BREW

Clignotant bleu – Appuyez pour infuser

Flashing Red – Wait (water is heating)

Clignotant rouge – Attendez (l'eau chauffe)

(POWER)

J Cordon d’alimentation

Évitez de toucher aux aiguilles pointues dans le boîtier du support à godet K-Cup®. Ne mettez pas les doigts dans le boîtier du support à K-Cup.

BREW

Solid Red – Beverage is dispensing

Rouge – La boisson coule

INSIDE PANEL B31 MINI Plus Getting Started Guide

Initial Cleansing & First Brew Nettoyage et première infusion

www.keurig.com I 1.866.901.BREW (2739)

Remove all tape and

MAX

cardboard.

10 oz

Retirez tous les rubans

5 Sec

adhésifs et cartons.


Let water fully drain into Brewer before lowering the Brewer Handle.

Laissez l'eau s'écouler au complet dans la cafetière (5 sec) avant d'abaisser la poignée de la cafetière.

DO NOT remove foil lid or puncture K-Cup.

NE PAS perforer le godet K-Cup ni enlever son couvercle d’aluminium.

8 oz

1.Plug Power Cord into an independent, grounded outlet.

1.Branchez le cordon d’alimentation dans une prise mise à la terre indépendante.

6 oz

MIN

2.

Press Power Button (does not

3.

Lift Cold Water Reservoir Lid.

4.

Pour water into reservoir up to the rim of


illuminate).


your desired fill level on the Water Level


Guide (min. 6 oz). Lower the lid. Bottled


or filtered water is recommended.

2.

Appuyez sur le bouton de mise en

3.

Soulevez le couvercle du

4.

Versez de l’eau dans le réservoir jusqu’à


marche (POWER) (le bouton n’est


réservoir d'eau froide.


la marque de niveau d’eau voulue


pas lumineux).


(177 ml/6 oz min.). Refermez le couvercle.


Il est recommandé d’utiliser de l’eau


embouteillée ou filtrée.

5.Lift Brewer Handle. Water starts to drain into Brewer.

5.Soulevez la poignée de la cafetière. L’eau commencera à s’écouler dans la cafetière.

6.

Place mug on Drip Tray.

7.

Place a K-Cup portion pack into


K-Cup Holder.


For initial cleansing brew,


do not insert K-Cup.

6.

Placez une tasse sur la

7.

Insérer un godet K-Cup dans


cuvette d’égouttage.


le support à K-Cup.

Pour la première infusion de nettoyage, n’insérez pas de K-Cup.

8.Wait until all water has drained (5 sec.) into the Brewer before lowering the Brewer Handle completely.

8.Attendez que toute l'eau se soit écoulée dans la cafetière (5 sec) avant d'abaisser complètement la poignée de la cafetière.

Page 1
Image 1
Keurig 60-201173-000 setup guide Outside Panel B31 Mini Plus Getting Started Guide, Lift Water Reservoir Lid and add water

60-201173-000 specifications

The Keurig 60-201173-000 is a premium single-serve coffee maker that combines convenience, innovation, and style, catering to coffee lovers who value quality and ease of use. This model is a part of the Keurig K-Series, known for its robust brewing capabilities and user-friendly design.

One of the standout features of the Keurig 60 is its ability to brew a cup of coffee within minutes. Equipped with a powerful heating element, this coffee maker can rapidly heat water to the ideal brewing temperature, allowing users to enjoy their favorite coffee without the wait. The 48-ounce water reservoir is another significant characteristic, reducing the frequency of refills and enabling multiple cups to be brewed in succession.

The machine makes use of K-Cup Pods, which are available in a vast selection of coffee varieties, flavors, and brands. This not only allows for a customized coffee experience but also ensures a clean and mess-free brewing process. Users can choose from different beverage sizes, including 6, 8, or 10 ounces, catering to individual preferences or desired caffeine levels.

The user-friendly interface is enhanced by a straightforward control panel featuring simple buttons for selecting brew size and power functions. Additionally, its attractive design, with a compact and sleek profile, makes it a stylish addition to any kitchen or office setting. The removable drip tray accommodates travel mugs, further adding to its versatility.

Moreover, the Keurig 60-201173-000 incorporates innovative technologies such as an automatic shut-off feature that conserves energy and enhances safety by turning off the machine after a period of inactivity. The brewing system itself is designed for easy cleaning and maintenance, ensuring that coffee remains fresh and flavorful cup after cup.

Overall, the Keurig 60-201173-000 stands out as an exemplary single-serve coffee maker that merges technology with practicality. With its speedy brewing capabilities, diverse pod options, and user-centric features, it is an excellent choice for anyone looking to enjoy high-quality coffee on demand while minimizing preparation time and cleanup. Whether at home or in the office, this coffee maker promises a delightful caffeine experience with every brew.