VentedEnclosureApplications
The SoloX was designed for a vented enclosure. Throw out every experience you have ever had with a vented speaker and prepare to be blown away! Our engineers have designed boxes that will intimidate and irritate everyone within a 3 mile radius. These enclosures incorporate massive
These boxes are the enclosure of choice for outrageous street bass and high performance SPL contests. If space is not a problem and you want to get the most from your SoloX, try one of these ported designs. You will not be disappointed.
The ported Compact design increases bass efficiency and fits in many
The SPL is the largest and most efficient enclosure design. The SPL delivers the sonic output needed to |
If you prefer an
For more advice on box building, refer to your Authorized Kicker Dealer, or click on the Support tab on the Kicker homepage, www.kicker.com. Choose the Technical Manuals link and then download or view the corresponding information. Please
(405)
RemovalMountingAssembly | Figure 5 |
|
Please follow these instruction to insure proper installation.
With assistance, remove the SoloX from the cardboard box. See Figure 5.
INSTALLATION | win SPL contests and it produces bass notes in a “Livin’ Loud” manner. This design is intended for test | |||
tones above 56Hz; playing music with frequencies below 56Hz will result in subwoofer damage. | ||||
Model: | VentedCompact (MinimumEnclosureVolume) | VentedSPL (MaximumEnclosureVolume) | ||
|
|
| ||
S18X | 5 ft3 (142L) + port displacement, Fb=35Hz | 10 ft3 (283L) + port displacement, Fb=56Hz | ||
| ||||
|
| Port: 60 in2 (387cm2) area x 14.5” (36.8cm) long | Port: 300 in2 (1935cm2) area x 9” (22.9cm) long | |
|
| Power Handling = 5000W Peak | Power Handling = 10000W Peak above 56Hz | |
| Model: | VentedSUV (TheOneToDo) |
| |
|
|
|
| |
| S18X | 10 ft3 (283L) + port displacement, Fb=35Hz |
| |
|
| Port: 150 in2 (968cm2) area x 21” (53.3cm) long |
| |
|
| Power Handling = 4500W Peak |
| |
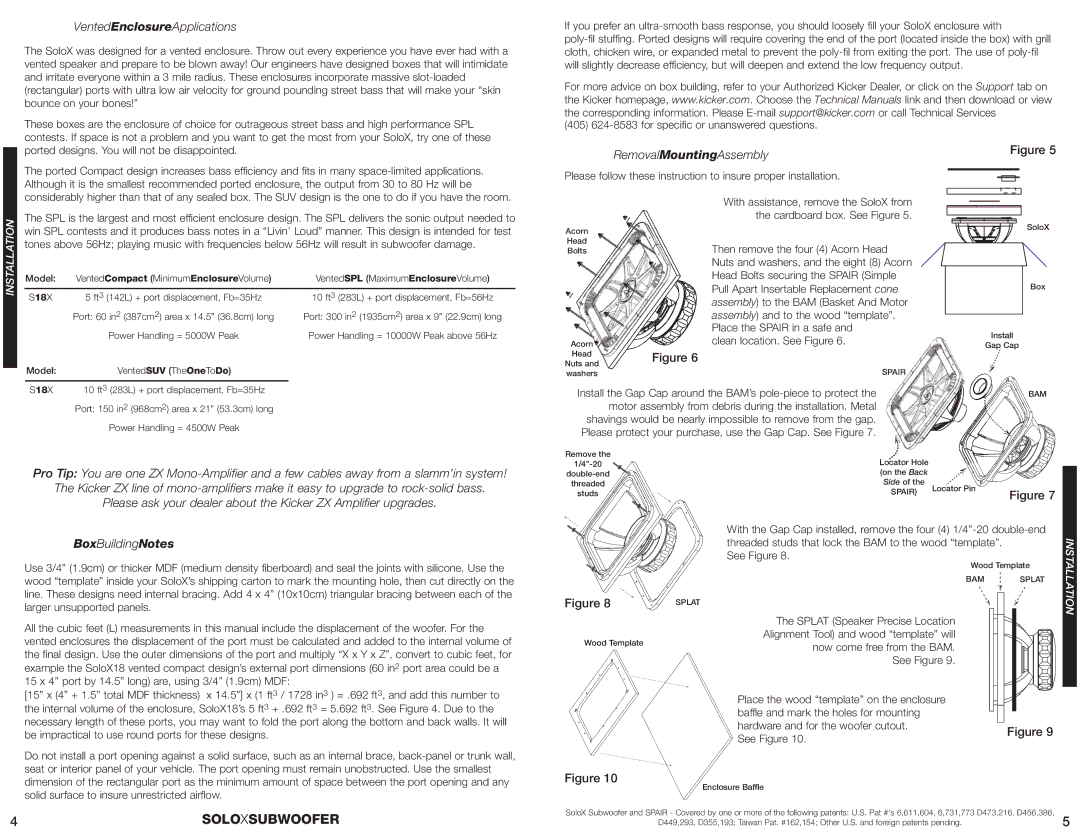
Acorn |
| |
Head | Then remove the four (4) Acorn Head | |
Bolts | ||
| Nuts and washers, and the eight (8) Acorn | |
| Head Bolts securing the SPAIR (Simple | |
| Pull Apart Insertable Replacement cone | |
| assembly) to the BAM (Basket And Motor | |
| assembly) and to the wood “template”. | |
| Place the SPAIR in a safe and | |
Acorn | clean location. See Figure 6. | |
Head | Figure 6 | |
Nuts and | ||
SPAIR | ||
washers |
Install the Gap Cap around the BAM’s
SoloX
Box
Install
Gap Cap
BAM
Pro Tip: You are one ZX
The Kicker ZX line of
Please ask your dealer about the Kicker ZX Amplifier upgrades.
BoxBuildingNotes
Use 3/4” (1.9cm) or thicker MDF (medium density fiberboard) and seal the joints with silicone. Use the wood “template” inside your SoloX’s shipping carton to mark the mounting hole, then cut directly on the line. These designs need internal bracing. Add 4 x 4” (10x10cm) triangular bracing between each of the larger unsupported panels.
All the cubic feet (L) measurements in this manual include the displacement of the woofer. For the vented enclosures the displacement of the port must be calculated and added to the internal volume of the final design. Use the outer dimensions of the port and multiply “X x Y x Z”, convert to cubic feet, for example the SoloX18 vented compact design’s external port dimensions (60 in2 port area could be a
15 x 4” port by 14.5” long) are, using 3/4” (1.9cm) MDF:
[15” x (4” + 1.5” total MDF thickness) x 14.5”] x (1 ft3 / 1728 in3 ) = .692 ft3, and add this number to the internal volume of the enclosure, SoloX18’s 5 ft3 + .692 ft3 = 5.692 ft3. See Figure 4. Due to the necessary length of these ports, you may want to fold the port along the bottom and back walls. It will be impractical to use round ports for these designs.
Do not install a port opening against a solid surface, such as an internal brace,
4 | SOLOXSUBWOOFER |
Remove the | Locator Hole |
|
|
|
|
|
| ||
(on the Back |
|
|
| |
threaded | Side of the | Locator Pin |
|
|
studs | SPAIR) | Figure 7 |
| |
|
| |||
|
|
| ||
| With the Gap Cap installed, remove the four (4) |
| ||
| threaded studs that lock the BAM to the wood “template”. |
| INSTALLATION | |
| See Figure 8. | Wood Template | ||
|
| |||
|
|
| ||
|
| BAM | SPLAT |
|
Figure 8 | SPLAT |
|
|
|
| The SPLAT (Speaker Precise Location |
|
| |
Wood Template | Alignment Tool) and wood “template” will |
|
| |
now come free from the BAM. |
|
| ||
|
|
| ||
| See Figure 9. |
|
| |
| Place the wood “template” on the enclosure |
|
| |
| baffle and mark the holes for mounting |
|
|
|
| hardware and for the woofer cutout. |
| Figure 9 |
|
| See Figure 10. |
|
| |
|
|
|
| |
Figure 10 | Enclosure Baffle |
|
|
|
|
|
|
| |
SoloX Subwoofer and SPAIR - Covered by one or more of the following patents: U.S. Pat #'s 6,611,604, 6,731,773 D473,216, D456,386, | 5 | |||
| D449,293, D355,193; Taiwan Pat. #162,154; Other U.S. and foreign patents pending. |
| ||