GRILL OPERATION CAUTIONS
• Avoid bumping or impacting grill. |
• Keep your hands, hair and face away from burning charcoal. |
1 | STEP 5. |
|
• This grill has an open flame. Be careful of loose hair and clothing during operation. They may |
catch fire. |
• Use protective gloves when handling this grill or working with fire. Use protective gloves or |
long, sturdy fireplace tools when adding wood or charcoal. |
• Do not allow anyone to conduct activities around this grill during or following its use until the |
unit has cooled. This grill is HOT during operation and remains HOT for a period of time |
following its use. |
• Fatty foods like hamburgers can have excess grease that can cause flare ups. When cooking |
fatty foods, use caution when opening lid and during cooking to avoid being burned. |
B
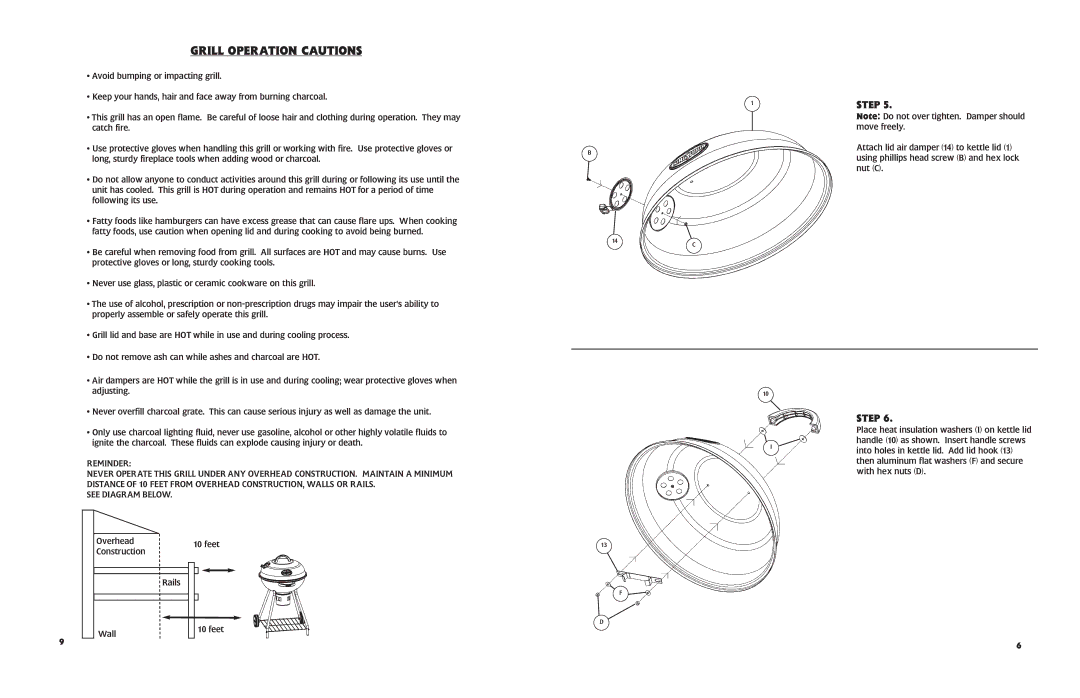
Note: Do not over tighten. Damper should move freely.
Attach lid air damper (14) to kettle lid (1) using phillips head screw (B) and hex lock nut (C).
• Be careful when removing food from grill. All surfaces are HOT and may cause burns. Use |
protective gloves or long, sturdy cooking tools. |
• Never use glass, plastic or ceramic cookware on this grill. |
• The use of alcohol, prescription or |
properly assemble or safely operate this grill. |
• Grill lid and base are HOT while in use and during cooling process. |
• Do not remove ash can while ashes and charcoal are HOT. |
• Air dampers are HOT while the grill is in use and during cooling; wear protective gloves when |
adjusting. |
• Never overfill charcoal grate. This can cause serious injury as well as damage the unit. |
• Only use charcoal lighting fluid, never use gasoline, alcohol or other highly volatile fluids to |
ignite the charcoal. These fluids can explode causing injury or death. |
REMINDER:
NEVER OPERATE THIS GRILL UNDER ANY OVERHEAD CONSTRUCTION. MAINTAIN A MINIMUM DISTANCE OF 10 FEET FROM OVERHEAD CONSTRUCTION, WALLS OR RAILS.
SEE DIAGRAM BELOW.
Overhead | 10 feet | |
Construction | ||
| ||
| Rails |
14
13
C
10
STEP 6.
Place heat insulation washers (I) on kettle lid handle (10) as shown. Insert handle screws
I | into holes in kettle lid. Add lid hook (13) |
| |
| then aluminum flat washers (F) and secure |
| with hex nuts (D). |
9
Wall | 10 feet |
|
F
D
6
