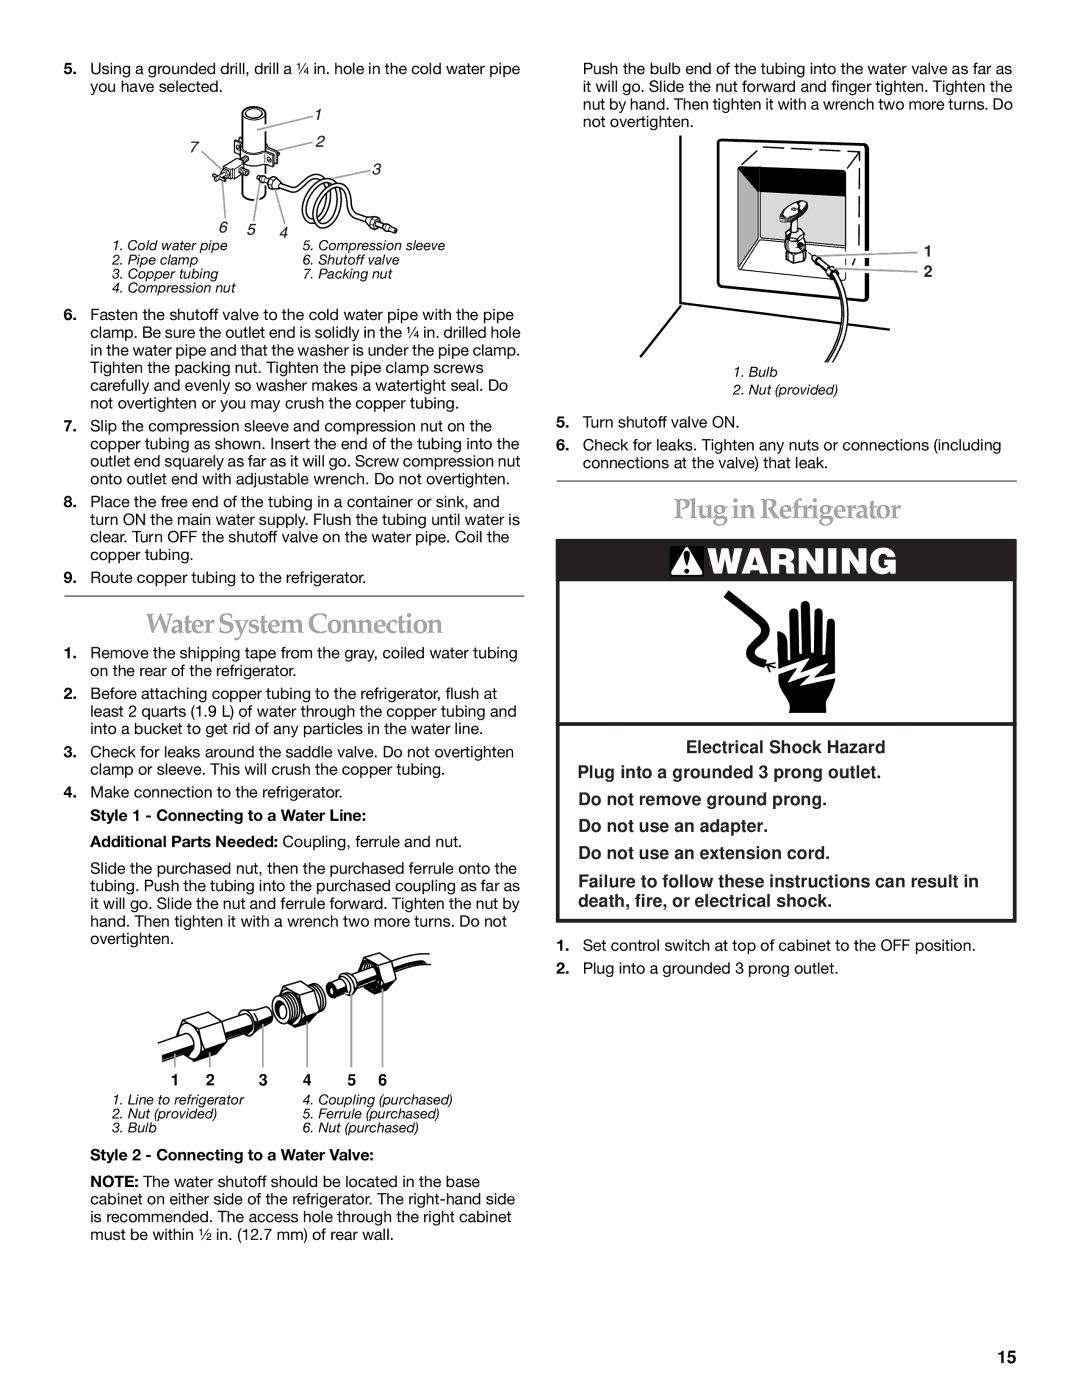
5.Using a grounded drill, drill a ¹⁄₄ in. hole in the cold water pipe you have selected.

Push the bulb end of the tubing into the water valve as far as it will go. Slide the nut forward and finger tighten. Tighten the nut by hand. Then tighten it with a wrench two more turns. Do not overtighten.

1.

Cold water pipe

5.

Compression sleeve

2.

Pipe clamp

6.

Shutoff valve

3.

Copper tubing

7.

Packing nut

4.Compression nut

6.Fasten the shutoff valve to the cold water pipe with the pipe clamp. Be sure the outlet end is solidly in the ¹⁄₄ in. drilled hole in the water pipe and that the washer is under the pipe clamp. Tighten the packing nut. Tighten the pipe clamp screws carefully and evenly so washer makes a watertight seal. Do not overtighten or you may crush the copper tubing.

7.Slip the compression sleeve and compression nut on the copper tubing as shown. Insert the end of the tubing into the outlet end squarely as far as it will go. Screw compression nut onto outlet end with adjustable wrench. Do not overtighten.

8.Place the free end of the tubing in a container or sink, and turn ON the main water supply. Flush the tubing until water is clear. Turn OFF the shutoff valve on the water pipe. Coil the copper tubing.

9.Route copper tubing to the refrigerator.

Water System Connection

1.Remove the shipping tape from the gray, coiled water tubing on the rear of the refrigerator.

2.Before attaching copper tubing to the refrigerator, flush at least 2 quarts (1.9 L) of water through the copper tubing and into a bucket to get rid of any particles in the water line.

3.Check for leaks around the saddle valve. Do not overtighten clamp or sleeve. This will crush the copper tubing.

4.Make connection to the refrigerator.

Style 1 - Connecting to a Water Line:

Additional Parts Needed: Coupling, ferrule and nut.

Slide the purchased nut, then the purchased ferrule onto the tubing. Push the tubing into the purchased coupling as far as it will go. Slide the nut and ferrule forward. Tighten the nut by hand. Then tighten it with a wrench two more turns. Do not overtighten.

1

2

1.Bulb

2.Nut (provided)

5.Turn shutoff valve ON.

6.Check for leaks. Tighten any nuts or connections (including connections at the valve) that leak.

Plug in Refrigerator

WARNING

Electrical Shock Hazard

Plug into a grounded 3 prong outlet.

Do not remove ground prong.

Do not use an adapter.

Do not use an extension cord.

Failure to follow these instructions can result in death, fire, or electrical shock.

1.Set control switch at top of cabinet to the OFF position.

2.Plug into a grounded 3 prong outlet.


1

2

3

4

5

6

1.

Line to refrigerator


4.

Coupling (purchased)

2.

Nut (provided)


5.

Ferrule (purchased)

3.

Bulb


6.

Nut (purchased)

Style 2 - Connecting to a Water Valve:

NOTE: The water shutoff should be located in the base cabinet on either side of the refrigerator. The right-hand side is recommended. The access hole through the right cabinet must be within ¹⁄₂ in. (12.7 mm) of rear wall.

15

Page 15
Image 15
KitchenAid 2266877 manual Water System Connection, Plug in Refrigerator, Style 1 Connecting to a Water Line

2266877 specifications

The KitchenAid 2266877 is an essential kitchen appliance that epitomizes convenience, durability, and style. As part of KitchenAid’s renowned lineup, this model is designed to cater to both amateur cooks and seasoned chefs. One of its standout features is the robust motor that ensures efficient mixing and kneading, while maintaining a quiet operation. This powerful motor is complemented by a range of speed settings, allowing users to choose the perfect speed for various tasks, from whipping egg whites to kneading pizza dough.

The construction of the KitchenAid 2266877 is marked by its high-quality materials. The body is crafted from sturdy metal, ensuring longevity and stability during use. Additionally, the mixer’s sleek design makes it an attractive addition to any kitchen countertop. Available in multiple colors, it can easily match different aesthetic preferences, making it as much a decorative piece as a functional appliance.

In terms of technologies, the KitchenAid 2266877 boasts an innovative planetary mixing action. This means that the mixing attachment moves in one direction while the bowl rotates in the opposite direction, ensuring that all ingredients are mixed thoroughly without any manual intervention. This feature is particularly useful for baking, as it promotes an even consistency and reduces the risk of lumps in the mixture.

The appliance comes equipped with different attachments that enhance its versatility. The standard wire whip, flat beater, and dough hook allow users to tackle a wide range of recipes, from delicate meringues to robust bread doughs. Its compatibility with additional attachments like pasta makers and food grinders further expands its functional utility, making it a valuable investment for anyone who enjoys cooking or baking.

Another remarkable characteristic of the KitchenAid 2266877 is its easy-to-use control panel. The intuitive design enables users to adjust speeds and settings effortlessly. Additionally, it features a tilt-head design, allowing for easy access to the bowl and attachments for quick installation and cleaning.

In conclusion, the KitchenAid 2266877 stands out for its powerful performance, durable construction, and versatile capabilities. This mixer is ideal for anyone looking to elevate their culinary skills while enjoying the convenience of a high-quality kitchen appliance. Its combination of technology, functionality, and style makes it a must-have for any kitchen enthusiast.