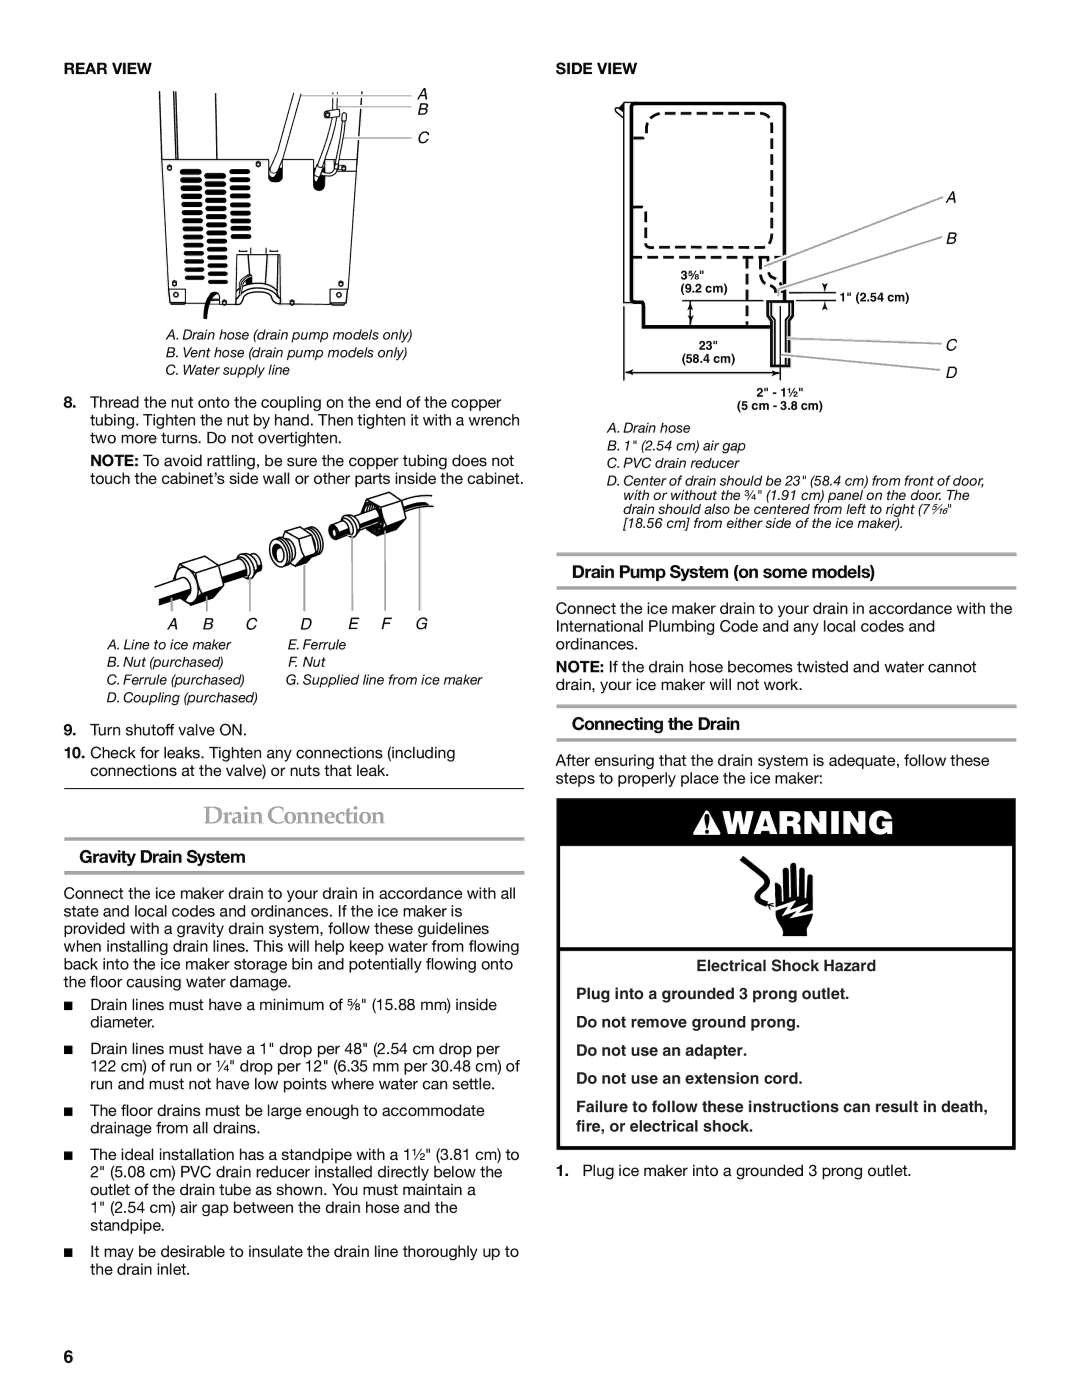
REAR VIEW

A

B

C

A. Drain hose (drain pump models only)

B. Vent hose (drain pump models only)

C. Water supply line

8.Thread the nut onto the coupling on the end of the copper tubing. Tighten the nut by hand. Then tighten it with a wrench two more turns. Do not overtighten.

NOTE: To avoid rattling, be sure the copper tubing does not touch the cabinet’s side wall or other parts inside the cabinet.

A

B

C

D

E F

G

A. Line to ice maker


E. Ferrule


B. Nut (purchased)


F. Nut


C. Ferrule (purchased)


G. Supplied line from ice maker

D. Coupling (purchased)


9.Turn shutoff valve ON.

10.Check for leaks. Tighten any connections (including connections at the valve) or nuts that leak.

SIDE VIEW

A

B

3⁵⁄₈"

(9.2 cm)

1" (2.54 cm)

23"


C

(58.4 cm)

D

2" - 1¹⁄₂"

(5 cm - 3.8 cm)

A. Drain hose

B. 1" (2.54 cm) air gap C. PVC drain reducer

D. Center of drain should be 23" (58.4 cm) from front of door, with or without the ³⁄₄" (1.91 cm) panel on the door. The drain should also be centered from left to right (7⁵⁄₁₆" [18.56 cm] from either side of the ice maker).

Drain Pump System (on some models)

Connect the ice maker drain to your drain in accordance with the International Plumbing Code and any local codes and ordinances.

NOTE: If the drain hose becomes twisted and water cannot drain, your ice maker will not work.

Connecting the Drain

After ensuring that the drain system is adequate, follow these steps to properly place the ice maker:

Drain Connection

Gravity Drain System

Connect the ice maker drain to your drain in accordance with all state and local codes and ordinances. If the ice maker is provided with a gravity drain system, follow these guidelines when installing drain lines. This will help keep water from flowing back into the ice maker storage bin and potentially flowing onto the floor causing water damage.

Drain lines must have a minimum of ⁵⁄₈" (15.88 mm) inside diameter.

Drain lines must have a 1" drop per 48" (2.54 cm drop per 122 cm) of run or ¹⁄₄" drop per 12" (6.35 mm per 30.48 cm) of run and must not have low points where water can settle.

The floor drains must be large enough to accommodate drainage from all drains.

The ideal installation has a standpipe with a 1¹⁄₂" (3.81 cm) to 2" (5.08 cm) PVC drain reducer installed directly below the outlet of the drain tube as shown. You must maintain a

1" (2.54 cm) air gap between the drain hose and the standpipe.

It may be desirable to insulate the drain line thoroughly up to the drain inlet.

WARNING

Electrical Shock Hazard

Plug into a grounded 3 prong outlet.

Do not remove ground prong.

Do not use an adapter.

Do not use an extension cord.

Failure to follow these instructions can result in death, fire, or electrical shock.

1.Plug ice maker into a grounded 3 prong outlet.

6

Page 6
Image 6
KitchenAid 2313684A manual Drain Connection, Drain Pump System on some models, Connecting the Drain, Gravity Drain System

2313684A specifications

The KitchenAid 2313684A is a versatile and powerful addition to any kitchen, designed to cater to the needs of home cooks and professional chefs alike. This model stands out with its exceptional design and array of features that enhance the cooking experience.

One of the main highlights of the KitchenAid 2313684A is its robust construction. Built to last, it combines a stainless steel body with a powerful motor that ensures durability and resilience. The elegant design not only makes it aesthetically pleasing but also easy to clean, maintaining its polished look after numerous culinary adventures.

The 2313684A is equipped with a variety of attachments, enabling users to perform multiple functions in the kitchen. From mixing and kneading to whipping and pounding, this device eliminates the need for various gadgets, as it can handle a range of tasks with ease. This feature is especially useful for those who wish to streamline their kitchen tools without sacrificing functionality.

Another significant feature is the variable speed control. Users can choose from multiple speeds, allowing for precise mixing according to individual recipes and preferences. This flexibility is essential when dealing with different ingredients, ensuring perfect results whether making delicate meringues or robust bread doughs.

The KitchenAid 2313684A also embraces modern technology with its ergonomic design, which provides a comfortable grip and usability. The bowl-lift mechanism allows for easy access to ingredients and the ability to work with larger batches, making it a practical choice for larger households or those who like to entertain.

Safety is integral to KitchenAid's philosophy, and the 2313684A incorporates various safety measures, including a locking mechanism during operation. This feature provides peace of mind, allowing users to focus on their culinary creations without worrying about accidental mishaps.

Moreover, KitchenAid offers a range of color options for the 2313684A, allowing customers to choose a model that matches their kitchen decor and personal style. This attention to detail ensures that the appliance not only performs well but also complements the overall aesthetic of the kitchen.

In conclusion, the KitchenAid 2313684A combines power, versatility, and style, making it an indispensable tool for any cooking enthusiast. Its high-quality construction, numerous attachments, variable speed options, and safety features set it apart in the competitive market of kitchen appliances, ensuring that it meets the demands of both casual cooks and seasoned professionals. Whether you’re baking a cake, whipping cream, or kneading dough, the KitchenAid 2313684A is designed to make the process efficient and enjoyable.