This appliance should be connected directly to the fused disconnect (or

circuit breaker box) through flexible, arrn&d or non-metallic sheathed, copper cable (with

6. Where local codes Do Not

permit...

connecting the cabinet-grounding conductor to the neutral (white) junction box wire:

Now start...

With oven in kitchen.

Remove shipping materials, tape, and

grounding wire). The flexible armored cable from the appliance should be connected directly to the junction box.

El Locate the junction box to allow as

. much slack in the cable as possible between the junction box and the appliance so that the oven can be moved if servicing is ever necessary. Do Not cut the conduit.

El A U.L.-listed conduit connector must

. be provided at the junction box.

Figure 2

Cable from

from oven connector

El . protective film from oven. Do Not remove shipping base at this time.

(21Remove the racks and other parts

. from inside both ovens.

Personal Injury/Property Damage Hazard l Use both hands to remove oven doors.

l Grasp only the sides of oven doors.

l Do Not use handle or any portion of the

A wiring diagram is included in the

El n Tech Sheet. The Tech Sheet is located behind the air grille.

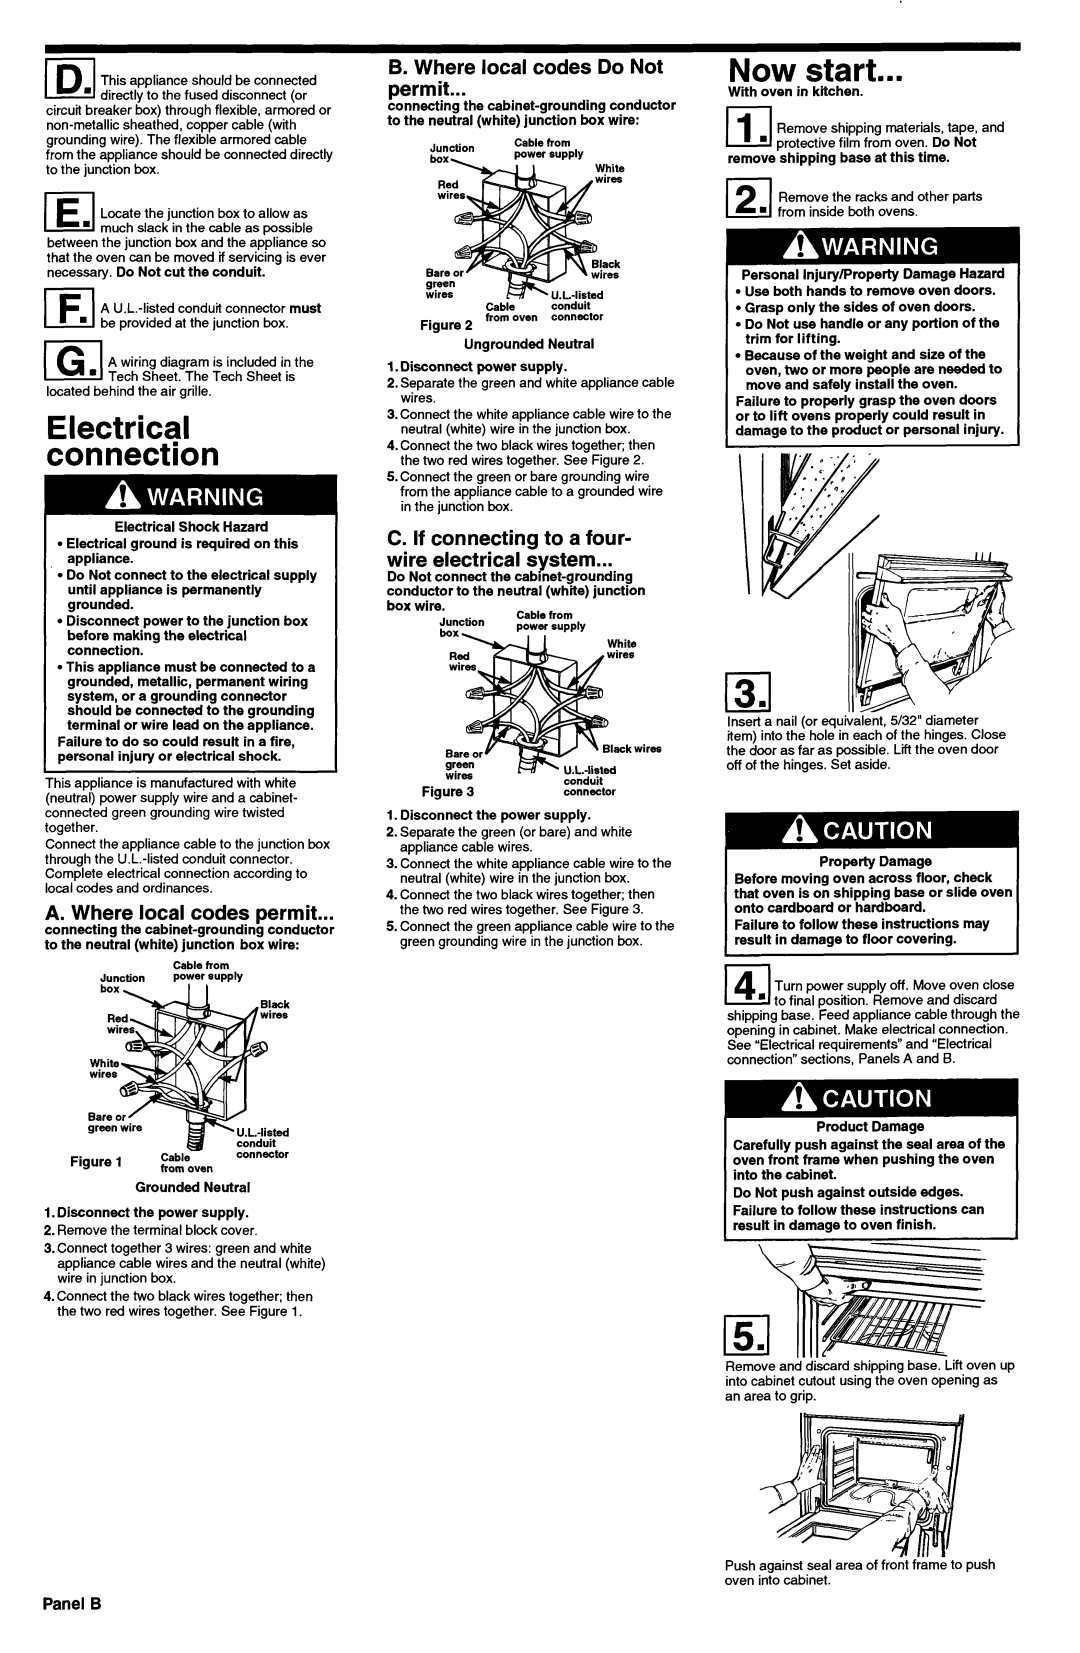
Electrical connection

Electrical Shock Hazard

l Electrical ground is required on this appliance.

l Do Not connect to the electrical supply until appliance is permanently grounded.

l Disconnect power to the junction box before making the electrical connection.

l This appliance must be connected to a grounded, metallic, permanent wiring system, or a grounding connector should be connected to the grounding terminal or wire lead on the appliance.

Failure to do so could result in a fire, personal injury or electrical shock.

This appliance is manufactured with white (neutral) power supply wire and a cabinet- connected green grounding wire twisted together.

Connect the appliance cable to the junction box through the U.L.-listed conduit connector. Complete electrical connection according to local codes and ordinances.

A. Where local codes permit...

connecting the cabinet-grounding conductor to the neutral (white) junction box wire:

Cable from power supply

green

wire


Figure

1

Cable

connector


from oven


Grounded Neutral

1.Disconnect the power supply.

2.Remove the terminal block cover.

3.Connect together 3 wires: green and white appliance cable wires and the neutral (white) wire in junction box.

4.Connect the two black wires together; then the two red wires together. See Figure 1.

Ungrounded Neutral

1.Disconnect power supply.

2.Separate the green and white appliance cable wires.

3.Connect the white appliance cable wire to the neutral (white) wire in the junction box.

4.Connect the two black wires together; then the two red wires together. See Figure 2.

5.Connect the green or bare grounding wire from the appliance cable to a grounded wire in the junction box.

C. If connecting to a four-

wire electrical system...

Do Not connect the cabinet-grounding conductor to the neutral (white) junction box wire.

Cable from

Figure 3

conduit

connector

1.Disconnect the power supply.

2.Separate the green (or bare) and white appliance cable wires.

3.Connect the white appliance cable wire to the neutral (white) wire in the junction box.

4.Connect the two black wires together; then the two red wires together. See Figure 3.

5.Connect the green appliance cable wire to the green grounding wire in the junction box.

trim for lifting.

l Because of the weight and size of the oven, two or more people are needed to move and safely install the oven.

Failure to properly grasp the oven doors or to lift ovens properly could result in damage to the product or personal injury.

Insert a nail (or equivalent, 5/32” diameter item) into the hole in each of the hinges. Close the door as far as possible. Lift the oven door off of the hinges. Set aside.

Property Damage

Before moving oven across floor, check that oven is on shipping base or slide oven onto cardboard or hardboard.

Failure to follow these instructions may result in damage to floor covering.

141Turn power supply off. Move oven close a to final position. Remove and discard

shipping base. Feed appliance cable through the opening in cabinet. Make electrical connection. See “Electrical requirements” and “Electrical connection” sections, Panels A and 6.

Product Damage

Carefully push against the seal area of the oven front frame when pushing the oven into the cabinet.

Do Not push against outside edges.

Failure to follow these instructions can result in damage to oven finish.

Remove and discard shipping base. Lift oven up into cabinet cutout using the oven opening as an area to grip.

Push against seal area of front frame to push oven into cabinet.

Panel B

Page 3
Image 3
KitchenAid 3187359 installation instructions Now start, Electrical connection, Panel B

3187359 specifications

The KitchenAid 3187359 is a highly regarded mixer attachment that enhances the functionality of KitchenAid stand mixers, allowing home chefs to expand their culinary repertoire. This attachment is specifically designed for those who wish to elevate their baking and cooking experiences.

One of the primary features of the KitchenAid 3187359 attachment is its versatile functionality. This food processor attachment can chop, slice, shred, and even julienne a variety of ingredients, making food preparation quicker and more efficient. Whether chopping vegetables for a salad, slicing cheese for a charcuterie board, or shredding carrots for a cake, the attachment streamlines the process, saving valuable time in the kitchen.

The KitchenAid 3187359 is built with high-quality materials, ensuring durability and longevity. The robust design is engineered to withstand daily use, making it a reliable addition to any kitchen. Moreover, it is easy to attach and detach, fitting seamlessly with existing KitchenAid stand mixers and allowing for quick clean-up and storage.

One of the standout technologies featured in this attachment is its ultra-sharp stainless-steel blades. These blades ensure precise cuts, which is essential for achieving consistent results in cooking and baking. The stainless-steel construction not only enhances its performance but also ensures that the attachment remains free from rust and damage over time.

Safety is another key consideration in the design of the KitchenAid 3187359. It includes safety features that prevent accidental blade exposure during operation, giving users peace of mind while using the device. The attachment is also designed to be user-friendly, with intuitive controls that allow for easy toggling between various cutting techniques.

The KitchenAid 3187359 attachment is ideal for food enthusiasts who value both efficiency and quality in their cooking processes. Its ability to handle a wide variety of ingredients makes it suitable for everything from simple weeknight meals to elaborate dinner parties.

In conclusion, the KitchenAid 3187359 attachment is a must-have for anyone seeking to maximize the potential of their KitchenAid stand mixer. With its combination of versatility, quality construction, and innovative technology, it serves as an indispensable tool in the modern kitchen, empowering cooks to create gourmet dining experiences at home.