INSTALLATION INSTRUCTIONS

BEFORE YOU BEGIN, READ THE FOLLOWING INSTRUCTIONS COMPLETELY AND CAREFULLY. THEY WILL SIMPLIFY THE INSTALLATION.

1.After removing the shipping carton, be sure to remove

all protective packaging materials such as tape and

shipping pads. Put extra key-knob In a safe place

Waxy residue from protective shipping material may

be removed from compactor with a mild solution of

liquid household cleaner and water.

2.Your compactor is designed for recessed installation.

A six (6) inch clearance from the right edge of the

drawer front is desirable for added convenience in bag

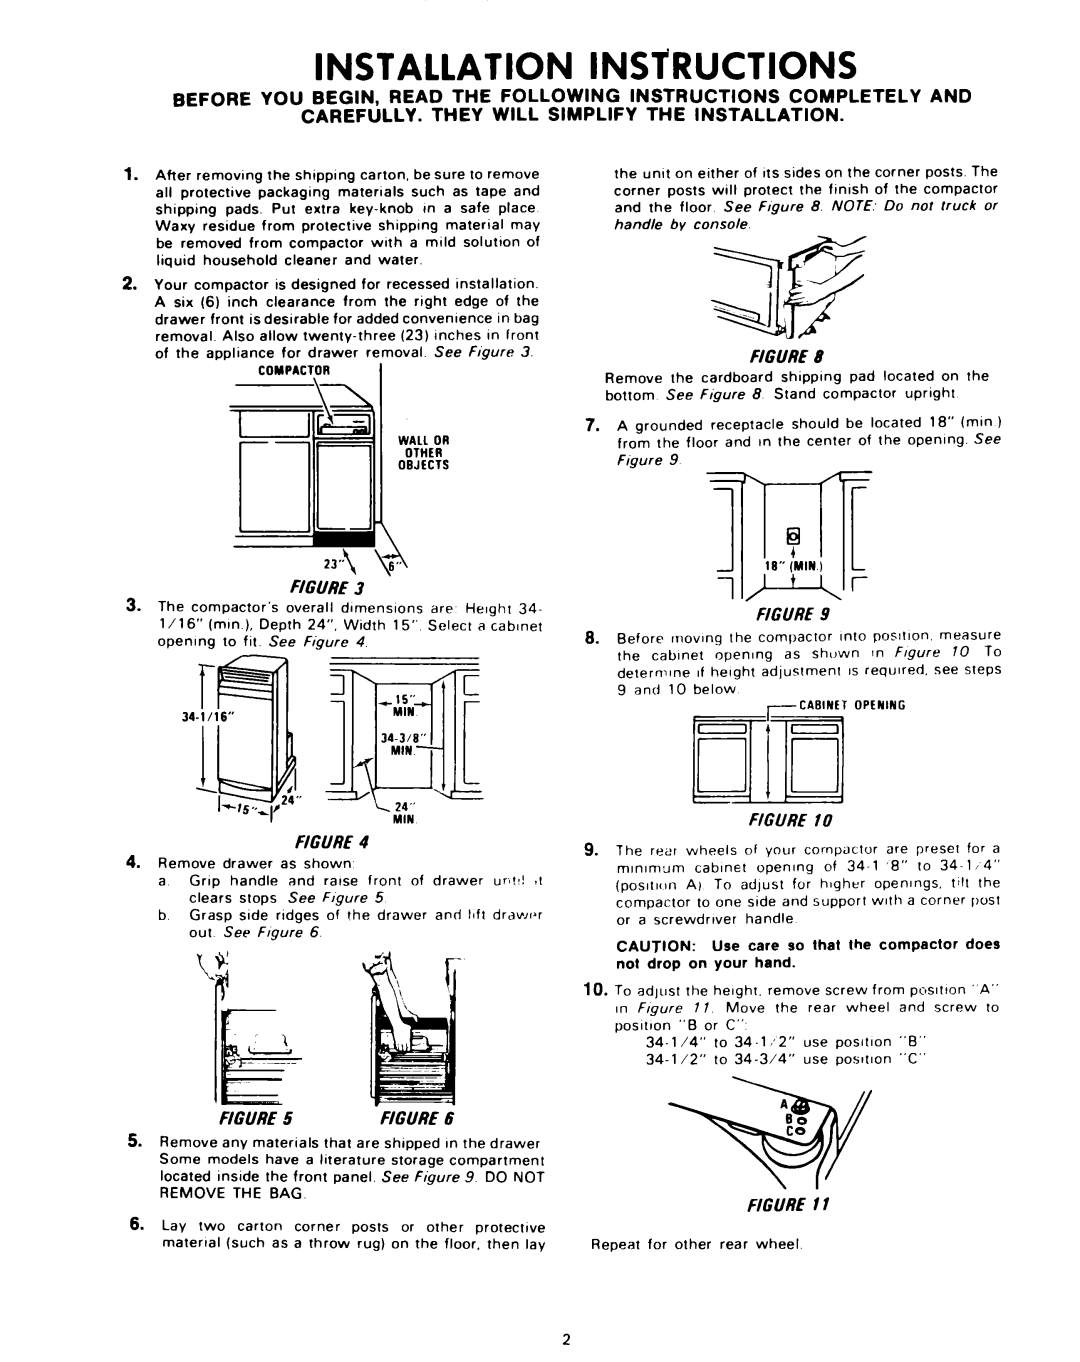
removal. Also allow twenty-three (23) Inches in front of the appliance for drawer removal. See Figure 3.

COMPACTOR

\\I

l&l

WALL OR

OTHER

OBJECTS

the umt on either of Its sides on the corner posts. The corner posts will protect the finish of the compactor and the floor See Figure 8. NOTE: Do not truck or handle by console.

FIGURE8

Remove the cardboard shipplng pad located on the

bottom See Figure 8 Stand compactor upright

7.A grounded receptacle should be located 18” (mln ) from the floor and in the center of the opening. See Fioure 9

u

=a

2-J”

,,

\\

6


FIGURE3


3. The compactor’s overall dlmenslons are Height 34.

l/16” (min.), Depth 24”. Width 15”. Select a cabinet opening to fit. See Fi.qure 4.

MIN

FIGURE4

4.Remove drawer as shown

aGrip handle and raise front of drawer uri!!! ,I clears stops See Figure 5

b.Grasp side ridges of !he drawer and lift drawr>r out See Flgure 6.

\

FIGURE5 FIGURE6

5.Remove any materials that are shipped In the drawer

Some models have a literature storage compartment located inside the front panel. See Figure 9. DO NOT REMOVE THE BAG.

6.Lay two carton corner posts or other protective material (such as a throw rug) on the floor, then lay

FIGURE9

8.Before moving the compactor Into posItion, measure

the cabinet opening as shown In Figure 70 To

determIne If height adjustmenr IS required. see steps

9 and 10 below

-CABINET OPENING

FIGURE 10

9.The rear wheels of your compactor are preset for a

mlnlmgm cabinet opening of 34-l ‘8” to 34-l 14”

(posItIon A) To adjust for higher openings. t:ll the

compactor to one side and support with a corner post

or a screwdrtver handle

CAUTION:

Use

care so that the compactor

does

not drop

on your

hand.


10.To adjust the height. remove screw from posltton A” In Figure 11. Move the rear wheel and screw to posltlon “B or C”,

34-l/4” to 34.1,*2” use position “B”

34-l/2” to 34.3/4” use posltion “C”

A

“,:

w

FIGURE 11

Repeat for other rear wheel

2

Page 2
Image 2
KitchenAid KCC-151 installation instructions Compactor, Other

KCC-151 specifications

The KitchenAid KCC-151 is a versatile and innovative kitchen appliance that has gained popularity for its exceptional performance and user-friendly design. This stand mixer is a reliable companion for both professional chefs and home cooks who want to elevate their culinary experience.

One of the standout features of the KitchenAid KCC-151 is its powerful motor, which offers a range of mixing speeds. With a 350-watt motor, this unit can handle various tasks, from whipping delicate egg whites to kneading heavy bread dough. The KCC-151 also boasts 10 different speed settings, allowing users to choose the precise level of mixing required for each recipe.

The bowl-lift design of the KCC-151 is another significant advantage. This feature allows for easy access to the mixing bowl and ensures stability while mixing. The large stainless-steel bowl, with a capacity of 4.5 quarts, is perfect for preparing large quantities of ingredients. The bowl is also dishwasher-safe, making cleanup a breeze.

The KitchenAid KCC-151 is equipped with a variety of attachments, including a flat beater, a dough hook, and a wire whip. These accessories allow users to tackle multiple tasks, from mixing and kneading to whipping and aerating. The attachments are easy to switch out, ensuring a seamless transition between different culinary tasks.

This mixer also incorporates the patented Planetary Mixing Action technology, which ensures that all ingredients are mixed evenly. The beater spirals around the bowl, reaching every corner and ensuring thorough mixing. This feature is particularly beneficial for recipes that require precision, such as cakes and pastries.

For added convenience, the KCC-151 features a tilt-head design, which allows for easy access to the mixing bowl and effortless attachment changes. The mixer's durable construction guarantees longevity, and its sleek design is available in various colors to match any kitchen aesthetic.

In conclusion, the KitchenAid KCC-151 stand mixer is an exceptional appliance that combines power, versatility, and style. With its robust motor, multiple speed settings, bowl-lift design, and a range of attachments, it is designed to cater to the needs of diverse culinary projects. Whether you're baking a cake, making bread, or preparing sauces, the KCC-151 is an invaluable tool that helps to achieve professional results in the kitchen.