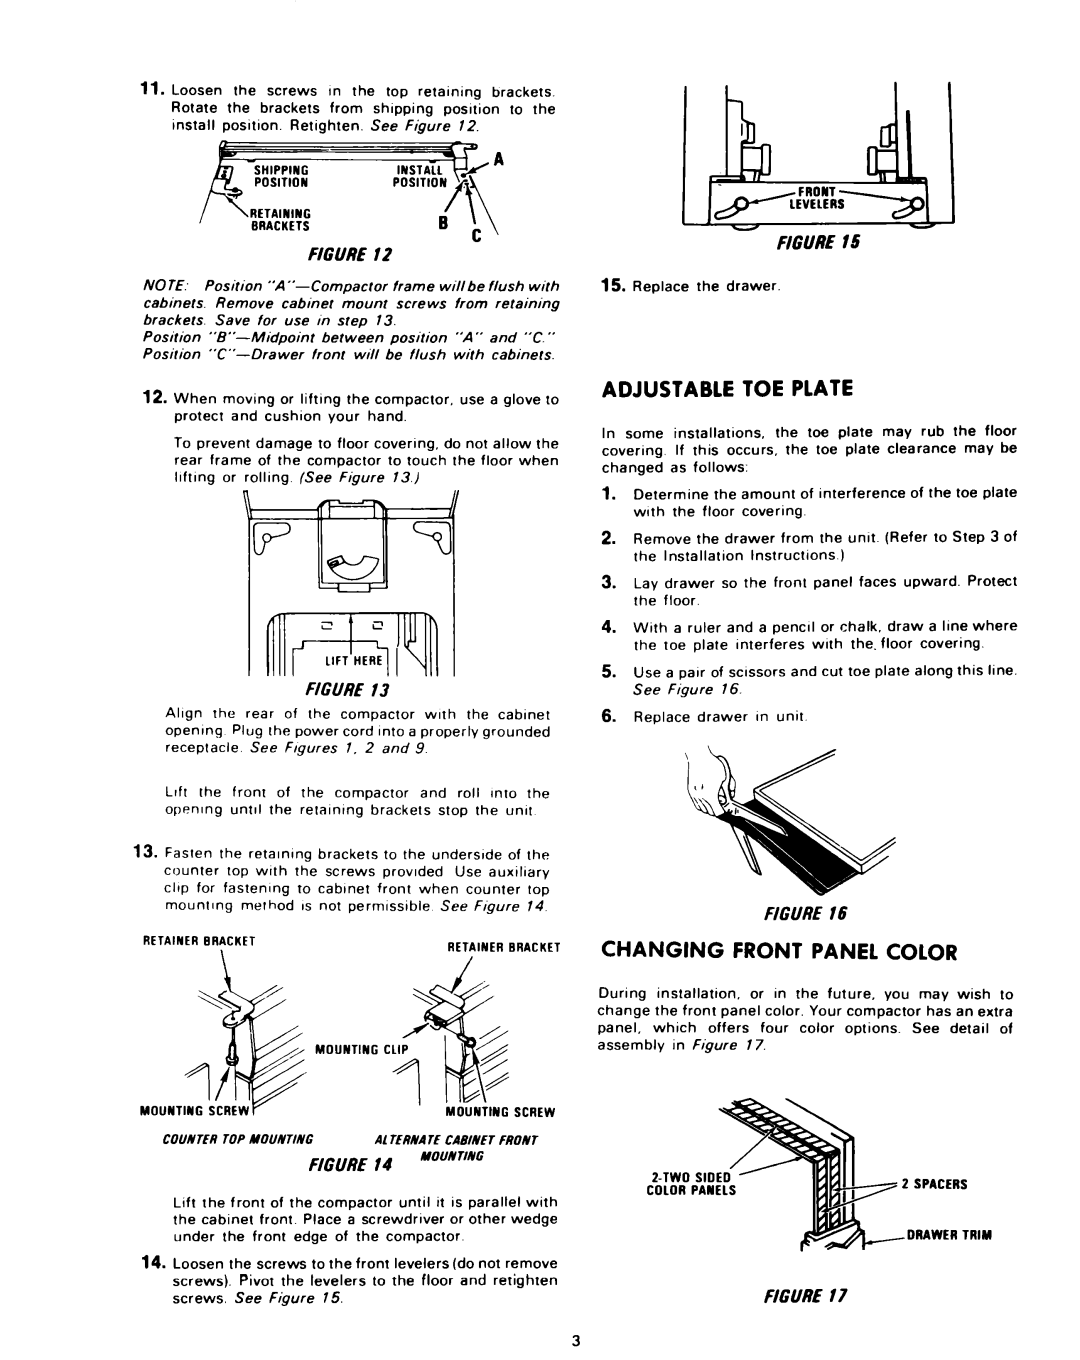
11. Loosen the screws In the top retaining brackets.

Rotate the brackets from shipping posrtion to the

install position. Retighten. See Figure 12.

/qziJYqr

C

FIGURE 12

NOTE: Position “A’‘-Compactor frame willbe flush with cabinets. Remove cabinet mount screws from retaining brackets. Save for use in step 13.

Position “B”-Midpoint between position “A” and “C.”

Position “C”--Drawer front will be flush with cabinets.

12.When moving or lifting the compactor, use a glove to protect and cushion your hand.

To prevent damage to floor covering, do not allow the

rear frame of the compactor to touch the floor when lrftrng or rolling. (See Figure 13.)

FIGURE 13

Alrgn the rear of the compactor wrth the cabinet openrng Plug the power cord Into a properly grounded

receptacle. See Frgures 1, 2 and 9.

Lrft the front of the compactor and roll Into the openrng untrl the retarnrng brackets stop the unrt

13.Fasten the retarnrng brackets to the undersrde of the

counter top wrth the screws provided Use auxiliary clip for fastenrng to cabrnet front when counter fop

mountrng method IS not permissible See Figure 14.

RETAINER BRACKET

RETAINER BRACKET

\/


MOUNTING SCREW

COUNTER TOP MOUNTING

Al TEERNATECABINET FRONT

FIGURE 14

MOUN TIMING


Lift the front of the compactor until it is parallel with

the cabinet front. Place a screwdriver or other wedge under the front edge of the compactor.

14.Loosen the screws to the front levelers (do not remove screws). Pivot the levelers to the floor and retighten screws. See Figure 15.

FIGURE 15

15.Replace the drawer.

ADJUSTABLE TOE PLATE

In some installations, the toe plate may rub the floor

covering. If this occurs, the toe plate clearance may be changed as follows:

1.Determine the amount of interference of the toe plate with the floor covering.

2.Remove the drawer from the unrt. (Refer to Step 3 of

the Installation Instructions.)

3.Lay drawer so the front panel faces upward. Protect the floor.

4.With a ruler and a pencrl or chalk, draw a line where

the toe plate interferes with the.floor covering.

5.Use a pair of scrssors and cut toe plate along this line. See Figure 16.

6.Replace drawer In unit

FIGURE 16

CHANGING FRONT PANEL COLOR

During installation, or in the future, you may wish to change the front panel color. Your compactor has an extra

panel, which offers four color options. See detail of assembly in Figure 17.

COLOR PANELS

DRAWER TRIM

FIGURE 17

3

Page 3
Image 3
KitchenAid KCC-151 Adjustable TOE Plate, Changing Front Panel Color, Counter TOP Mounting, Moun Timing

KCC-151 specifications

The KitchenAid KCC-151 is a versatile and innovative kitchen appliance that has gained popularity for its exceptional performance and user-friendly design. This stand mixer is a reliable companion for both professional chefs and home cooks who want to elevate their culinary experience.

One of the standout features of the KitchenAid KCC-151 is its powerful motor, which offers a range of mixing speeds. With a 350-watt motor, this unit can handle various tasks, from whipping delicate egg whites to kneading heavy bread dough. The KCC-151 also boasts 10 different speed settings, allowing users to choose the precise level of mixing required for each recipe.

The bowl-lift design of the KCC-151 is another significant advantage. This feature allows for easy access to the mixing bowl and ensures stability while mixing. The large stainless-steel bowl, with a capacity of 4.5 quarts, is perfect for preparing large quantities of ingredients. The bowl is also dishwasher-safe, making cleanup a breeze.

The KitchenAid KCC-151 is equipped with a variety of attachments, including a flat beater, a dough hook, and a wire whip. These accessories allow users to tackle multiple tasks, from mixing and kneading to whipping and aerating. The attachments are easy to switch out, ensuring a seamless transition between different culinary tasks.

This mixer also incorporates the patented Planetary Mixing Action technology, which ensures that all ingredients are mixed evenly. The beater spirals around the bowl, reaching every corner and ensuring thorough mixing. This feature is particularly beneficial for recipes that require precision, such as cakes and pastries.

For added convenience, the KCC-151 features a tilt-head design, which allows for easy access to the mixing bowl and effortless attachment changes. The mixer's durable construction guarantees longevity, and its sleek design is available in various colors to match any kitchen aesthetic.

In conclusion, the KitchenAid KCC-151 stand mixer is an exceptional appliance that combines power, versatility, and style. With its robust motor, multiple speed settings, bowl-lift design, and a range of attachments, it is designed to cater to the needs of diverse culinary projects. Whether you're baking a cake, making bread, or preparing sauces, the KCC-151 is an invaluable tool that helps to achieve professional results in the kitchen.