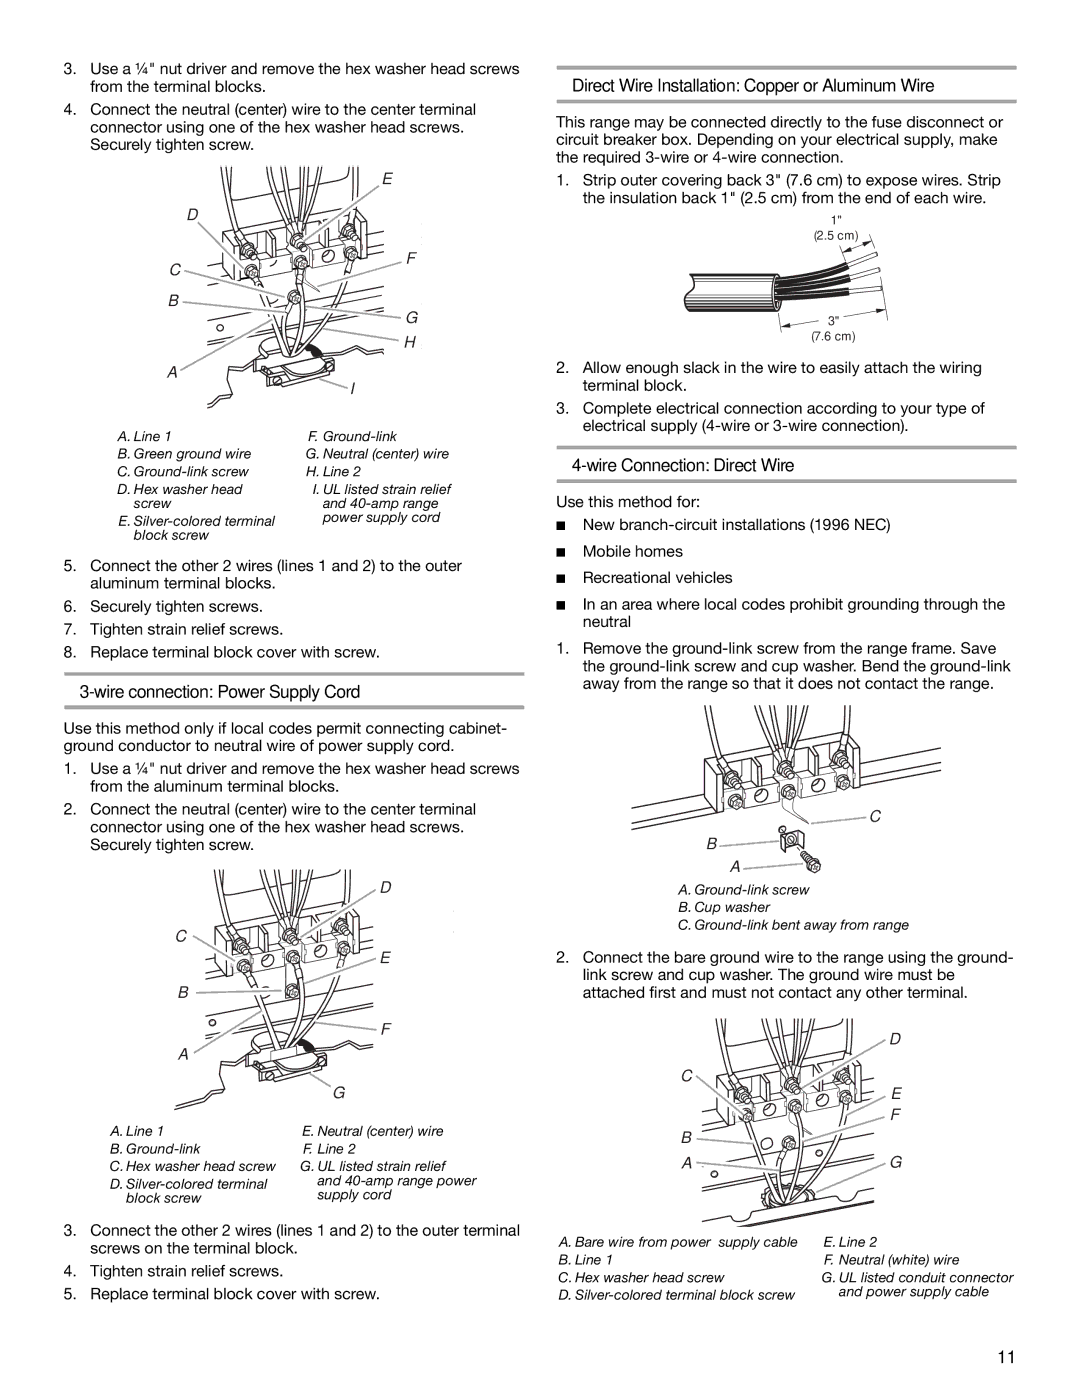
3.Use a ¼" nut driver and remove the hex washer head screws from the terminal blocks.

4.Connect the neutral (center) wire to the center terminal connector using one of the hex washer head screws. Securely tighten screw.

E

D

F

C

B

G

H

A

I

A. Line 1

F. Ground-link

B. Green ground wire

G. Neutral (center) wire

C. Ground-link screw

H. Line 2

D. Hex washer head

I. UL listed strain relief

screw

and 40-amp range

E. Silver-colored terminal

power supply cord

block screw


5.Connect the other 2 wires (lines 1 and 2) to the outer aluminum terminal blocks.

6.Securely tighten screws.

7.Tighten strain relief screws.

8.Replace terminal block cover with screw.

3-wire connection: Power Supply Cord

Use this method only if local codes permit connecting cabinet- ground conductor to neutral wire of power supply cord.

1.Use a ¼" nut driver and remove the hex washer head screws from the aluminum terminal blocks.

2.Connect the neutral (center) wire to the center terminal connector using one of the hex washer head screws. Securely tighten screw.

D

C

E

B


F

A


G

A. Line 1

E. Neutral (center) wire

B. Ground-link

F. Line 2

C. Hex washer head screw

G. UL listed strain relief

D. Silver-colored terminal

and 40-amp range power

block screw

supply cord

3.Connect the other 2 wires (lines 1 and 2) to the outer terminal screws on the terminal block.

4.Tighten strain relief screws.

5.Replace terminal block cover with screw.

Direct Wire Installation: Copper or Aluminum Wire

This range may be connected directly to the fuse disconnect or circuit breaker box. Depending on your electrical supply, make the required 3-wire or 4-wire connection.

1.Strip outer covering back 3" (7.6 cm) to expose wires. Strip the insulation back 1" (2.5 cm) from the end of each wire.

1"

(2.5 cm)

3"

(7.6 cm)

2.Allow enough slack in the wire to easily attach the wiring terminal block.

3.Complete electrical connection according to your type of electrical supply (4-wire or 3-wire connection).

4-wire Connection: Direct Wire

Use this method for:

New branch-circuit installations (1996 NEC)

Mobile homes

Recreational vehicles

In an area where local codes prohibit grounding through the neutral

1.Remove the ground-link screw from the range frame. Save the ground-link screw and cup washer. Bend the ground-link away from the range so that it does not contact the range.

C

B

A

A.Ground-link screw

B.Cup washer

C.Ground-link bent away from range

2.Connect the bare ground wire to the range using the ground- link screw and cup washer. The ground wire must be attached first and must not contact any other terminal.


D

C

E


F

B


A

G

A. Bare wire from power supply cable

E. Line 2

B. Line 1

F. Neutral (white) wire

C. Hex washer head screw

G. UL listed conduit connector

D. Silver-colored terminal block screw

and power supply cable

11

Page 11
Image 11
KitchenAid KERS807SBB Direct Wire Installation Copper or Aluminum Wire, Wire Connection Direct Wire

KERS807SBB specifications

The KitchenAid KERS807SBB is a standout in the realm of kitchen appliances, renowned for its versatile cooking capabilities and stylish design. This range combines technology, efficiency, and aesthetic appeal, making it an ideal addition to any modern kitchen.

One of the key features of the KERS807SBB is its large capacity oven, which offers a generous 6.4 cubic feet of cooking space. This ample size allows home cooks to prepare multiple dishes simultaneously, ideal for family gatherings or dinner parties. The oven is equipped with a True Convection cooking system, which employs a third heating element and a powerful fan that circulates hot air throughout the oven. This technology ensures even baking and roasting, eliminating hot spots and ensuring that every dish is cooked to perfection.

The range boasts a sleek stainless steel finish, which not only enhances its durability but also adds a touch of elegance to any kitchen decor. Its glass touch controls make adjusting settings and selecting cooking modes intuitive and user-friendly. The oven also features an adaptive bake function that adjusts cooking time and temperature for various dishes, enhancing cooking precision.

In addition to its impressive oven capabilities, the KERS807SBB offers a powerful cooktop with five burners, including a high-output burner that provides intense heat for quick boiling or searing. The burners include a simmer setting, perfect for delicate sauces or melting chocolate. All burners are designed for easy cleanup, featuring sealed designs to prevent spills from reaching the burner compartment.

The range also includes a self-cleaning feature that simplifies maintenance and upkeep, saving time and effort for busy home cooks. Its Warm Hold feature ensures that food remains at the perfect temperature until serving, providing peace of mind during meal preparation.

In terms of energy efficiency, the KERS807SBB is designed to minimize energy consumption while delivering high performance. It’s a perfect blend of modern technology and classic design, making it a practical and stylish choice for anyone looking to elevate their culinary experience.

With its premium features and user-friendly technologies, the KitchenAid KERS807SBB is more than just a cooking appliance; it's an essential tool for any home chef seeking reliability, efficiency, and sophistication in the kitchen.