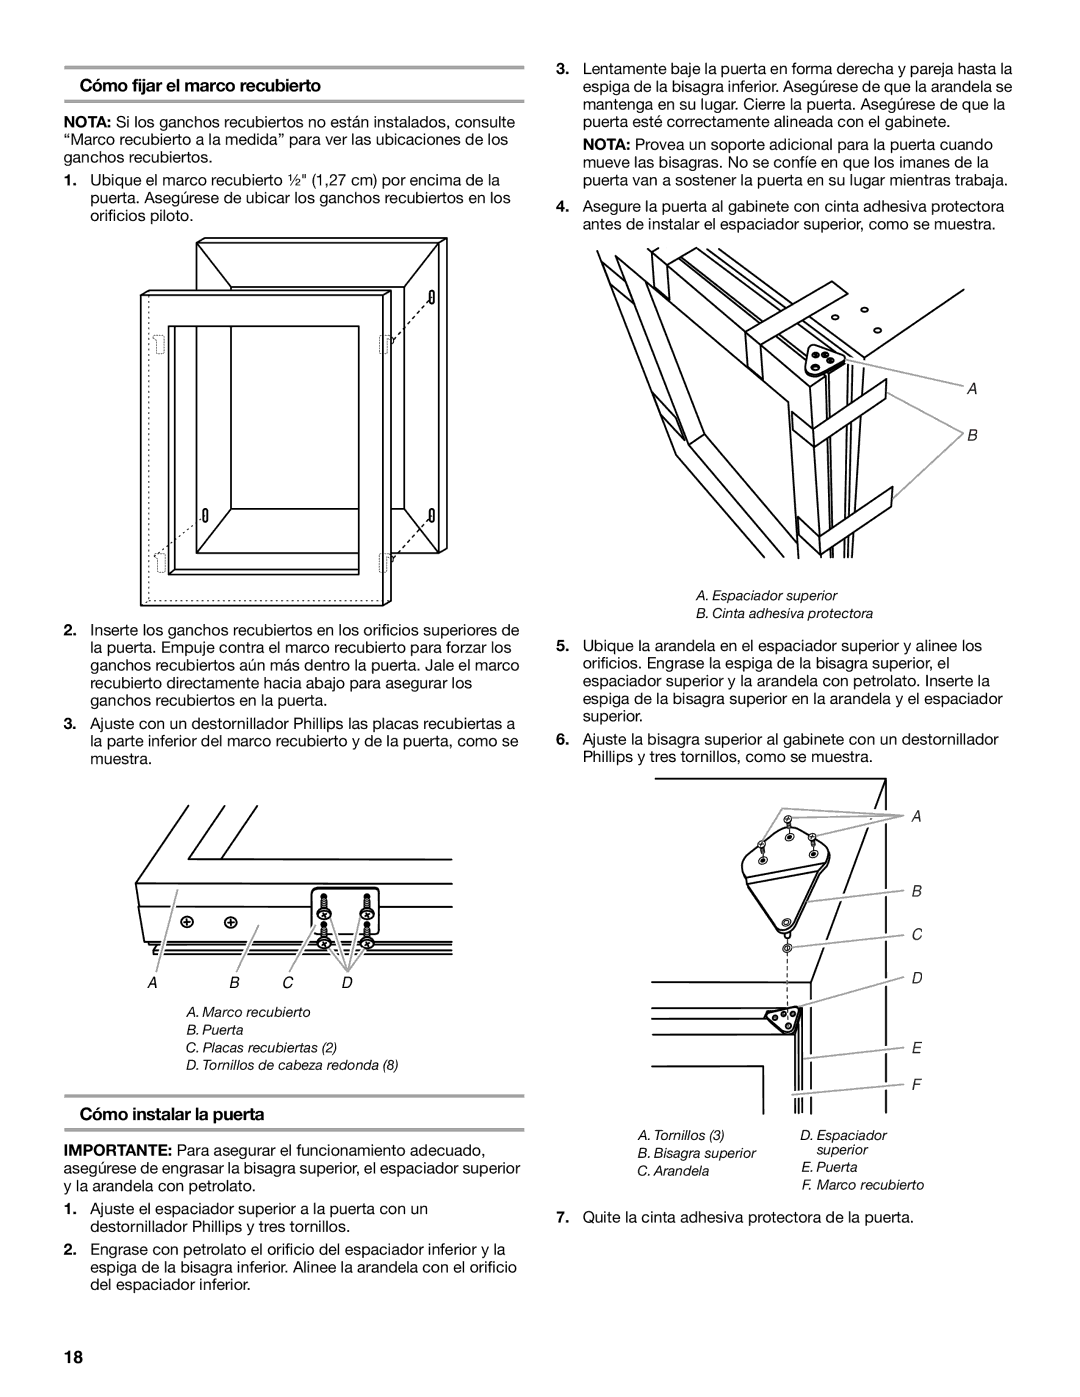
Cómo fijar el marco recubierto

NOTA: Si los ganchos recubiertos no están instalados, consulte “Marco recubierto a la medida” para ver las ubicaciones de los ganchos recubiertos.

1.Ubique el marco recubierto ¹⁄₂" (1,27 cm) por encima de la puerta. Asegúrese de ubicar los ganchos recubiertos en los orificios piloto.

2.Inserte los ganchos recubiertos en los orificios superiores de la puerta. Empuje contra el marco recubierto para forzar los ganchos recubiertos aún más dentro la puerta. Jale el marco recubierto directamente hacia abajo para asegurar los ganchos recubiertos en la puerta.

3.Ajuste con un destornillador Phillips las placas recubiertas a la parte inferior del marco recubierto y de la puerta, como se muestra.

A B C D

A. Marco recubierto

B.Puerta

C.Placas recubiertas (2)

D.Tornillos de cabeza redonda (8)

Cómo instalar la puerta

IMPORTANTE: Para asegurar el funcionamiento adecuado, asegúrese de engrasar la bisagra superior, el espaciador superior y la arandela con petrolato.

1.Ajuste el espaciador superior a la puerta con un destornillador Phillips y tres tornillos.

2.Engrase con petrolato el orificio del espaciador inferior y la espiga de la bisagra inferior. Alinee la arandela con el orificio del espaciador inferior.

3.Lentamente baje la puerta en forma derecha y pareja hasta la espiga de la bisagra inferior. Asegúrese de que la arandela se mantenga en su lugar. Cierre la puerta. Asegúrese de que la puerta esté correctamente alineada con el gabinete.

NOTA: Provea un soporte adicional para la puerta cuando mueve las bisagras. No se confíe en que los imanes de la puerta van a sostener la puerta en su lugar mientras trabaja.

4.Asegure la puerta al gabinete con cinta adhesiva protectora antes de instalar el espaciador superior, como se muestra.

A

B

A. Espaciador superior

B. Cinta adhesiva protectora

5.Ubique la arandela en el espaciador superior y alinee los orificios. Engrase la espiga de la bisagra superior, el espaciador superior y la arandela con petrolato. Inserte la espiga de la bisagra superior en la arandela y el espaciador superior.

6.Ajuste la bisagra superior al gabinete con un destornillador Phillips y tres tornillos, como se muestra.

A

B

C

D

E

F

A. Tornillos (3)

D. Espaciador

B. Bisagra superior

superior

C. Arandela

E. Puerta


F. Marco recubierto

7.Quite la cinta adhesiva protectora de la puerta.

18

Page 18
Image 18
KitchenAid Overlay Model Beverage Center manual Cómo fijar el marco recubierto, Cómo instalar la puerta

Overlay Model Beverage Center specifications

The KitchenAid Overlay Model Beverage Center is the ultimate solution for beverage storage and organization, seamlessly blending functionality and style within your kitchen. This appliance is designed to provide a dedicated space for everything from chilled wines to refreshing sodas, all while maintaining the aesthetic coherence with your kitchen cabinetry thanks to its customizable overlay panel.

One of the main features that sets the KitchenAid Overlay Model apart is its impressive storage capacity. With adjustable shelves, this beverage center can accommodate a variety of bottle sizes and shapes, from standard wine bottles to larger craft beer cans. The glass door not only offers visibility into the contents but also allows for easy access, making it convenient to grab your favorite drink on the go. The interior LED lighting enhances the visibility, illuminating the beverages while minimizing energy consumption.

Temperature control is another standout characteristic of the KitchenAid Overlay Model Beverage Center. Equipped with a sophisticated temperature management system, it ensures that your drinks are stored at optimal temperatures. Users can set two separate temperature zones, making it perfect for keeping wines at the ideal serving temperature while simultaneously chilling other beverages.

The appliance is engineered with a quiet operation technology that maintains a peaceful kitchen ambiance, allowing you to enjoy a tranquil environment without the distraction of unnecessary noise. Additionally, the unit features a door alarm that alerts you if the door is left ajar, preventing fluctuations in temperature that could compromise your beverage inventory.

In terms of design, the KitchenAid Overlay Model Beverage Center is tailored to integrate seamlessly with your existing kitchen décor. The sleek finish and customizable panel options allow homeowners to match the beverage center beautifully with their cabinetry, creating a cohesive and sophisticated look.

Overall, the KitchenAid Overlay Model Beverage Center embodies a blend of stylish design, innovative technologies, and practical features. With its ample storage capacity, precise temperature controls, and quiet operation, it makes a perfect addition to any kitchen or entertaining space, ensuring your beverages are always perfectly chilled and ready to serve.