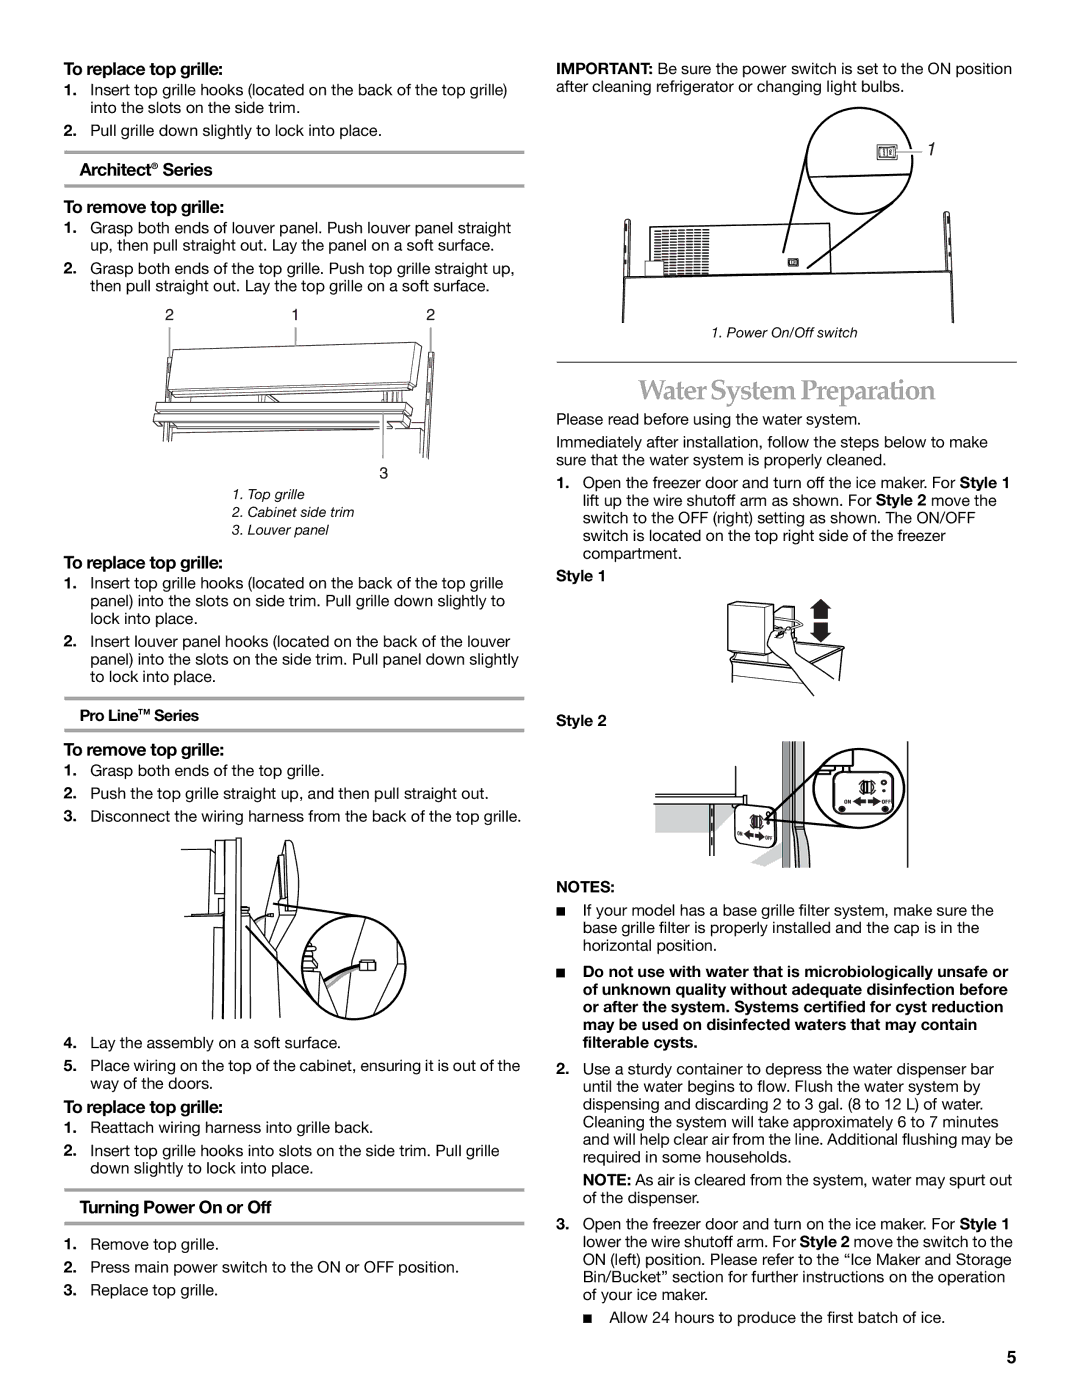
KitchenAid Side-by-Side Referigerator manual Water System Preparation, To replace top grille

Models: Side-by-Side Referigerator

1 64
Download 64 pages 29.55 Kb
Page 5
Image 5

To replace top grille:

1.Insert top grille hooks (located on the back of the top grille) into the slots on the side trim.

2.Pull grille down slightly to lock into place.

Architect® Series

To remove top grille:

1.Grasp both ends of louver panel. Push louver panel straight up, then pull straight out. Lay the panel on a soft surface.

2.Grasp both ends of the top grille. Push top grille straight up, then pull straight out. Lay the top grille on a soft surface.

IMPORTANT: Be sure the power switch is set to the ON position after cleaning refrigerator or changing light bulbs.

1

1. Power On/Off switch

1.Top grille

2.Cabinet side trim

3.Louver panel

To replace top grille:

1.Insert top grille hooks (located on the back of the top grille panel) into the slots on side trim. Pull grille down slightly to lock into place.

2.Insert louver panel hooks (located on the back of the louver panel) into the slots on the side trim. Pull panel down slightly to lock into place.

Pro LineTM Series

To remove top grille:

1.Grasp both ends of the top grille.

2.Push the top grille straight up, and then pull straight out.

3.Disconnect the wiring harness from the back of the top grille.

4.Lay the assembly on a soft surface.

5.Place wiring on the top of the cabinet, ensuring it is out of the way of the doors.

To replace top grille:

1.Reattach wiring harness into grille back.

2.Insert top grille hooks into slots on the side trim. Pull grille down slightly to lock into place.

Turning Power On or Off

1.Remove top grille.

2.Press main power switch to the ON or OFF position.

3.Replace top grille.

Water System Preparation

Please read before using the water system.

Immediately after installation, follow the steps below to make sure that the water system is properly cleaned.

1.Open the freezer door and turn off the ice maker. For Style 1 lift up the wire shutoff arm as shown. For Style 2 move the switch to the OFF (right) setting as shown. The ON/OFF switch is located on the top right side of the freezer compartment.

Style 1

Style 2

NOTES:

If your model has a base grille filter system, make sure the base grille filter is properly installed and the cap is in the horizontal position.

Do not use with water that is microbiologically unsafe or of unknown quality without adequate disinfection before or after the system. Systems certified for cyst reduction may be used on disinfected waters that may contain filterable cysts.

2.Use a sturdy container to depress the water dispenser bar until the water begins to flow. Flush the water system by dispensing and discarding 2 to 3 gal. (8 to 12 L) of water. Cleaning the system will take approximately 6 to 7 minutes and will help clear air from the line. Additional flushing may be required in some households.

NOTE: As air is cleared from the system, water may spurt out of the dispenser.

3.Open the freezer door and turn on the ice maker. For Style 1 lower the wire shutoff arm. For Style 2 move the switch to the ON (left) position. Please refer to the “Ice Maker and Storage Bin/Bucket” section for further instructions on the operation of your ice maker.

Allow 24 hours to produce the first batch of ice.

5

Page 5
Image 5
KitchenAid Side-by-Side Referigerator manual Water System Preparation, To replace top grille, Turning Power On or Off

Side-by-Side Referigerator specifications

The KitchenAid Side-by-Side Refrigerator stands out as a highly functional and stylish appliance, perfect for modern kitchens. Offering an impressive combination of practicality and advanced technology, this refrigerator is designed to enhance food preservation and organization while complementing your home décor.

One of the main features of the KitchenAid Side-by-Side Refrigerator is its spacious interior. With ample storage capacity divided into flexible shelving and bins, homeowners can easily organize groceries and beverages. Its side-by-side configuration allows for quick access to both frozen and fresh items, making meal prep efficient.

The refrigerator is equipped with adjustable glass shelves that can be modified to accommodate tall items or create additional space for larger containers. The unit often includes a humidity-controlled crisper drawer, which is designed specifically to preserve fruits and vegetables, keeping them fresh for longer periods. A deli drawer is also available, providing an ideal environment for meats and cheeses.

Another significant characteristic is the refrigerator's advanced cooling technologies. The KitchenAid model typically features an adaptive cooling system that responds to temperature changes and adjusts accordingly. This ensures that food stays at the optimal temperature, enhancing freshness and preventing spoilage. Additionally, the built-in Air Filter helps eliminate odors, ensuring that your food maintains its original flavor profile.

One of the standout technologies is the exterior ice and water dispenser. With a sleek design, it provides filtered water and ice at the touch of a button, enhancing convenience. The dispenser often allows users to select between cubed and crushed ice, catering to individual preferences. To maintain cleanliness, the dispenser area is built with easy-to-clean materials.

Energy efficiency is another key consideration in the KitchenAid Side-by-Side Refrigerator design. Many models are ENERGY STAR certified, which means they meet stringent energy efficiency guidelines, helping to reduce electricity consumption and lower utility bills.

In conclusion, the KitchenAid Side-by-Side Refrigerator combines style, spaciousness, and advanced technology to cater to the needs of modern households. Its intuitive design and high-quality features make it an invaluable addition to any kitchen, ensuring that food remains fresh and ready to serve. Whether preparing a family meal or hosting guests, this refrigerator is equipped to handle all culinary tasks with ease.