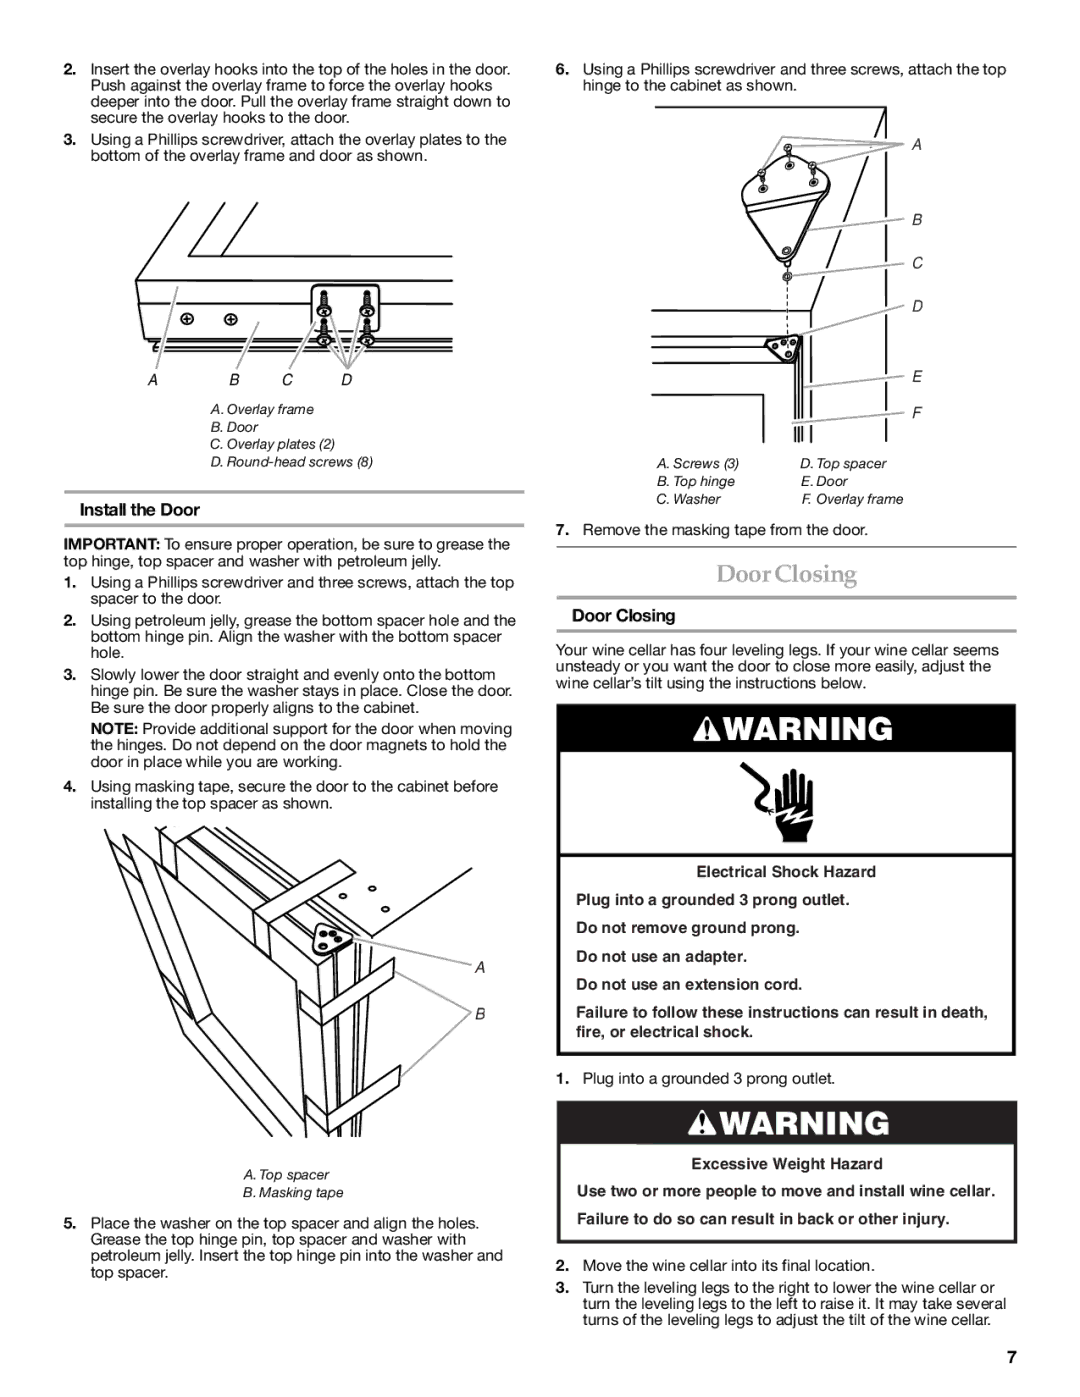
2.Insert the overlay hooks into the top of the holes in the door. Push against the overlay frame to force the overlay hooks deeper into the door. Pull the overlay frame straight down to secure the overlay hooks to the door.

3.Using a Phillips screwdriver, attach the overlay plates to the bottom of the overlay frame and door as shown.

AB C D

A. Overlay frame

B.Door

C.Overlay plates (2)

D.Round-head screws (8)

Install the Door

IMPORTANT: To ensure proper operation, be sure to grease the top hinge, top spacer and washer with petroleum jelly.

1.Using a Phillips screwdriver and three screws, attach the top spacer to the door.

2.Using petroleum jelly, grease the bottom spacer hole and the bottom hinge pin. Align the washer with the bottom spacer hole.

3.Slowly lower the door straight and evenly onto the bottom hinge pin. Be sure the washer stays in place. Close the door. Be sure the door properly aligns to the cabinet.

NOTE: Provide additional support for the door when moving the hinges. Do not depend on the door magnets to hold the door in place while you are working.

4.Using masking tape, secure the door to the cabinet before installing the top spacer as shown.

A

B

A. Top spacer

B. Masking tape

5.Place the washer on the top spacer and align the holes. Grease the top hinge pin, top spacer and washer with petroleum jelly. Insert the top hinge pin into the washer and top spacer.

6.Using a Phillips screwdriver and three screws, attach the top hinge to the cabinet as shown.

A

B

C

D

E

F

A. Screws (3)

D. Top spacer

B. Top hinge

E. Door

C. Washer

F. Overlay frame

7.Remove the masking tape from the door.

Door Closing

Door Closing

Your wine cellar has four leveling legs. If your wine cellar seems unsteady or you want the door to close more easily, adjust the wine cellar’s tilt using the instructions below.

WARNING

Electrical Shock Hazard

Plug into a grounded 3 prong outlet.

Do not remove ground prong.

Do not use an adapter.

Do not use an extension cord.

Failure to follow these instructions can result in death, fire, or electrical shock.

1.Plug into a grounded 3 prong outlet.

WARNING

Excessive Weight Hazard

Use two or more people to move and install wine cellar. Failure to do so can result in back or other injury.

2.Move the wine cellar into its final location.

3.Turn the leveling legs to the right to lower the wine cellar or turn the leveling legs to the left to raise it. It may take several turns of the leveling legs to adjust the tilt of the wine cellar.

7

Page 7
Image 7
KitchenAid TX802RTDF-CU10-F-2 SERIES manual Door Closing, Install the Door, Remove the masking tape from the door

TX802RTDF-CU10-F-2 SERIES specifications

The KitchenAid TX802RTDF-CU10-F-2 SERIES is a remarkable addition to the array of kitchen appliances designed to elevate culinary experiences. This versatile and powerful kitchen tool combines practicality with innovative technology to make cooking more enjoyable and efficient.

At the core of the TX802RTDF-CU10-F-2 SERIES is its robust motor that delivers consistent performance whether you are kneading dough, mixing batters, or whipping cream. The model boasts multiple speed settings, allowing users to select the appropriate speed for different tasks. This customization helps achieve perfect results, whether you're preparing a delicate meringue or mixing heavy cookie dough.

One of the standout features of this series is its generous mixing capacity. The large stainless-steel bowl is designed to handle significant quantities, making it ideal for both everyday cooking and larger gatherings. With a capacity of up to 10 quarts, this appliance can facilitate the preparation of multiple meals or tackle large baking projects with ease.

The TX802RTDF-CU10-F-2 SERIES incorporates advanced technologies such as the Tilt-Head Design, which allows easy access to the bowl and attachments. This feature makes it simple to add ingredients or change attachments without hassle. Additionally, the model is equipped with a variety of attachments, including a flat beater, dough hook, and wire whip, further enhancing its versatility in handling diverse kitchen tasks.

Another notable aspect of the KitchenAid Series is its durability and classic design. Constructed with high-quality materials, the appliance is not just built to withstand the rigors of daily use but also adds an aesthetic appeal to any kitchen décor. The finish options and sleek lines reflect a timeless elegance that can complement a variety of kitchen styles.

Safety and ease of use are also prioritized in the TX802RTDF-CU10-F-2 SERIES. Non-slip feet provide stability during operation, while a safety lock mechanism ensures that the motor does not accidentally engage when the bowl is not properly positioned.

In conclusion, the KitchenAid TX802RTDF-CU10-F-2 SERIES offers an unparalleled combination of power, capacity, and versatility. Whether you are a seasoned chef or a novice cook, this appliance is designed to make your time in the kitchen more enjoyable and productive. With its thoughtful engineering, robust performance, and classic design, it is undoubtedly a worthy investment for any culinary enthusiast.