LP Gas Orifice Spud Chart for TripleTier® Flame Burners

Burner Location

Burner Rating

Color

Size

Left front (external

11,800

Btu/h

Brown

1.00 mm

TripleTier® burner)


Left front (internal

2,200

Btu/h

Orange

0.42 mm

TripleTier® burner)


7.Replace burner plate, head and cap.

8.Place Natural gas orifice spuds in plastic parts bag for future use and keep with literature package.

9.Reinstall the warming drawer. See the “Replace Oven Racks & Warming Drawer” section for instructions.

10.Complete installation. See “Make Gas Connection” and “Electronic Ignition System” sections.

Checking for proper cooktop burner flames is very important. The small inner cone should have a very distinct blue flame ¼" to ½" long. The outer cone is not as distinct as the inner cone. LP gas flames have a slightly yellow tip.

IMPORTANT: You may have to adjust the “LO” setting for each cooktop burner.

NaturalGas Conversion

WARNING

Tip Over Hazard

A child or adult can tip the range and be killed.

Connect anti-tip bracket to rear range foot.

Reconnect the anti-tip bracket, if the range is moved.

Failure to follow these instructions can result in death or serious burns to children and adults.

To Convert Gas Pressure Regulator

1.Turn manual shutoff valve to the “closed” position.

2.Unplug range or disconnect power

B

A

C

A. To range

B. Manual shutoff valve “closed” position

C. Gas supply line

3.Remove warming drawer. See the “Remove Warming Drawer” section for instructions. Locate gas pressure regulator at rear of warming drawer compartment.

4.Remove access cover from the gas pressure regulator.

A

A. Gas pressure regulator

IMPORTANT: Do not remove the gas pressure regulator.

Gas pressure regulator

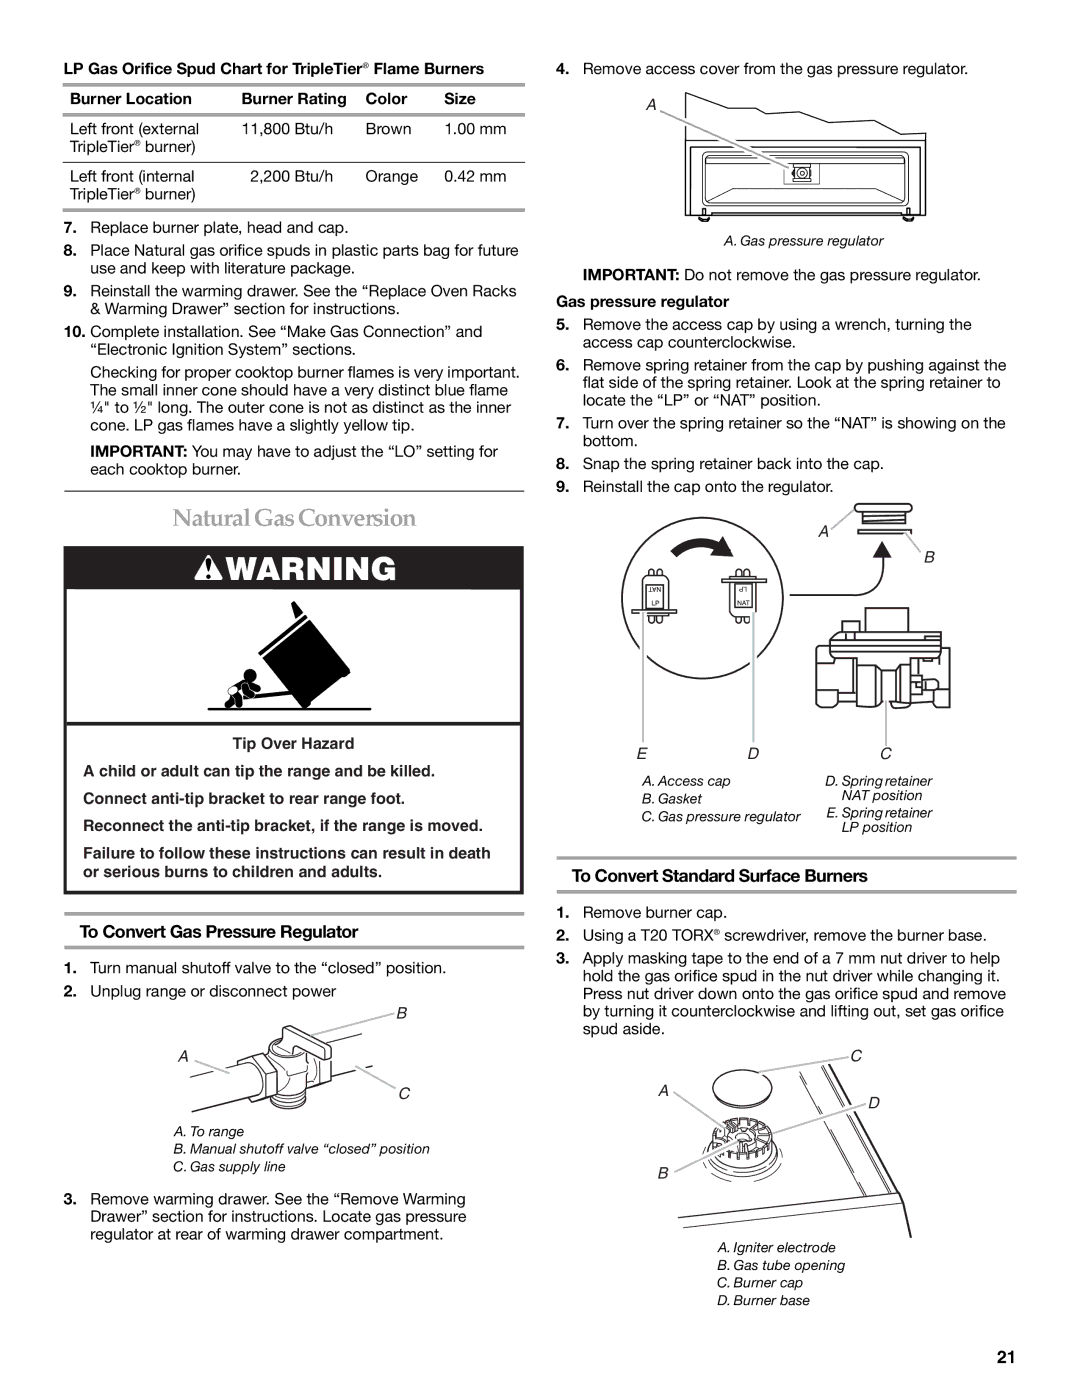
5.Remove the access cap by using a wrench, turning the access cap counterclockwise.

6.Remove spring retainer from the cap by pushing against the flat side of the spring retainer. Look at the spring retainer to locate the “LP” or “NAT” position.

7.Turn over the spring retainer so the “NAT” is showing on the bottom.

8.Snap the spring retainer back into the cap.

9.Reinstall the cap onto the regulator.

A

B

E

D

C

A. Access cap


D. Spring retainer

B. Gasket


NAT position

C. Gas pressure regulator

E. Spring retainer


LP position

To Convert Standard Surface Burners

1.Remove burner cap.

2.Using a T20 TORX® screwdriver, remove the burner base.

3.Apply masking tape to the end of a 7 mm nut driver to help hold the gas orifice spud in the nut driver while changing it. Press nut driver down onto the gas orifice spud and remove by turning it counterclockwise and lifting out, set gas orifice spud aside.

C

A

D

B

A. Igniter electrode

B. Gas tube opening

C. Burner cap

D. Burner base

21

Page 21
Image 21
KitchenAid W10154991A installation instructions NaturalGas Conversion

W10154991A specifications

The KitchenAid W10154991A is a versatile kitchen appliance designed to simplify meal preparation while enhancing culinary creativity. This food processor is equipped with innovative features and technologies that make it an essential addition to any modern kitchen.

One of the main features of the W10154991A is its powerful motor, which allows for quick and efficient processing of various ingredients. Whether you're chopping vegetables, shredding cheese, or mixing dough, this food processor can handle a wide range of tasks with ease. The motor's robust performance ensures that you can complete your cooking projects in a fraction of the time compared to using manual methods.

Another significant characteristic of the KitchenAid W10154991A is its variety of attachments and blades. The food processor comes equipped with multiple blades for different functions, including slicing, shredding, and chopping. This versatility enables users to achieve the desired texture and consistency for their recipes, all with one appliance. The included attachments are designed for easy installation and removal, making the transition between tasks seamless.

The design of the W10154991A also speaks to its user-friendly nature. It features a large capacity bowl, allowing you to process larger quantities of ingredients at once, which is ideal for meal prepping or when entertaining guests. The bowl is made from durable materials that can withstand the rigors of daily use while remaining easy to clean, as many parts are dishwasher safe.

Safety is a priority in the design of the KitchenAid W10154991A. It includes a safety lock feature that ensures the processor will not operate unless the bowl and lid are correctly secured. This feature gives users peace of mind while using the appliance and helps prevent accidents in the kitchen.

In terms of technology, the KitchenAid W10154991A employs a straightforward control panel that includes several speed settings. This means you can select the perfect speed for the task at hand, whether you need a gentle pulse or a steady chop. The intuitive design of the control panel makes it accessible for cooks of all skill levels.

In conclusion, the KitchenAid W10154991A food processor is an excellent investment for anyone looking to enhance their cooking experience. With its powerful motor, versatile attachments, user-friendly design, and safety features, this appliance stands out in the crowded market of kitchen gadgets. It empowers users to explore their culinary potential while simplifying time-consuming tasks in the kitchen.