Crisper Humidity Control

(on some models)

You can control the amount of humidity in the moisture-sealed crisper. Adjust the control to any setting between LOW and HIGH.

LOW (open) for best storage of fruits and vegetables with skins. HIGH (closed) for best storage of fresh, leafy vegetables.

Door Air Control

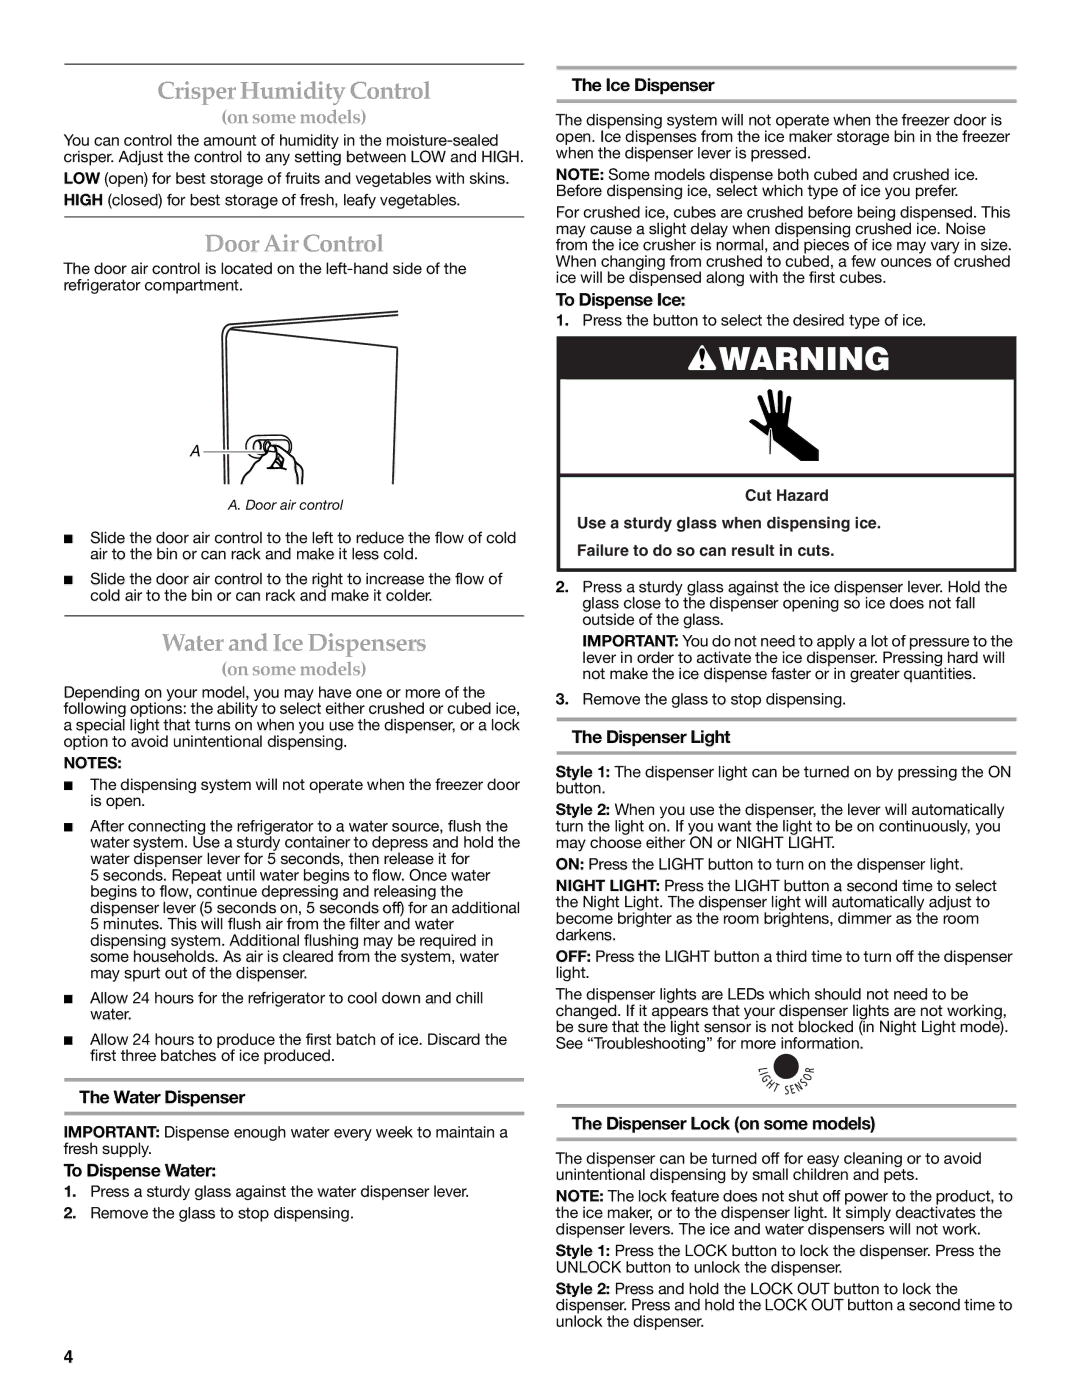
The door air control is located on the left-hand side of the refrigerator compartment.

A

A. Door air control

Slide the door air control to the left to reduce the flow of cold air to the bin or can rack and make it less cold.

Slide the door air control to the right to increase the flow of cold air to the bin or can rack and make it colder.

Water and Ice Dispensers

(on some models)

Depending on your model, you may have one or more of the following options: the ability to select either crushed or cubed ice, a special light that turns on when you use the dispenser, or a lock option to avoid unintentional dispensing.

NOTES:

The dispensing system will not operate when the freezer door is open.

After connecting the refrigerator to a water source, flush the water system. Use a sturdy container to depress and hold the water dispenser lever for 5 seconds, then release it for

5 seconds. Repeat until water begins to flow. Once water begins to flow, continue depressing and releasing the dispenser lever (5 seconds on, 5 seconds off) for an additional 5 minutes. This will flush air from the filter and water dispensing system. Additional flushing may be required in some households. As air is cleared from the system, water may spurt out of the dispenser.

Allow 24 hours for the refrigerator to cool down and chill water.

Allow 24 hours to produce the first batch of ice. Discard the first three batches of ice produced.

The Ice Dispenser

The dispensing system will not operate when the freezer door is open. Ice dispenses from the ice maker storage bin in the freezer when the dispenser lever is pressed.

NOTE: Some models dispense both cubed and crushed ice. Before dispensing ice, select which type of ice you prefer.

For crushed ice, cubes are crushed before being dispensed. This may cause a slight delay when dispensing crushed ice. Noise from the ice crusher is normal, and pieces of ice may vary in size. When changing from crushed to cubed, a few ounces of crushed ice will be dispensed along with the first cubes.

To Dispense Ice:

1.Press the button to select the desired type of ice.

WARNING

Cut Hazard

Use a sturdy glass when dispensing ice.

Failure to do so can result in cuts.

2.Press a sturdy glass against the ice dispenser lever. Hold the glass close to the dispenser opening so ice does not fall outside of the glass.

IMPORTANT: You do not need to apply a lot of pressure to the lever in order to activate the ice dispenser. Pressing hard will not make the ice dispense faster or in greater quantities.

3.Remove the glass to stop dispensing.

The Dispenser Light

Style 1: The dispenser light can be turned on by pressing the ON button.

Style 2: When you use the dispenser, the lever will automatically turn the light on. If you want the light to be on continuously, you may choose either ON or NIGHT LIGHT.

ON: Press the LIGHT button to turn on the dispenser light.

NIGHT LIGHT: Press the LIGHT button a second time to select the Night Light. The dispenser light will automatically adjust to become brighter as the room brightens, dimmer as the room darkens.

OFF: Press the LIGHT button a third time to turn off the dispenser light.

The dispenser lights are LEDs which should not need to be changed. If it appears that your dispenser lights are not working, be sure that the light sensor is not blocked (in Night Light mode). See “Troubleshooting” for more information.

The Water Dispenser

IMPORTANT: Dispense enough water every week to maintain a fresh supply.

To Dispense Water:

1.Press a sturdy glass against the water dispenser lever.

2.Remove the glass to stop dispensing.

The Dispenser Lock (on some models)

The dispenser can be turned off for easy cleaning or to avoid unintentional dispensing by small children and pets.

NOTE: The lock feature does not shut off power to the product, to the ice maker, or to the dispenser light. It simply deactivates the dispenser levers. The ice and water dispensers will not work.

Style 1: Press the LOCK button to lock the dispenser. Press the UNLOCK button to unlock the dispenser.

Style 2: Press and hold the LOCK OUT button to lock the dispenser. Press and hold the LOCK OUT button a second time to unlock the dispenser.

4

Page 4
Image 4
KitchenAid W10162462A, W10162463A warranty Crisper Humidity Control, Door Air Control, Water and Ice Dispensers

W10162463A, W10162462A specifications

When it comes to kitchen appliances, KitchenAid has established itself as a trusted brand synonymous with quality and performance. Among their extensive range of products, the KitchenAid W10162462A and W10162463A stand out for their innovative features and reliability, making them a popular choice for both amateur cooks and professional chefs.

The KitchenAid W10162462A is an essential accessory designed to enhance the functionality of KitchenAid stand mixers. This product is specifically a wire whip attachment, enabling users to achieve perfectly whipped cream, fluffy meringues, and light soufflés. Its unique design incorporates stainless steel wires that easily incorporate air into mixtures, resulting in superior aeration and increased volume. The whip attachment is dishwasher safe, making cleanup a breeze, and is designed for compatibility with a wide range of KitchenAid mixer models, ensuring versatility in the kitchen.

On the other hand, the W10162463A is a dough hook attachment, perfect for those who enjoy baking homemade bread, pizza, and pasta. Made from durable materials, this spiral dough hook efficiently kneads dough, saving users from the time-consuming task of manual kneading. The design allows for optimal mixing of ingredients, ensuring that the dough reaches the perfect consistency without harming the integrity of the mixer. The W10162463A is also dishwasher safe, contributing to easy maintenance and hygiene.

Both of these accessories feature KitchenAid's commitment to innovation and user-friendly design. The attachments are quick and simple to install, allowing for a seamless transition between different mixing tasks. Users can easily switch between the wire whip and dough hook, making it possible to experiment with various recipes without the need for multiple appliances.

Another notable characteristic of both attachments is their ability to withstand high demands. Crafted with robust materials, they are designed to endure the rigors of daily usage, making them essential components of any kitchen setup. Furthermore, KitchenAid's reputation for customer support ensures that users can rely on them for assistance, enhancing the overall ownership experience.

In summary, the KitchenAid W10162462A and W10162463A attachments are perfect solutions for elevating culinary endeavors. With advanced features, including ease of use and reliable performance, they exemplify KitchenAid's dedication to enhancing the cooking experience for all users. Whether whipping cream or kneading dough, these attachments are indispensable tools for anyone looking to explore their culinary creativity.