Two-Channel Stereo System - Figure 2 shows a typical speaker arrangement for a two-channel stereo system. A good starting point is to create an equilateral triangle with the speakers and your listening position. Depending on the size of the room and the furniture arrangement, you may find it convenient to make the distance from the listening position to the line between the speakers somewhat larger or smaller, but try to keep it centered, so that you are at approximately the same distance from each speaker. That will yield the best stereo image. Angling widely spread speakers in slightly toward the listening position can help maintain a good stereo image.
Stereo Setup for Wide Coverage - If you are primarily interested in being able to hear the sound well from any position in the room rather than from a particular seating area, you may prefer to move the speakers far apart along adjoining walls, creating a big “L.” This will not provide a very good stereo image, but it will give spacious, well-balanced sound with good coverage.
Home Theater System - Figure 3 shows a typical home theater speaker setup, with a pair of bookshelf speakers at the front left and right, a horizontal center-channel speaker between them, and a pair of surround speakers on the side walls. The basic strategy for placing the front left and right speakers is similar to the one described above for a two-channel stereo system, but anchored by the video screen. Ideally, the front left and right speakers should be approximately in line with the screen and equidistant from it. Unless your video screen is very large, you may prefer less spread between the left and right speakers than in a dedicated stereo music system. This may better associate the size of the sonic image with the video image.
| S | 6'-15' | S |
| | |
| Optional | TV | Optional |
| sub | C | sub |
| L | R |
| |
| | | X=Y=Z |
| | Y | =Z |
| | X | Z |
| A | | A |
| B | Alternate | B |
| rear placement |
Figure 3
Reference Series bookshelf speakers can also be used as surround-channel speakers. The best location usually is high up, on the walls to the sides and slightly behind the seating area. Many other placements can work surprisingly well, however — behind the listening area, for example, or even on the floor facing up toward the ceiling in a pinch. Aiming the speakers toward your listening area will emphasize specific rear channel sounds, while directing them away from the listening position will produce a greater sense of spaciousness. Experiment and find what sounds best to you.
WALL AND CEILING MOUNTING
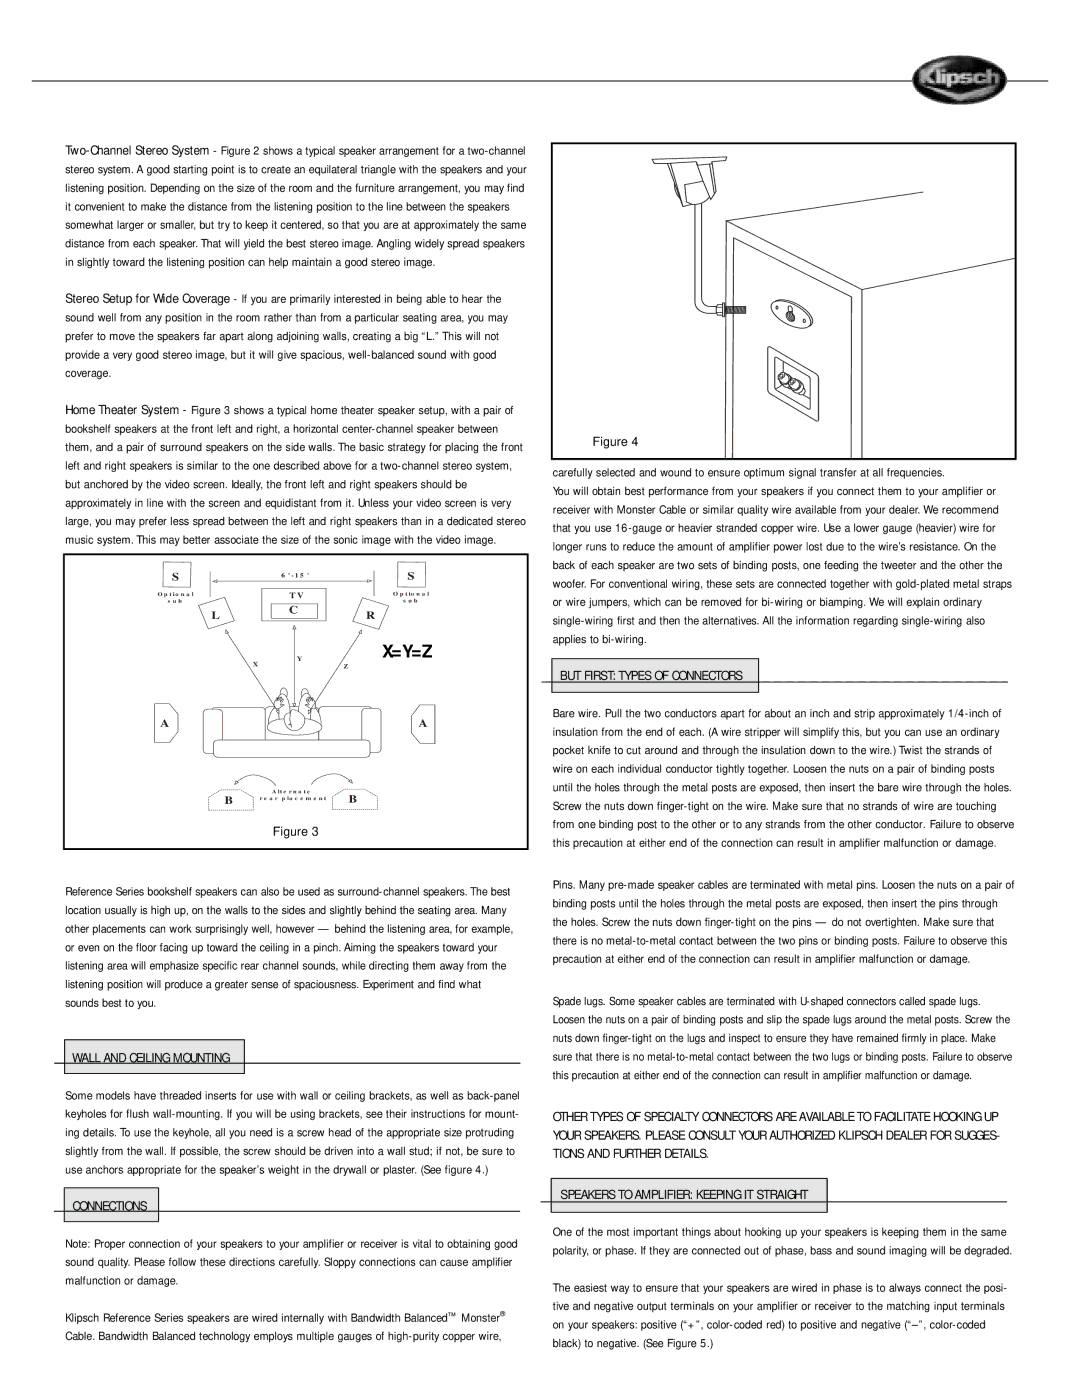
Some models have threaded inserts for use with wall or ceiling brackets, as well as back-panel keyholes for flush wall-mounting. If you will be using brackets, see their instructions for mount- ing details. To use the keyhole, all you need is a screw head of the appropriate size protruding slightly from the wall. If possible, the screw should be driven into a wall stud; if not, be sure to use anchors appropriate for the speaker’s weight in the drywall or plaster. (See figure 4.)
CONNECTIONS
Note: Proper connection of your speakers to your amplifier or receiver is vital to obtaining good sound quality. Please follow these directions carefully. Sloppy connections can cause amplifier malfunction or damage.
Klipsch Reference Series speakers are wired internally with Bandwidth Balanced™ Monster® Cable. Bandwidth Balanced technology employs multiple gauges of high-purity copper wire,
carefully selected and wound to ensure optimum signal transfer at all frequencies.
You will obtain best performance from your speakers if you connect them to your amplifier or receiver with Monster Cable or similar quality wire available from your dealer. We recommend that you use 16-gauge or heavier stranded copper wire. Use a lower gauge (heavier) wire for longer runs to reduce the amount of amplifier power lost due to the wire’s resistance. On the back of each speaker are two sets of binding posts, one feeding the tweeter and the other the woofer. For conventional wiring, these sets are connected together with gold-plated metal straps or wire jumpers, which can be removed for bi-wiring or biamping. We will explain ordinary single-wiring first and then the alternatives. All the information regarding single-wiring also applies to bi-wiring.
BUT FIRST: TYPES OF CONNECTORS
Bare wire. Pull the two conductors apart for about an inch and strip approximately 1/4-inch of insulation from the end of each. (A wire stripper will simplify this, but you can use an ordinary pocket knife to cut around and through the insulation down to the wire.) Twist the strands of wire on each individual conductor tightly together. Loosen the nuts on a pair of binding posts until the holes through the metal posts are exposed, then insert the bare wire through the holes. Screw the nuts down finger-tight on the wire. Make sure that no strands of wire are touching from one binding post to the other or to any strands from the other conductor. Failure to observe this precaution at either end of the connection can result in amplifier malfunction or damage.
Pins. Many pre-made speaker cables are terminated with metal pins. Loosen the nuts on a pair of binding posts until the holes through the metal posts are exposed, then insert the pins through the holes. Screw the nuts down finger-tight on the pins — do not overtighten. Make sure that there is no metal-to-metal contact between the two pins or binding posts. Failure to observe this precaution at either end of the connection can result in amplifier malfunction or damage.
Spade lugs. Some speaker cables are terminated with U-shaped connectors called spade lugs. Loosen the nuts on a pair of binding posts and slip the spade lugs around the metal posts. Screw the nuts down finger-tight on the lugs and inspect to ensure they have remained firmly in place. Make sure that there is no metal-to-metal contact between the two lugs or binding posts. Failure to observe this precaution at either end of the connection can result in amplifier malfunction or damage.
OTHER TYPES OF SPECIALTY CONNECTORS ARE AVAILABLE TO FACILITATE HOOKING UP YOUR SPEAKERS. PLEASE CONSULT YOUR AUTHORIZED KLIPSCH DEALER FOR SUGGES- TIONS AND FURTHER DETAILS.
SPEAKERS TO AMPLIFIER: KEEPING IT STRAIGHT
One of the most important things about hooking up your speakers is keeping them in the same polarity, or phase. If they are connected out of phase, bass and sound imaging will be degraded.
The easiest way to ensure that your speakers are wired in phase is to always connect the posi- tive and negative output terminals on your amplifier or receiver to the matching input terminals on your speakers: positive (“+”, color-coded red) to positive and negative (“–”, color-coded black) to negative. (See Figure 5.)